Introduction
Strawberry jam is a classic and beloved spread that adds a sweet and fruity touch to any breakfast or snack. Homemade strawberry jam is a great idea for several reasons: it’s delicious, easy to make, and can be customized to your liking. In this article, we will guide you through a step-by-step process for making perfect homemade strawberry jam, explore its health benefits, variations, preservation methods, and even how to gift it or use it in special recipes.
A Step-by-Step Guide to Making the Perfect Homemade Strawberry Jam
Before we start, let’s gather the necessary ingredients and equipment. You’ll need:
- 2 pounds of fresh strawberries, hulled and diced
- 4 cups of granulated sugar
- 1/4 cup of fresh lemon juice
- 1 packet (1.75 oz) of powdered fruit pectin
- A large saucepan
- A potato masher or immersion blender
- A candy thermometer
- Mason jars and lids
Now that we have everything ready let’s begin:
- Clean and dry your mason jars and lids. You may sterilize them if you wish, by boiling them for a few minutes or using the dishwasher in a high-temperature setting.
- In a large saucepan, combine the strawberries, lemon juice, and pectin. Cook over medium-high heat until the strawberries have released their juice and the mixture is boiling.
- Slowly add the sugar, stirring constantly to dissolve it. Continue boiling for 1 minute, stirring frequently.
- Insert the candy thermometer and boil for another 10-15 minutes or until the mixture reaches 220°F. Remove any foam that forms on top with a spoon.
- Take the mixture off the heat and use a potato masher or immersion blender to mash the strawberries until the desired consistency is reached. We suggest leaving some small chunks of strawberry for texture.
- If you have too much foam or bubbles, skim it off using a spoon. Your jam should now have a bright color and glossy texture.
- Carefully pour the hot jam into the clean mason jars, leaving about a half-inch of space at the top. Wipe any excess jam from the rim with a clean cloth or paper towel, screw on the lid tightly, and let it cool down at room temperature for about 24 hours.
- Store the jars in the fridge or a cool pantry away from light and heat. The jam should last for several months unopened, or up to two weeks in the fridge once opened.
If at any point your jam doesn’t set properly, you can either add a little bit of lemon juice or sugar and boil it again, or use it as a topping or sauce instead. Practice makes perfect, so don’t be discouraged and adjust the recipe to your liking!
The Health Benefits of Homemade Strawberry Jam
While store-bought jam may be convenient, homemade is healthier because you get to control the quality and quantity of ingredients. Luckily, strawberries are already packed with nutrients, and the canning process doesn’t remove them.
One serving (1 tbsp) of homemade strawberry jam has approximately:
- 16 calories
- less than 1 gram of fat, protein, and sodium
- 4 grams of carbohydrates
- 3 grams of sugar
- 1% of your daily recommended intake of vitamin C.
These numbers are based on pure strawberry jam, and may vary depending on the add-ons or substitutions you make. Some healthier recipe variations include using less sugar, honey, or maple syrup as a sweetener, or substituting some of the strawberries with chia seeds for added fiber.
Variations on Traditional Strawberry Jam
One of the beauties of making homemade jam is that you can experiment with flavors and textures without changing the basic recipe. Here are some examples of flavors and additives that pair well with strawberries:
- Rhubarb
- Balsamic vinegar
- Ginger
- Cinnamon
- Cloves
- Nutmeg
- Lavender
- Mint leaves
- Black pepper
- Champagne
You can add these ingredients during the cooking process or macerate them with the strawberries beforehand. However, be mindful of the sugar and acid content, as too much of them can inhibit the setting of the jam or its safety for canning.
Here are some basic guidelines for experimenting with flavors:
- Use fresh or high-quality dried spices and herbs.
- Start with small amounts and taste frequently.
- Do not use artificial flavors or colors.
- Consult a reliable recipe or experienced jam-maker before making significant changes to the recipe, especially regarding acidity levels.
The Art of Preserving Strawberries
Preserving strawberries has a long history, dating back to ancient Rome, where they were candied or macerated in honey. Later on, European and American settlers in the 18th and 19th centuries developed techniques such as boiling, sealing, and adding vinegar or alcohol to create jams, jellies, and other preserves. Today, we have more advanced tools and knowledge to safely preserve and can strawberries.
The most common methods for preserving strawberries are:
- Canning: boiling the filled jars in a water bath or pressure canner to sterilize and seal them. This method can keep the jam safe for up to a year, but requires specific equipment and attention to detail.
- Freezing: storing the jam in airtight bags or containers and freezing it for later use. This method takes less time and effort than canning, but can alter the texture and flavor of the jam.
- Drying: slicing the strawberries and dehydrating them in a low-heat oven or dehydrator. This method creates a chewy and fruity texture that can be eaten on its own or used as a topping.
Each method has its benefits and drawbacks, and the choice depends on the quantity, quality, and purpose of the strawberries. We recommend following a reputable source for detailed guidelines and safety instructions.
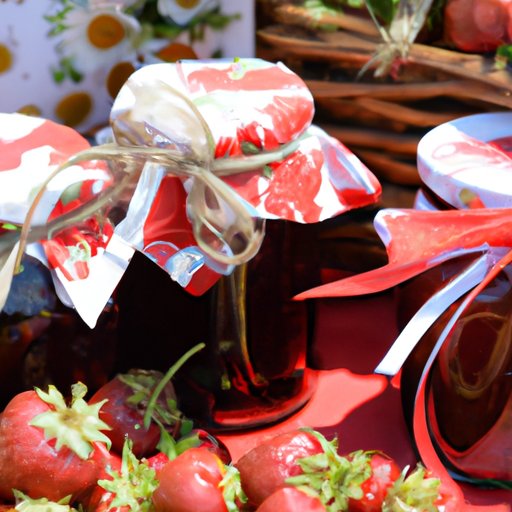
Strawberry Jam for Special Occasions
Homemade strawberry jam is not only a tasty treat for yourself, but also a thoughtful and charming gift or ingredient for special occasions. Here are some recipe variations and tips for presenting and packaging strawberry jam elegantly:
- Vanilla strawberry jam: add a scraped vanilla bean or a teaspoon of vanilla extract to the basic recipe for a warm and comforting flavor.
- Champagne strawberry jam: replace the lemon juice with a cup of champagne or sparkling white wine for a sophisticated touch.
- Christmas jam: mix strawberries, cranberries, and spices like cinnamon and cloves for a festive and colorful spread.
- Wedding favors: fill small jars with strawberry jam and tie a ribbon or a personalized label with the couple’s names and date.
- Baking ingredient: use strawberry jam as a filling for cupcakes, muffins, or thumbprints.
To make your homemade jam even more appealing, consider these tips:
- Use high-quality ingredients and choose the ripest and freshest berries.
- Decorate the jars with fabric covers, twine, or tags that match the occasion.
- Include a recipe card or serving suggestions with your gift.
- Store the jars in a cool, dry, and dark spot until ready to gift.
- Offer a variety of homemade jams as a gift set or a favor bag.
Conclusion
Making homemade strawberry jam may seem daunting at first, but with a little practice and creativity, it can become a fun and satisfying activity. The benefits of homemade jam go beyond its taste, as it allows you to appreciate the value of fresh ingredients, sustainability, and personal expression. So why not give it a try? We hope this guide has inspired you to make the perfect homemade strawberry jam and add some sweetness to your life.