Introduction
Low buns have become one of the most popular hairstyles due to its versatility in any occasion. Whether it’s a formal event, a casual day out, or simply a bad hair day, low buns can effortlessly elevate your look and make you feel beautiful. Here, we will guide you through different styles of the low bun, how to accessorize and upgrade it, its history and evolution, and quick and easy tips for busy days.
Effortlessly Chic: Mastering the Low Bun Hairstyle
Low buns have many variations that vary from messy to sleek to braided, etc. With each style, there are different techniques and steps to create the look. We’ll walk you through how to create each one, so you can pick the style that suits your mood or event.
Messy Bun:
The messy bun is perfect for a no-fuss, easy-going, and effortless look. It is also ideal for a late-night gathering with friends. Here’s how to create it in three easy steps:
- Gather your hair as if creating a ponytail, but don’t pull it all the way through the hairband.
- Twist your hair around the base of the ponytail and secure with another hairband.
- Pull out some strands of hair to achieve a tousled look, and you’re done!

Sleek Bun:
The sleek bun hairstyle is perfect for formal events or business meetings. Here’s how to create it in six simple steps:
- Gather your hair into a low ponytail and secure it with a hairband.
- Brush the ponytail with a fine-tooth comb to remove any bumps or tangles.
- Apply a hair gel or pomade to smooth the hair and add shine.
- Twist the ponytail around the hair tie, and secure it with bobby pins.
- Spray hairspray to hold the hair in place.
Braided Bun:
The braided bun is perfect for those who want to add extra sophistication to their look. It can be worn on formal events or business occasions. Here’s how to create it in eight easy steps:
- Start by creating a Dutch braid on one side of your head, starting at the temple and braiding towards the back of your head.
- When you reach the nape of your neck, secure the braid with a clear hair elastic.
- Repeat on the other side of your head, so you have two braids.
- Gather the remaining hair into a low ponytail at the nape of your neck and secure it with a hairband.
- Twist the ponytail around the hairband to create a bun shape.
- Tuck the end of the braids into the bun and bobby pins.
- Pull out random pieces of hair to make it look more laid back.
- Spray hairspray to hold the hair in place.

Low Bun: The Perfect Hairstyle for Any Occasion
The beauty of a low bun is that it goes well with any outfit or occasion. It looks great with dresses, blouses, and even on-trend jumpsuits. Here are some tips to wear low buns on different occasions:
Casual:
For a casual look, you can go for a messy bun, a knotted bun, or even a half-up, half-down low bun. Pair it with comfy jeans, a shirt, and your favorite sneakers, and you’re good to go!
Formal:
A sleek bun or a braided bun is perfect for a formal occasion. Pair it with a cocktail dress and heels, and you’ll feel like a red carpet star.
Business:
A tidy bun is ideal for a business meeting. While you want to look professional, you don’t need to sacrifice style. Pair a sleek bun with statement earrings or a popping lipstick to add more personality to your look.
You can also accessorize low buns with clips, hairpins, or even headbands. Adding a beautiful accessory can take your bun from a typical hairstyle to a stunning masterpiece.
5 Ways to Upgrade Your Low Bun Game
If you’re looking to upgrade your low bun game, there are many twists and variations to choose from. Here are five ways to do it:
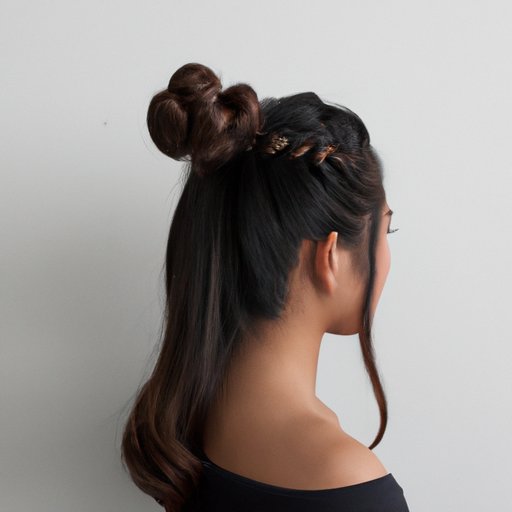
Braided Top Knot:
A braided top knot is excellent for a romantic date night or a wedding. Here’s how to create it in seven easy steps:
- Gather your hair into a high ponytail and secure it with a hairband.
- Braid the ponytail and secure with another hairband at the end.
- Wrap the braided hair around the hairband and tuck the end of the braid under the hair tie.
- Secure the bun with bobby pins.
- Pull out a few strands to make the look seem appealing.
- Apply hairspray to hold the hair in place.

A twisted low bun is perfect for a business meeting or an engagement party. Here’s how to create it in six easy steps:
- Gather your hair into a low ponytail and secure it with a hairband.
- Twist the ponytail into a rope-like shape.
- Wrap the twisted ponytail around the hairband, creating a bun shape.
- Secure the bun with bobby pins.
- Pull out a few strands from the sides to create a relaxing look.
- Apply hairspray to hold the hair in place.

Double low buns are perfect for a casual and fun look. Here’s how to create it in four easy steps:
- Part your hair down the center, dividing it into two equal parts.
- Gather each section of hair into a ponytail behind the ear and secure it with a hairband.
- Twist the ponytail into a rope-like shape and wrap it around the hairband, creating a bun shape.
- Secure the bun with bobby pins.
A twisted chignon is perfect for a vintage-inspired wedding or as a bridesmaid hairstyle. Here’s how to create it in eight easy steps:
- Part your hair down the middle, creating two sections.
- Twist each section towards the back of your head and secure it with bobby pins.
- Gather the remaining hair into a low ponytail and twist it into a bun shape.
- Twist the bun around both twisted sections and secure with bobby pins.
- Tuck the ends of each section into the chignon and secure with bobby pins.
- Apply hairspray to hold the hair in place.
A braided side bun is perfect for a garden party or any outdoor event. Here’s how to create it in seven easy steps:
- Braid your hair on one side of your head until you reach the nape of your neck.
- Secure the braid with a hairband.
- Gather the hair on the opposite side of the braid into a low ponytail.
- Twist the ponytail into a bun shape.
- Wrap the braid around the bun and secure with bobby pins.
- Apply hairspray to hold the hair in place.
Low Bun Hairstyles: A History & Evolution
The low bun hairstyle dates back to ancient Greek times, where women often wore a version of the low bun called a “krikelon”. Later on, the French twist became popularized in the 1920s and soon became a symbol of elegance and sophistication. Fast forward to today, and we have seen low buns on the red carpet worn by celebrities such as Mila Kunis, Emma Stone, and Keira Knightley. The evolution of this hairstyle is a testament to its timeless beauty.
No Fuss, No Problem: Quick Low Bun Hairstyles for Busy Days
Low buns are also perfect for those busy days where you don’t have much time to style your hair. Here are some quick styles you can rock:
The low ponytail bun is perfect for a morning run or a quick grocery store trip. Here’s how to create it in three easy steps:
- Secure your hair into a low ponytail.
- Twist the ponytail around the hairband to create a bun shape.
- Secure the bun with bobby pins.
The pull-through low bun is a creative take on the traditional low bun and is perfect for a casual day out. Here’s how to create it in four easy steps:
- Divide your hair into two sections and tie them into a half ponytail, leaving two loose strands in front.
- Create a hole between the hairband and your hair and pull the entire ponytail through the hole.
- Tie another hairband a few inches below the previous one and create a hole again.
- Pull the ponytail through the hole created and wrap it into a bun shape.

Conclusion
Low buns are a versatile hairstyle that can make you look effortlessly chic in any occasion. They are easy to create, and you can accessorize them to match your style. Whether you prefer a sleek bun or a braided top knot, low buns are an ideal hairstyle for anyone with long hair.