I. Introduction
Wiring a light switch may seem daunting, but with the right tools and knowledge, it can be done safely and easily. This article aims to provide a comprehensive guide on how to wire a light switch, including step-by-step instructions, safety tips, and alternative wiring options.
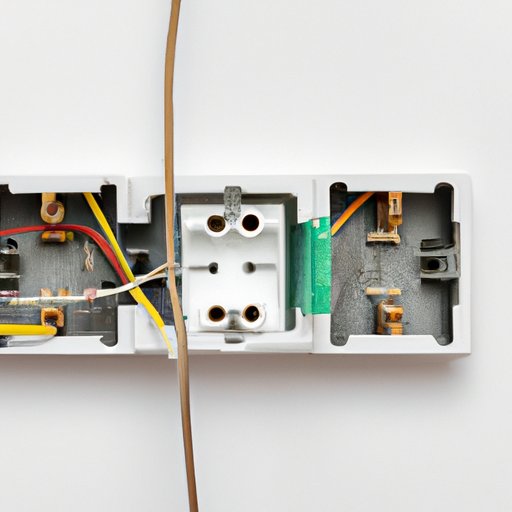
II. Step-by-Step Guide
Wiring a light switch requires a basic understanding of electrical wiring. Follow these step-by-step instructions to ensure safe and successful wiring:
1. Turning off the power
Before starting any electrical work, it is essential to turn off the power to the circuit. Locate the circuit breaker that controls the light switch and turn it off.
2. Removing the old switch
Using a screwdriver, remove the screws that secure the old switch to the wall. Gently pull the switch out of the wall and disconnect the wires by unscrewing the wire connectors.
3. Preparing the wires
Before connecting the wires to the new switch, use wire cutters to trim the tips of the wires and wire strippers to remove the insulation from the ends of the wires. This will ensure a solid connection when connecting the wires.
4. Connecting the wires
Connect the wires to the new switch, matching the wires to the appropriate terminals. Typically, there are two black wires, one white wire, and one green or bare wire. The black wires connect to the switch’s brass or gold-colored terminals, and the white wire connects to the silver-colored terminal. The green or bare wire connects to the ground screw. Secure the wires using wire connectors.
5. Attaching the switch to the wall
Gently push the wires back into the electrical box and attach the switch to the wall using the screws provided. Ensure that the switch is flush with the wall and secure.
6. Testing the switch
Turn the power back on to the circuit and test the switch by turning the light on and off. If the switch works correctly, turn the power back off and secure the faceplate to the switch.
III. Video Tutorial
In addition to the step-by-step guide, a video tutorial can be a helpful resource for those who prefer to see the wiring process in action. Check out a real-time wiring process in this video tutorial:
Embedded video tutorial of wiring a light switch.
IV. Safety Tips
Wiring anything electrical has inherent risks that must be taken seriously. Follow these safety tips to ensure a successful and safe wiring project:
1. Turning off the power
Before starting any electrical work, it is crucial to turn off the power to the circuit. Use a circuit tester to verify that the power is off before removing the old switch or working on any wires.
2. Using the correct tools
Using the right tools can reduce the chances of injury and ensure a successful wiring project. Always use wire cutters, wire strippers, and other electrical tools designed for the task at hand.
3. Avoiding shortcuts
Shortcuts, like using electrical tape instead of wire connectors, can put your safety and the project’s success at risk. Follow the manufacturer’s instructions and do not take shortcuts.
4. Being aware of surroundings
Be mindful of your surroundings when working on electrical projects. Avoid standing in water or other damp areas and ensure that your workspace is well-lit and free of clutter.
5. Safety precautions to take when working with electricity
When working with electricity, always wear rubber-soled shoes, avoid touching water or metal surfaces, and use insulated tools to reduce the risk of electrical shock.
V. Common Mistakes
Avoiding common mistakes can help ensure a successful wiring project. Here are some common mistakes to avoid when wiring a light switch:
1. Incorrect wiring
Connecting the wires to the wrong terminals can cause faulty wiring and increase the risk of electrical shock and fire. Check the manufacturer’s instructions, and ensure that the wires are connected to the correct terminals.
2. Overloading circuit
Overloading the circuit can cause electrical damage, increasing the risk of fire. Ensure that the circuit can handle the lighting load and consult an electrician if needed.
3. Not securing wires correctly
Loose wires can increase the risk of fire and electrical shock. Ensure that the wires are tightly secured to the terminals and protected with wire connectors.
4. Forgetting to turn off the power
Working on live circuits increases the risk of electrical shock and fire. Always turn off the power to the circuit before starting any electrical work.
VI. Alternatives to Traditional Wiring
Traditional wiring is not the only option when it comes to light switches. Here are some alternative wiring options:
1. Smart switches
Smart switches allow you to control your lighting using your smartphone or voice commands. They also offer features like scheduling and geofencing.
2. Remote-controlled switches
Remote-controlled switches allow you to turn your lights on and off using a remote control. They can be useful for hard-to-reach areas or those with limited mobility.
3. Other non-traditional options
Other non-traditional options include battery-powered switches and wireless switches that can be installed anywhere without the need for wiring.
VII. Best Tools for the Job
Having the right tools for the job can make any electrical project easier and safer. Here are some essential tools for wiring a light switch:
1. Wire strippers
Wire strippers are a must-have for any electrical project. They are used to remove the insulation from the tips of the wires, allowing for a secure connection.
2. Wire cutters
Wire cutters are used to trim the tips of the wires and remove any excess wire that may be causing clutter.
3. Electrical tape
Electrical tape can be used to secure wires in place and add an extra layer of insulation.
4. Other essential tools
Other essential tools include a screwdriver, pliers, circuit tester, and voltage meter.
VIII. Conclusion
Wiring a light switch can be intimidating, but by following a step-by-step guide, utilizing safety tips, and using the right tools, it can be done safely and successfully.
Remember, electrical work can be dangerous, and if you’re unsure about any aspect of the project, consult an experienced electrician.