Introduction
Whitewashing brick is an excellent way to update the look of your home, whether you are going for a modern, rustic, or classic aesthetic. Not only does it provide an instant facelift to your walls, but it also helps protect the brick from the elements and extends its lifespan. In this article, we will guide you through the step-by-step process of whitewashing brick, provide tips and tricks, and explain the benefits of giving your brick walls a fresh coat of paint.
Step-by-Step Guide
Here is a breakdown of the steps involved in whitewashing brick:
Step 1: Prepare the Surface
The first step is to prepare the surface by cleaning it of any dirt, dust, or debris. You can use a wire brush, soap, and water to scrub the brick. If it has mold or mildew, you may need to use a bleach solution to remove it. Once you have cleaned the surface, allow it to dry completely before continuing.
Step 2: Protect the Surrounding Area
Next, you’ll want to protect the surrounding area from splatters or drips of paint. Cover any nearby windows, doors, or landscaping with plastic sheeting or drop cloths. Also, wear gloves, safety glasses, and a dust mask to protect yourself.
Step 3: Mix the Paint
Before applying the paint, mix it well to ensure an even consistency. If you’re using a premixed whitewash, you can skip this step. If you’re mixing your own, combine equal parts of white latex paint and water in a bucket. Stir well until the mixture is smooth and free of lumps.
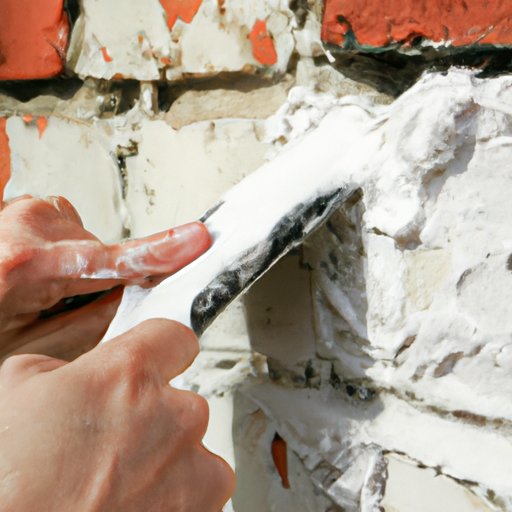
Step 4: Apply the Paint
Using a paintbrush or roller, apply the paint to the brick in a uniform fashion. Start at the top of the wall and work your way down, so that you don’t accidentally drip paint onto painted areas. Be sure to fill in any crevices or gaps between the bricks to ensure complete coverage.
Step 5: Wipe Off the Excess
After applying the paint, use a clean cloth or rag to wipe off any excess. This will give your brick wall a textured, vintage look while still maintaining the white color that you desire.
Materials and Tools Needed
Here’s a list of materials and tools that you’ll need for your whitewashing project:
- Whitewash paint or equal parts of white latex paint and water
- Paintbrush and/or roller
- Bucket
- Clean rags or cloths
- Wire brush
- Soap and water
- Plastic sheeting and/or drop cloths
- Gloves, dust mask, and safety glasses
Tips and Tricks
Here are some insider tips and tricks for achieving the best results when whitewashing brick:
- Test your paint on a small, inconspicuous area of the brick first to make sure you like the result.
- Apply the paint in small sections to prevent it from drying out too quickly.
- Use a natural bristle paintbrush or roller to achieve a textured look.
- Add more water to your paint mixture for a thinner, more transparent finish.
- For a more rustic, aged look, apply two coats of paint and allow some of the brick to show through.
Before and After Pictures
Here are some examples of brick walls that have been whitewashed:


The visual impact of the transformation is striking, and these photos demonstrate how giving your brick wall a fresh coat of paint can completely change the look of a room or outdoor space.
Benefits of Whitewashing
Here are some reasons why whitewashing brick may be a good choice for your home:
- It creates an instant update to your walls without having to remove or replace bricks.
- It provides a protective barrier to your brick against weathering, moisture, and decay, which can extend the lifespan of your walls.
- It’s an affordable and quick DIY project that can be completed in a weekend.
- It complements a variety of design styles, including modern, rustic, and classic.
- It’s easy to maintain and clean. You can simply wipe down your walls with a damp cloth or sponge.
Common Mistakes to Avoid
Here are some common mistakes people make when whitewashing brick, and how to avoid them:
- Not cleaning the surface properly before painting. This can lead to poor adherence and a less-than-ideal finish. Be sure to scrub your wall thoroughly with soap and water, and use a wire brush if necessary to remove any dirt or debris.
- Using too much paint. This can result in a thick, opaque finish that conceals the natural texture and character of the brick. Remember to wipe off excess paint with a rag or cloth to achieve a more nuanced look.
- Rushing the drying process. It’s important to allow each coat of paint sufficient time to dry before applying the next one. If you apply paint too soon, it can result in clumping, streaking, or uneven coverage.
- Choosing the wrong type of paint. Not all paints are suitable for use on brick, particularly if your wall is exposed to the elements. Be sure to choose a paint that is weather-resistant and formulated for masonry.
Conclusion
Whitewashing brick is a simple, affordable DIY project that can instantly update the look of your home while also protecting your walls from the elements. By following this step-by-step guide and avoiding common mistakes, you can achieve a beautiful, textured finish that complements your personal style. So roll up those sleeves, grab your paintbrush, and get to work transforming your brick walls!
If you need more assistance or information on how to whitewash brick, please visit our website or contact us at [insert contact information here].