I. Introduction
Are you tired of your plain old t-shirts and want to spice up your wardrobe with some unique designs? Tie-dyeing is the perfect solution! It’s a fun and easy way to breathe new life into old clothes, but it can be daunting for beginners. This article will guide you through everything you need to know to tie-dye your shirts with confidence and style
II. Step-by-Step Tutorial
Materials needed for tie-dyeing shirts
Before we begin, let’s make sure you have all the necessary items for tie-dyeing your shirts:
- White, cotton shirts
- Tie-dye kit (powdered dye, squeeze bottles, gloves)
- Plastic wrap
- Baking rack or clothesline
- Salt (optional, depending on dye kit instructions)
Different tie-dye techniques
There are many ways to tie-dye your shirts, but here are some of the most popular methods:
- Crumple: scrunch up the shirt in random folds and bind it tightly with rubber bands
- Spiral: lay the shirt flat, pinch the center, and twist it into a spiral, then bind it with rubber bands
- Dip-dye: submerge the bottom of the shirt into the dye and hold it there for several minutes, gradually lifting it up higher to create an ombre effect
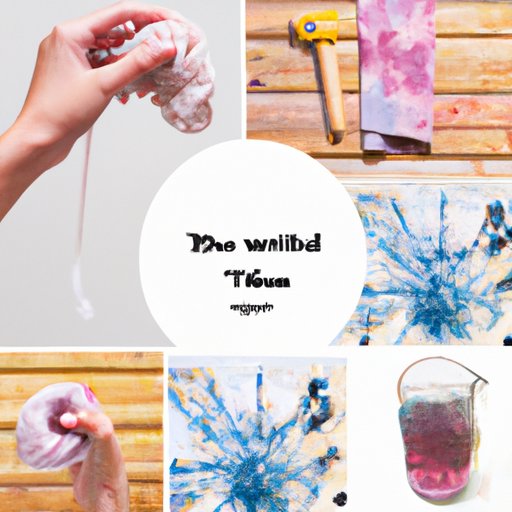
Step-by-Step Guide to Tie-Dyeing Shirts
Now that you have your materials and technique chosen, let’s get started on tie-dyeing your shirt:
- First, prewash your shirt to remove any sizing or dirt that could affect how the dye takes.
- Lay your shirt flat on a clean surface, and choose the areas you want to tie up based on the method you have chosen.
- Use rubber bands or string to tie up these sections tightly, making sure they are secure enough to prevent dye from entering.
- Prepare the tie-dye mixture according to your kit’s instructions; this will usually involve adding water to a powdered dye and shaking it in a squeeze bottle.
- Carefully apply the dye mixture to the sections of the shirt you have chosen. Be sure to wear gloves and protect your work surface from spills and splatters.
- Wrap the shirt tightly in plastic wrap, ensuring that the dye does not bleed between the sections. Leave it for at least 6-8 hours so the dye can properly set into the fabric. The longer you leave it, the darker the colors will be.
- Unwrap the shirt and rinse it gently under running water until all excess dye is gone and the water runs clear.
- Wash the shirt in cool water with a mild detergent; this will help set the dye for future washes. Rinse, and let it dry.
Tips on How to Make the Dye Last Longer
Here are some extra tips to ensure that your tie-dye shirts stay bright and vibrant:
- Wash your tie-dye with similar colors in cold water.
- Do not use bleach or harsh detergents, as this will ruin the colors.
- Avoid putting your tie-dye shirts in the dryer, as heat can cause the colors to fade and bleed. Instead, hang them up to air dry out of direct sunlight.
III. Trending Patterns and Colors
If you’re looking for some inspiration for your next tie-dye project, check out the latest trends:
- Summer colors like bright yellow, orange, and pink.
- Natural, earthy tones like beige, olive, and terracotta.
- Geometric patterns like stripes, triangles, and chevrons.
If you want to stay ahead of the curve, follow fashion influencers on Instagram, Pinterest, and other social media platforms. You’ll get tons of creative ideas for tie-dyeing from enthusiasts all around the world.
IV. Color Theory
Explanation of Color Theory
Color theory is the science of how colors interact with one another. It’s essential to know when tie-dyeing so you can create a harmonious and balanced color scheme.
Complimentary Colors and How to Use Them in Tie-Dyeing
Complimentary colors are hues located opposite each other on the color wheel, such as red and green or blue and orange. They provide excellent contrast when paired together and are perfect for creating tie-dye patterns with depth and vibrancy.
Different Color Combinations Will Give Various Results
Experimentation is key when it comes to color combinations in tie-dye. Some popular color schemes are:
- Triadic: using three colors evenly spaced on the color wheel. For example, red, yellow, and blue.
- Analogous: using colors next to each other on the color wheel. For example, red, pink, and orange.
- Monochromatic: using various shades and tones of one color, such as light blue, navy, and turquoise.
Color-Themed Guide for Shirt Dyeing
If you’re not sure where to begin with color choices, here are some suggestions based on your skin tone:
- Fair or pale skin: Pastel colors like light pink, lavender, and baby blue
- Medium or olive skin: Earthy tones like brown, green, and rust
- Dark or deep skin: Vibrant hues like bright yellow, hot pink, and orange
V. Eco-Friendly and Natural-Dye Options
Introduction to Eco-Friendliness in Fashion
As more people become environmentally conscious, eco-friendly fashion is on the rise. Tie-dyeing is no exception, and there are many ways you can make your tie-dye project more sustainable.
Showcasing Natural-Dye Options like Turmeric, Coffee, Beetroot
If you’re interested in natural-dyes, here are some materials you can use:
- Turmeric: gives a bright yellow color
- Coffee: creates a warm, earthy brown
- Beetroot: produces a faint pink or red hue
Benefits of Using Natural-Dye Like Safety and Eco-Friendliness
One of the biggest advantages of natural dyes is that they’re non-toxic and safe for both the environment and your skin. They’re also a great way to reduce waste as many natural dyes can be made from leftover food scraps or garden plants.
VI. Tie-Dye History and Culture
The History and Culture of Tie-Dyeing
Tie-dyeing has been around for centuries, with evidence of its use as far back as 6th-century Asia. However, its popularity exploded during the 1960s and 1970s in Western culture as part of the hippie movement.
Explanation of How Tie-Dyeing Has Been Used by Different Cultures and Subcultures
From Africa to Japan, many cultures have used tie-dyeing in their textiles for centuries. It wasn’t until the hippie movement that tie-dyeing became mainstream in Western culture. Today it is widely adopted in different fashion segments, music festivals, and other subcultures.
How Subcultures Like The Hippie Movement In The 70s Influenced Tie-Dyeing Patterns
The hippie movement in the 60s and 70s was a countercultural revolution that rejected mainstream society’s values, including fashion. Tie-dyeing became a way for them to express their individuality and reject mass-produced clothing. They incorporated organic patterns and bright colors, often producing intricate designs based on nature.
VII. Accessorizing with Tie-Dye
Accessorizing is an excellent way to pair your tie-dye shirts to create a stylish and fashion-forward look.
Ideas for Accessorizing Tie-Dye Shirts
Here are some ideas to get you started:
- Accessorize with hats, headbands, or bandanas for a cool and casual look.
- Combine your tie-dye shirts with denim jackets, skirts, or shorts for a timeless and chic style.
- Complete your ensemble with bold, chunky jewelry or earthy, wooden beads for a bohemian feel.
VIII. Conclusion
Tie-dyeing is an incredibly fun and creative way to express your fashion sense while also being eco-friendly and unique. With the rise of social media platforms like Tik-Tok and Instagram, tie-dye fashion has made a resurgence to become one of the most visible trends in the fashion industry.
By following this guide, you gained all the tools you need to start experimenting with dyes to create various patterns or to mix and match colors. Remember to play around with the color wheel and design before committing by tieing your clothes.
Whether you go for classic swirls, bold stripes or understated earthy tones, your tie-dye creations will undoubtedly be a one-of-a-kind piece that you can be proud of.