I. Introduction
Are you having a hard time tying your durag? Look no further! This article provides a step-by-step guide to achieving the perfect knot. We will also discuss different methods to tie your durag, common mistakes to avoid, and how to take care of your durag. But first, let’s explore the importance of wearing a durag and its brief history.
A. Overview of the article
This article focuses on helping you tie the perfect durag knot. It provides step-by-step guides on different methods of tying a durag, the common mistakes you should avoid, and the different types of durags available on the market. You’ll also learn how to care for your durag properly, and how to rock it as a fashion statement.
B. Importance of wearing a durag
A durag is an important accessory for people with textured hair, commonly worn by men and women of color. It is primarily used to maintain hairstyles such as waves, braids, and locks, and also to protect the hair from damage during sleep or physical activities.
C. Brief history of durags
The durag has a long and rich history that goes back to the 19th century. It was originally worn by slaves and laborers to keep their hair out of their faces and protect their heads from the sun. Later on, it became a fashion statement and cultural symbol for black people, particularly in the hip-hop community.
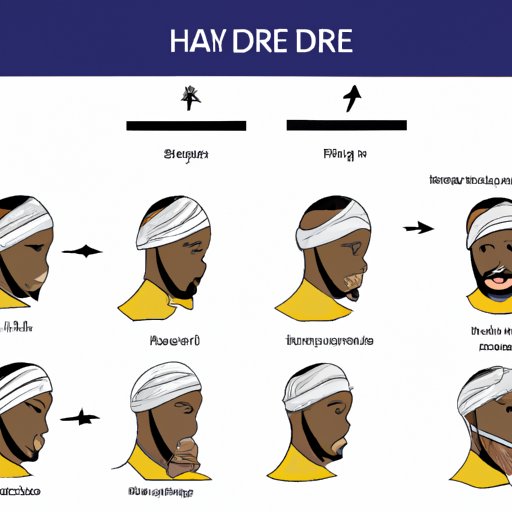
II. Step-by-Step Guide
Before we dive into the different methods of tying a durag, we must first prepare your hair.
A. Preparing your hair
Start by brushing your hair in the direction you want it to lie. This will help ensure a neat and clean finish for your waves. If you have long hair, you can tie it up in a ponytail or a bun to make it easier to wrap your durag around your head.
B. Starting position
Place the durag on your head, with the flap facing backward. The two straps should be hanging downward at the front of your head.
C. Tying the knot
Take the straps and cross them behind your head, ensuring that they are not twisted. Bring the straps to the front of your head and create an X shape.
D. Securing the durag
Loop the straps over the X shape, then pull them through the hole created by the X shape. Make sure the durag is tight enough to stay in place but not too tight that it feels uncomfortable. Tuck any excess fabric inside the durag for a neat finish.
E. Tips for a perfect knot
To achieve a perfect knot, make sure your durag is centered on your head and that the knot lies directly on your forehead. Avoid pulling the durag too tight as this could lead to discomfort. Instead, aim for a snug, but comfortable fit.
F. Images or video tutorial
For a more visual guide, check out our video tutorial on how to tie a durag.
III. Different Methods
There are different methods for tying a durag, and each has its advantages. Let’s explore the traditional, locking, and overlapping methods.
A. Traditional method
The traditional method is the most common way to tie a durag. It involves crossing the straps behind your head, creating an X shape on your forehead, and securing the knot by bringing the straps back to the front of your head. This method is best for short hair or hair that does not require a lot of compression or hold.
B. Locking method
The locking method is suitable for hair that requires a high level of compression, such as locks or twist styles. Instead of crossing the straps at the back of your head, twist them together like a rope to create a secure fit. Bring the twisted straps to the front of your head, create an X shape, and secure the knot.
C. Overlapping method
The overlapping method is similar to the traditional method, but it involves overlapping one strap over the other at the back of your head before bringing them to the front to create an X shape and secure the knot. This method increases the compression and hold of your durag, making it ideal for creating waves or maintaining braids.
D. Discuss the difference between each method
The main difference between each method is the level of compression and hold they provide. The traditional method is suitable for short hair or hair that does not require much compression. The locking method is necessary for hair that needs a high level of compression. The overlapping method provides an added level of compression and hold, making it ideal for creating waves or braids.
E. Guide readers to choose the best method for their hair type
To choose the best method for your hair type, consider how much compression or hold your hair requires. If you have a short haircut or don’t need much compression, the traditional method will work fine. If you have locks or twist styles, the locking method will provide the necessary hold. Finally, if you need to create waves or maintain braids, the overlapping method will work best for you.
IV. Common Mistakes
Learning how to tie a durag takes time, and it’s easy to make mistakes. Here are the most common mistakes people make when tying their durag and how to avoid them.
A. Uncomfortable knots
If your knot feels too tight and uncomfortable, it’s because you tied it too tight. To avoid this, aim for a snug fit instead of a tight one. Also, always check that your durag is centered on your head before tying the knot.
B. Not tying it correctly
If your durag keeps slipping off or the knot is too loose, you are not tying it correctly. Make sure that you are following the correct steps for your preferred method. It’s also essential to ensure that the knot lies directly on your forehead for a secure fit.
C. Tightness and tension
If you feel too much tension around your head or your hairline, it’s because you tied your durag too tight. Avoid pulling your durag too tight as this could cause hair breakage and discomfort. Instead, aim for a comfy and snug fit.
D. How to avoid and fix these mistakes
The best way to avoid these mistakes is to follow the correct steps for your preferred method and to aim for a comfortable and snug fit rather than a tight one. To fix these mistakes, take off your durag and start over. This may seem inconvenient, but it’s better than having a poorly tied durag on your head.
E. Tying the durag in a way that suits different types of hair
The different methods of tying a durag are designed to suit different types of hair. The traditional method is more suitable for short hair, while the locking method is designed for hair that requires a high level of compression. The overlapping method is perfect for creating waves or maintaining braids. Choose the method that best suits your hair type.
V. Different Types of Durags
There are different types of durags available on the market, ranging from materials to colors and designs. Let’s see the options available, their care, and how to tie them.
A. Types of materials
The most common materials used for durags are silk, polyester, and nylon. Silk is the most popular material for its softness and breathability. Polyester is durable and easy to care for. Nylon is lightweight and moisture-wicking, making it ideal for physical activities.
B. Colors available
Durags are available in different colors, from simple white or black to bright and bold hues. Choose a color that complements your style or personality.
C. Different durags for different hair types
If you have long hair, look for a durag that’s longer than the traditional length. If you have sensitive skin, choose a silk or satin durag that’s gentle on your skin.
D. Step-by-step guide on how to tie each type of durag
To learn how to tie a specific type of durag, check the instructions on the package or look for online tutorials. The steps are similar, but the length and materials may differ.
VI. Durag Care
Caring for your durag is essential in maintaining its shape, durability, and functionality. Here are some tips to help you care for your durag.
A. How to wash and dry your durag
Wash your durag with mild detergent in cold water and avoid using bleach or fabric softeners. You can machine-wash it, but hand-washing is gentler and will prolong its life. Hang it to dry or lay it flat, and avoid using the dryer.
B. Tips for maintaining its shape
Store your durag flat to maintain its shape and avoid wrinkling. Don’t store it in a damp or humid place, as this could cause mold or mildew. Also, avoid storing it in direct sunlight, as this could fade the color.
C. Ways to ensure its durability
Avoid using harsh chemicals or detergents that could damage your durag’s material. Also, avoid washing it with other clothes that could snag or tear it. It’s essential to follow the care instructions on the packaging to prolong its durability.
VII. The Role of Durags
Durags are more than just functional accessories; they hold cultural significance and have a newfound role in fashion. Let’s explore the role of durags.
A. Brief history and cultural significance
Durags have a rich history that’s rooted in the black community, and they’ve played an essential role in the hair care and maintenance of textured hair. They’re also a symbol of cultural identity and expression.
B. Recent durag trend in fashion
Durags have recently resurfaced as a fashion trend, with celebrities and fashion enthusiasts rocking them on red carpets and runways. They’re no longer seen as just a hair accessory, but a statement piece that adds an edge to any outfit.
C. How to rock the durag style
There are different ways to style your durag, depending on your preference and outfit. You can wear it low on your forehead for a more street-inspired look or higher up for a chic and sophisticated look. Don’t be afraid to experiment with different colors and fabrics to add some personality to your style.
D. Brief instructions on how to tie a durag to pull off a stylish look
To rock a durag as a fashion statement, choose a color that complements your outfit and style. Tie it slightly higher than your forehead for a cool and trendy look. Pair it with streetwear or casual wear for a laid-back vibe, or with a suit for a fashion-forward look.
VIII. Conclusion
Tying a durag is a process that requires practice, patience, and knowledge of the different methods and styles. By following the step-by-step guide, you will achieve the perfect knot for your hair type.