I. Introduction
There’s nothing quite like a good campfire. The crackle of the flames, the warmth of the fire, and the satisfaction of a successful ignition are all part of the allure. Whether you’re camping, hiking, or just spending time in your backyard, knowing how to start a fire is an important skill for any outdoor enthusiast. In this article, we’ll provide a beginner’s guide to campfire building, as well as tips and tricks to take your fire-making game to the next level.
II. 7 Essential Steps for Starting a Fire: A Beginner’s Guide
Before delving into the finer points of fire-making, it’s important to understand the basic steps. Here are 7 essential steps for starting a fire:
A. Gathering materials
Start by collecting your materials. You’ll need tinder (small, dry materials that ignite quickly), kindling (larger sticks and twigs), and fuel (larger pieces of wood).
B. Preparing the site
Next, prepare your fire site. Clear any leaves, grass, or debris from the area, and dig a shallow pit to contain the fire. Never build a fire near dry brush or under low-hanging branches.
C. Building the fire
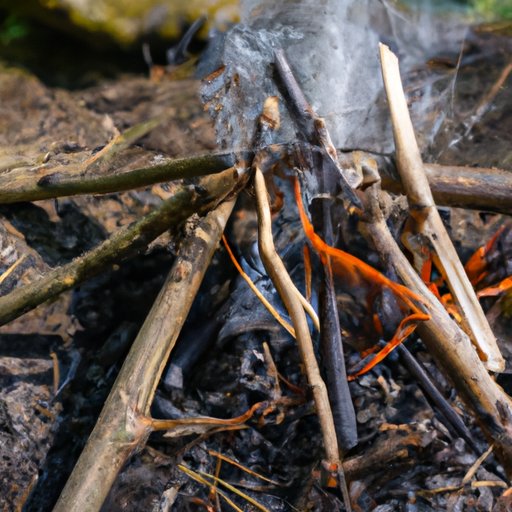
There are several methods for building a fire, but the most common is the teepee method. Arrange your tinder in a small pile in the center of your fire pit. Lean kindling in a teepee shape around the tinder, leaving a small opening for air flow.
D. Starting the fire
Using a lighter or matches, ignite the tinder in several places. Blow gently on the flames to encourage them to spread to the kindling.
E. Feed the fire
As the fire grows, add larger pieces of fuel to keep it going. Be sure to let each new piece catch fire before adding the next.
F. Maintain the fire
Watch the fire carefully, adding fuel as needed. Keep a bucket of water or a shovel nearby in case the fire gets out of control.
G. Safety precautions
Never leave a fire unattended, and always fully extinguish your fire before leaving. Use water to put out the fire, and stir the ashes until they’re cool to the touch.
III. Mastering the Art of Fire Making: Tips and Tricks to Get You Started
Now that you have the basics down, it’s time to take your fire-making skills to the next level. Here are some tips and tricks to get you started:
A. Types of tinder and kindling
Consider different types of tinder and kindling, such as cotton balls, dryer lint, or even a bird’s nest made of grass and twigs. Pine needles and small sticks are ideal for kindling because they ignite easily.
B. Choosing the right wood
When selecting a type of wood, choose dry, seasoned wood that’s been standing dead (not cut down). Hardwoods like oak and maple burn longer and hotter than softwoods like pine and spruce.
C. Fire starting tools
Carry a fire starting kit with you that includes a lighter, matches, and a fire starter like cotton balls soaked in petroleum jelly. A magnesium fire starter is also a great backup option.
D. Techniques to ignite the fire
If you’re in a pinch, use a battery and steel wool to start a fire. Rubbing two sticks together can also work, but it takes practice.
E. Common mistakes and how to avoid them
One common mistake is overloading the fire with fuel. Start small, and gradually add more fuel as the fire grows. Keep an eye on winds, which can send sparks flying and ignite nearby grass or bushes.
IV. The Ultimate Guide to Building a Fire: Techniques and Tools for a Successful Ignition
There are several methods for building a fire, each with its own advantages and disadvantages. Here are a few of the most popular:
A. The teepee method
This is the method we described earlier. The teepee shape allows for good air flow and easy ignition of the tinder.
B. The lean-to method
Lean several larger sticks against a small pile of tinder, like a teepee on its side. Light the tinder, and the flames will spread to the kindling sticks.
C. The log cabin method
Start by placing two larger logs parallel to each other, with a small gap between them. Place two more logs perpendicular to the first two, creating a “log cabin” structure. Fill the center with tinder and kindling, and light.
D. Other advanced techniques
Other methods include the pyramid, the platform, and the upside-down fire.
E. Fire starting tools and equipment
Consider investing in a fire piston or fire plow for an added challenge. A hatchet or saw can be useful for gathering and processing wood.
V. Starting a Fire in Any Weather: Expert Advice for Your Next Camping Adventure
When it comes to starting a fire in adverse weather conditions, preparation is key. Here are some tips for starting a fire in the rain or snow:
A. Fire safety in different weather conditions
Be aware of fire restrictions and potential fire danger in your area. In wet conditions, fires can spread quickly through dry brush and grass.
B. Tips for starting a fire in the rain or snow
Use dry tinder and kindling when possible, and store your fire starter in a waterproof container. Create a wind barrier using rocks or logs, and use a tarp to keep the wood dry.
C. Windy conditions and how to manage them
Build your fire in a sheltered area, and stack the fuel in a way that will shield the flames. A fire reflector made of rocks can also be helpful. Watch for sparks that may fly away in the wind.
VI. From Tinder to Flames: Simple Steps for Starting a Fire with Minimal Resources
What if you don’t have your trusty fire starter kit on hand? Don’t worry – you can still start a fire with minimal resources. Here’s how:
A. Finding tinder and kindling in nature
Look for dry pine needles or leaves to use as tinder, and scout the area for small sticks and twigs for kindling. Birch bark or tree resin can also be used to start a fire.
B. Making your own fire starters at home
Cotton balls soaked in petroleum jelly or homemade fire starters made of dryer lint and sawdust can be effective fire starters. Dip cotton balls in melted wax for a waterproof option.
C. Using household items to create a successful fire
A battery and steel wool can be used to ignite tinder, and a magnifying glass can focus sunlight to start a fire. Hand sanitizer gel, chips, and even Doritos have been known to work as kindling!
VII. Lighting Your Way: How to Start a Fire Safely and Efficiently
While starting a fire may seem simple, safety is essential. Here are some tips to minimize the risk of fire-related injuries:
A. Safety precautions to take when starting a fire
Always build a fire in a designated fire pit or area, and never leave it unattended. Keep a bucket of water or shovel nearby, and avoid wearing loose clothing that may catch fire.
B. Avoiding common mistakes
Overloading the fire with fuel or starting a fire too close to dry brush or trees can create a dangerous situation. Always check for fire restrictions and follow all regulations.
C. How to prepare the site and build the fire to minimize risks
Clear the area of all flammable materials, and dig a pit to contain the fire. Build the fire slowly and gradually, using small pieces of kindling and fuel.
VIII. 5 Foolproof Methods for Starting a Fire: Tried and Tested Techniques for Outdoor Enthusiasts
If you’re looking to spice up your fire starting routine, try one of these five tried and tested methods:
A. Flint and steel method
Strike a flint against a piece of steel, sending sparks onto your prepared tinder.
B. Using a magnifying glass
Hold a magnifying glass over a piece of dry tinder, focusing the sunlight onto the material until it ignites.
C. Chemical fire starters
Purchase a chemical fire starter, which usually comes in the form of a small brick. Light the brick and place it under your dry kindling.
D. Cotton ball and petroleum jelly method
Soak cotton balls in petroleum jelly, storing them in a waterproof container until ready to use. Ignite the cotton ball, placing it under your kindling.
E. Electrical lighters and matches
An electrical lighter or waterproof matches can make fire starting a breeze. Just be sure to store your matches in a waterproof container.
IX. Conclusion
Starting a fire is a skill that takes practice and experimentation. By following these basic steps and trying out different methods, you’ll become a pro in no time. Remember to always practice fire safety and respect any fire restrictions in your area.