I. Introduction
Soldering copper pipe is an important skill for any DIY plumber or homeowner. From repairing leaks to installing new plumbing systems, the ability to solder copper pipe can save you time and money in the long run. In this article, we will provide you with a step-by-step guide on how to solder copper pipe, as well as safety tips, a review of the best tools for the job, common mistakes to avoid, and FAQs.
II. Step-by-Step Guide to Soldering Copper Pipe
Soldering copper pipe is a relatively simple process, as long as you have the right materials and follow the correct steps. Here is a step-by-step guide on how to solder copper pipe:
A. Materials needed
Before you begin, make sure you have all the necessary materials. You will need:
- Copper pipe
- Copper fittings
- Solder
- Flux
- Cleaning cloth or abrasive pad
- Soldering torch
- Fire-resistant work surface or mat
- Protective gloves, goggles, and clothing
B. Prep work
The first step to soldering copper pipe is to prepare the joint. Cut the copper pipe to the desired length using a pipe cutter. Use a cleaning cloth or abrasive pad to clean both the inside and outside of the copper joints. The joint needs to be clean and dry to properly conduct heat.
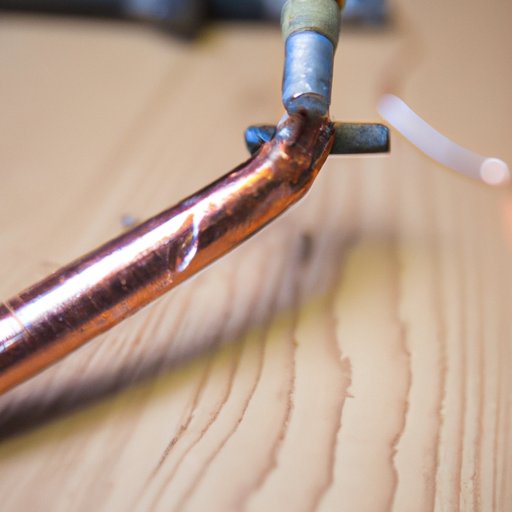
C. Heat the joint
Using a propane torch, heat the joint at the point where the pipe and fitting meet. Move the flame in a circular motion around the joint, making sure to heat both the pipe and fitting evenly. When the flux starts to bubble, you know the joint has reached the correct temperature.
D. Apply flux
With the joint heated, it’s time to apply flux. Using a small brush, apply a thin layer of flux around the joint. The flux acts as a bonding agent, helping the solder adhere properly to the copper.
E. Add solder
Once the flux is applied, you can add the solder. Place the solder at the joint, allowing it to melt and flow into the joint. Make sure to add enough solder to complete the joint, but not so much that excess solder drips away from the joint.
F. Cool the joint
Once the solder is added, remove the heat and allow the joint to cool. Don’t move the work until the joint has cooled completely. Cooling time may vary depending on the size of the joint, but a general rule of thumb is to wait at least five minutes before handling the joint.
G. Test the joint
After the joint has cooled, it’s time to test it. Turn on the water supply and check the joint for leaks. If there are any leaks, you will need to start the process over from the beginning.
III. Video Tutorial
To supplement this step-by-step guide, we recommend watching a video tutorial on how to solder copper pipes. Watching a professional in action can help you visualize the process and identify any areas you may not have fully understood. Here is a video tutorial we recommend:
A. Explanation of why a video tutorial is helpful
Video tutorials are helpful because they allow you to see the process in action. Sometimes, written instructions can be difficult to follow, but seeing the process in action can make it much easier to understand.
B. Link to the video tutorial
How to Solder Copper Pipes – The Home Depot
IV. Pros and Cons of Soldering Copper Pipe
Like any plumbing method, there are both benefits and challenges to soldering copper pipe. Here are some pros and cons to consider:
A. Benefits of soldering
- Copper pipe is durable and long-lasting, making it a popular option for plumbing systems
- Soldering is a relatively simple process
- Copper has good thermal conductivity, making it resistant to extremely hot or cold temperatures
B. Challenges of soldering
- It can be difficult to reach tight spaces with a torch
- Soldering requires a steady hand and precise technique
- It can be dangerous if safety precautions are not taken
C. When soldering is the best option
Soldering copper pipe is typically the best option for permanent plumbing systems, as it creates a strong bond that is resistant to leaks and other types of damage. Soldering can also be a cost-effective option, as it does not require costly equipment or special skills.
V. Common Mistakes When Soldering Copper Pipe
While soldering copper pipe is a relatively simple process, there are some common mistakes that can cause problems with the joint. Here are some mistakes to avoid:
A. Overheating the pipe
If you overheat the pipe, you can weaken or melt it, causing the joint to fail. Make sure to have a steady hand and move the flame in a circular motion to evenly distribute the heat.
B. Not cleaning the pipe properly
If you don’t properly clean the pipe and fitting, the solder won’t bond correctly, causing leaks and other issues. Use a cleaning cloth or abrasive pad to thoroughly clean the joint before proceeding.
C. Applying too much or too little solder
If you apply too little solder, the joint won’t be strong enough to hold the pressure of the water supply. If you apply too much, the excess solder can drip away from the joint and cause other issues. Apply enough solder to complete the joint, but not so much that it drips away from the joint.
D. Tips to avoid these mistakes
To avoid these mistakes, it’s important to practice and be patient. Take the time to thoroughly clean the joint, use a steady hand, and apply the correct amount of heat and pressure. If you make a mistake, don’t be afraid to start over and try again.
VI. Answering FAQs About Soldering Copper Pipe
Here are some frequently asked questions about soldering copper pipe:
A. What if the joint leaks?
If the joint leaks, it’s likely because the solder didn’t bond correctly. You will need to start over and follow the steps above to create a new joint.
B. Can you solder copper pipes while water is still flowing through them?
No, you should not attempt to solder copper pipes while water is still flowing through them. Make sure to turn off the water supply and drain the pipes before beginning the soldering process.
C. How long does a soldered joint last?
A properly soldered joint can last up to 50 years or more, making it a reliable and long-lasting option for plumbing systems.
D. Additional FAQs with answers
For additional FAQs and answers about soldering copper pipe, check out our resource How to Solder Copper Pipe – The Family Handyman.
VII. Safety Tips for Soldering Copper Pipe
When soldering copper pipes, it’s important to take proper safety precautions to avoid accidents and injuries. Here are some safety tips to follow:
A. Protective equipment needed
Wear protective gloves, goggles, and clothing to avoid burns and other injuries. Make sure you have a fire extinguisher nearby in case of accidental fires.
B. How to avoid burns
Use a fire-resistant work surface or mat and keep flammable materials away from the area. Be mindful of where you place the torch and avoid touching the joint until it has cooled completely.
C. Steps to take in case of an accident
If an accident does occur, turn off the torch immediately and assess the situation. If there is a fire, use a fire extinguisher or call 911 if necessary.
D. Other safety precautions
Make sure to work in a well-ventilated area and avoid inhaling fumes. Keep children and pets away from the area, and never leave the torch unattended.
VIII. Review of Best Tools for Soldering Copper Pipe
To properly solder copper pipe, you will need the right tools. Here is a review of some of the best tools for the job:
A. Soldering iron
The Weller WLC100 40-Watt Soldering Station is a popular option among DIY plumbers and homeowners. It’s affordable, easy to use, and features a range of temperature settings.
B. Flux
The Oatey 1.7 Oz. No. 5 Lead-Free Flux is a reliable choice for soldering copper pipe. It’s easy to apply, provides an excellent bond, and cleans up easily with water.
C. Solder
The Oatey 1 Lb. Safe-Flo Silver Solder is a lead-free option that provides a strong, durable bond. It melts at a lower temperature than other solders, making it easier to use for beginners.
D. Other tools needed
In addition to the soldering iron, flux, and solder, you will also need a pipe cutter, cleaning cloth or abrasive pad, and a propane torch.
E. Top-rated options
- Tabiger Soldering Iron Kit Adjustable Temperature
- Rectorseal T-95 Pocket Paks Flux
- Aqua Plumb 1201 Solder
IX. Conclusion
Learning how to solder copper pipe is an important skill for any DIY plumber or homeowner. By following the steps above and taking proper safety precautions, you can create strong, durable joints that will last for years to come. Remember to avoid common mistakes, use the right tools, and practice until you feel confident in your skills.