Introduction
There is something special about sushi: a sense of art, delicacy, and craftsmanship that comes hand-in-hand with deliciousness. Whether you are eating it at a fancy restaurant or in your own kitchen, sushi is more than just a meal; it is an experience. But how can you master the art of sushi-making and learn how to roll sushi like a pro? In this article, we will guide you through a step-by-step process of making the perfect sushi roll, provide you with a recipe and instructions, suggest creative ideas, and discuss the health benefits of this delicious dish.
Step-by-Step Guide to Rolling Sushi
Before diving into the details, it is worth noting that sushi-making may appear intimidating at first, but it is all about practice. The more attempts you make, the better you will get at rolling sushi. Now, let’s jump into the steps for rolling sushi.
- Prepare the Rice: The first step in making sushi is to prepare the sushi rice. Wash 2 cups of short-grain sushi rice in cold water until the water becomes clear. Drain the rice and put it in a rice cooker with 2 cups of water. Cook the rice for about 15 minutes and let it sit for another 15 minutes to cool down. Once the rice is cool enough to handle, transfer it to a large mixing bowl and season it with a mixture of ½ cup rice vinegar, 2 tablespoons sugar, and 1 teaspoon salt. Mix well and set aside.
- Prepare the Filling: While the rice is cooking, you can prepare the fillings for your sushi rolls. Common fillings include cucumber, avocado, crab meat, shrimp, salmon, and tuna. Slice the vegetables into thin strips and cook the seafood if needed. Make sure the filling is dry before placing it onto the rice.
- Prepare the Nori: Next, you need to prepare the seaweed wrap, or Nori. Cut a sheet of nori in half with scissors and place it shiny side down onto a bamboo sushi mat. Wet your hands to prevent the rice from sticking to them and grab a handful of sushi rice. Spread the rice onto the nori sheet, leaving a ½ inch gap at the top and bottom edges.
- Add the Filling: Place your preferred fillings in a line, slightly off-center, on top of the rice. Take the bottom edge of the bamboo mat and lift it up and over the filling. Apply pressure with your fingers to tighten the roll.
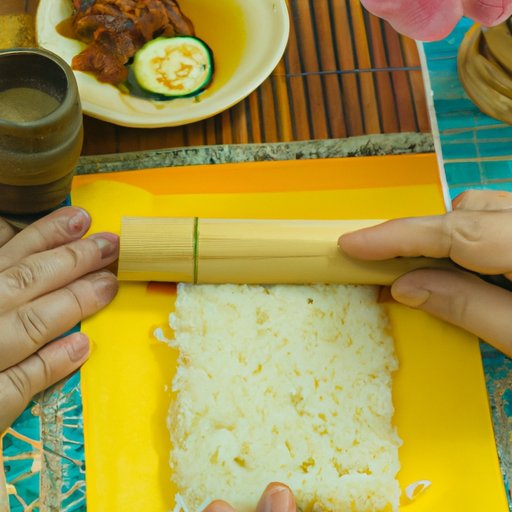
- Roll the Sushi: With the nori sheet wrapped around the filling, pull the end of the bamboo mat closest to you up and over the sushi roll. Use your fingers to compress the roll as you do so. Keep rolling until the mat has been completely wound around the sushi roll, making sure to compress the roll with your fingers each time you roll it to make it tight and firm.
- Seal the Roll: The last step is to use a small amount of water mixed with rice vinegar and seal the edge of the nori where it meets the roll. This will ensure it sticks together properly. Cut the sushi roll into even slices using a sharp knife (wipe the blade with a damp cloth to ensure smooth cuts).
Congratulations! You have successfully made your first sushi roll! Don’t forget to practice this technique until you get comfortable with it. Just as in most restaurants, the more you practice, the better your sushi-making skills will become.
Video Tutorial on Rolling Sushi
If you still find it challenging to roll sushi, you can watch a video tutorial that can help you.
Different techniques and tips you might not have considered.
Sushi Recipe and Instructions
Now that you know the basics of sushi-making, it is time for you to achieve your sushi-making skills by making your own sushi rolls. Here is a recipe for simple sushi rolls:
- Two cups of short-grain sushi rice
- Two cups of water
- Half a cup of rice vinegar
- Two tablespoons of sugar
- One teaspoon of salt
- Seaweed (nori)
- Fillings of your choice (cucumber, avocado, salmon, crab meat, shrimp, tuna)
- Soy sauce and wasabi to serve
Follow the steps described in the section above to prepare your rice and fillings. Once you have your nori sheets ready, place one nori sheet on top of your bamboo mat and spread the rice evenly over the nori sheet with damp hands, leaving ½ inch at the top and the bottom. Place the fillings of your choice in the center of the rice. Roll the sushi tightly with the help of the bamboo mat. Seal the edge of the nori where it meets to ensure it sticks together and cut your roll into even slices. Serve with soy sauce and wasabi.
Tools Needed for Sushi-Making
Sushi-making requires several essential tools. Here are the primary tools you need to prepare your sushi:
- Bamboo sushi mat: it helps roll the sushi tightly.
- Rice cooker: essential to prepare the perfect rice.
- Sushi knife: it allows clean cuts without crushing the roll.
- Plastic wrap: it protects the bamboo mat from the sushi rice.
- Bowl: to mix the sushi rice seasoning.
- Measuring cups: to measure ingredients precisely.
- Cutting board: to cut the sushi roll into even slices.
These tools may be found at any online or offline store that sells sushi-making equipment and supplies.
Common Mistakes to Avoid When Rolling Sushi
Like any other culinary technique, sushi-making has its fair share of common mistakes. Here are some common mistakes that people make and tips on how to avoid them:
- Too much or too little rice: when making sushi, it is paramount to ensure the right proportion of rice to other ingredients. The rice should be spread evenly and sparingly to avoid overpowering the sushi roll flavors with rice. Conversely, too little rice can lead to a fragile roll that falls apart easily.
- Not preparing the rice correctly: the key to making sushi is the rice, so if you don’t have the right consistency and seasoning of the rice, the sushi roll won’t come out as planned.
- Overfilling the roll: too much filling in the roll can make it challenging to roll the sushi properly and result in a loose and less visually appealing finished product.
- Rolling too tightly or too loosely: rolling the sushi too tightly can compromise the texture of the sushi, while rolling it too loosely can make it fall apart easily. With practice, you will acquire the necessary skill to make the perfect roll.
- Wrong knife technique: slicing the sushi roll can be challenging if you don’t have the correct technique or a sharp sushi knife, so it is essential to practice using a sharp knife or follow video tutorials available online.
If you experience challenges making sushi, don’t get discouraged. Perfection takes time and practice.
Creative Sushi Ideas
Sushi-making provides the opportunity to experiment with various fillings and toppings, and this results in a broad array of creative ideas that you might not have considered before. Here are some creative ideas for your sushi rolls:
- Vegetarian sushi: adding vegetables to your sushi can be a healthful and delicious alternative. Some excellent vegetable choices for sushi include asparagus, bell pepper, carrot, and yam.
- Sweet sushi: using fruit pieces such as strawberries, mangoes, and blueberries, mixed with whipped cream cheese in the filling, can produce a delightful contrast of sweet and creamy flavors with the seaweed paper and rice.
- Spicy sushi: adding dashi sauce or wasabi to the sushi filling will create a mild spicy flavor in the roll.
Creating an attractive and eye-catching sushi presentation requires creativity and experience, so don’t be afraid to experiment with several different combinations of fillings and toppings.
Sushi Health Benefits
There are plenty of health benefits of consuming sushi, and here are a few:
- Rich in Omega-3: sushi contains seaweed, which is packed with omega-3 fatty acids that help to improve brain function.
- Low in Calories: sushi rolls are usually low in calories, making them an ideal addition to your diet plan.
- Source of Iodine: seaweed in sushi is also rich in iodine, which helps improve thyroid function and hence, weight loss.
- High in Vitamins and Minerals: sushi is rich in vitamins and minerals present in the filling and rice.
- Reducing the Risk of Diseases: regular sushi consumption helps to reduce the risk of heart diseases and stroke.
Conclusion
Congratulations! You’re now well-equipped with the knowledge to master sushi rolling! This guide offers a step-by-step guide, a recipe, creative ideas, and health benefits with sushi. Now it’s your turn to put your new skills to the test and create your sushi rolls at home. Whether you’re preparing for dinner, date night, or fun with friends, sushi-making can be a delightful experience with perfect company.