I. Introduction
Window tint is a great way to reduce glare and heat in your home or car, but over time, it can become faded, damaged, or simply outdated. Removing window tint properly is an important step in maintaining the appearance and functionality of your windows. In this article, we will explore the best methods for removing window tint, including the benefits and potential risks of each approach.
II. Step-by-Step Guide to Window Tint Removal
Before beginning the process of removing window tint, it is important to gather all necessary materials. You will need a spray bottle filled with soapy water, a razor blade or scraper, a towel, and some kind of adhesive remover or window tint remover solution.
Before starting the removal process, it is also important to take some precautions. Be sure to wear gloves and eye protection, as well as clothing that you don’t mind getting dirty. Additionally, you should work in a well-ventilated area to avoid inhaling any fumes or chemicals.
To begin removing your window tint, spray the soapy water onto the surface of the window and the tint. Use the razor blade or scraper to gently peel up a corner of the tint. Use the towel to soak up any excess water as you go.
Continue pulling up the tint slowly, keeping the scraper close to the surface of the glass to avoid scratching it. If the tint begins to tear, you can use your adhesive remover or window tint remover solution to help dissolve the adhesive and make it easier to remove.
Repeat this process until all the tint is removed from the window. Be sure to clean the glass thoroughly with some glass cleaner before moving on to the next window.
III. Using Heat to Remove Window Tint
Another effective method for removing window tint is to use heat. This can be done with either a heat gun or a hairdryer.
The benefits of using heat to remove window tint are that it softens the adhesive and makes it easier to remove the tint, and it is less likely to damage the glass than other methods.
To use a heat gun, set it to a low heat setting and hold it a few inches away from the surface of the tint. Move it slowly back and forth across the surface until the adhesive melts and the tint begins to peel up. Use your scraper to gently lift the tint and peel it away from the glass.
If you are using a hairdryer, set it to a high heat setting and hold it right up against the surface of the tint. Move it back and forth slowly until the adhesive melts and the tint begins to peel up.
IV. Using Ammonia to Remove Window Tint
Another effective method for removing window tint is to use ammonia. However, it is important to note that ammonia can be dangerous if not used correctly, so make sure to follow the proper precautions before starting.
To use ammonia to remove window tint, mix it with water in a spray bottle and apply it to the surface of the tint. Be sure to wear gloves and eye protection, and work in a well-ventilated area to avoid inhaling fumes or chemical irritation.
Cover the area with plastic wrap and let it sit in the sun for a few hours. After this time, use a razor blade or scraper to gently peel up a corner of the tint. Use your towel to soak up any excess water and continue pulling up the tint slowly, using the ammonia solution to help dissolve the adhesive as you go.
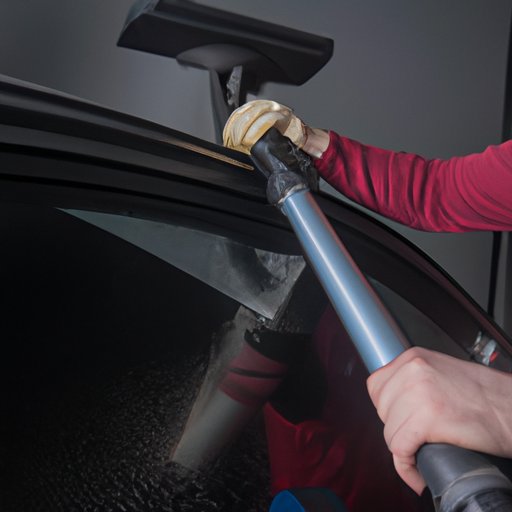
V. Using a Steamer to Remove Window Tint
A steamer can also be an effective way to remove window tint, as it helps to loosen the adhesive and make it easier to remove.
Before starting the process, make sure to wear gloves and eye protection, and work in a well-ventilated area to avoid inhaling any fumes or chemicals.
To use a steamer, point the nozzle at the edge of the tint and move it up and down slowly, making sure to keep a distance of a few inches from the surface of the glass. This will help to soften the adhesive and make it easier to remove the tint.
VI. Benefits of Professional Window Tint Removal
While DIY window tint removal can be effective, there are some advantages to seeking professional help. Professional equipment can ensure safe removal and prevent damage to your windows, and a professional can also provide expert advice on the best method for removing your particular type of window tint.
If you are not confident in your ability to remove your window tint safely and effectively, or if you have more complex or difficult to remove tint, it may be wise to consider hiring a professional to do the job for you.
VII. DIY Window Tint Removal Kit
If you prefer to tackle the job of removing your window tint yourself, you can purchase a DIY window tint removal kit. These kits usually include tools like a razor blade, scraper, and adhesive remover, as well as instructions for how to use them.
Be sure to follow the instructions carefully, and always work in a well-ventilated area to avoid inhaling fumes or chemical irritation.
VIII. Conclusion
When it comes to removing window tint, there are several methods to choose from. Whether you choose to use heat, ammonia, a steamer, or a professional, it is important to take the necessary precautions to ensure safe and effective removal.
By following the step-by-step guide in this article, you can feel confident in your ability to remove your window tint and maintain the appearance and functionality of your windows for years to come.