I. Introduction
Removing a sink stopper is a crucial skill that every homeowner or tenant should know. It may seem daunting at first, but with the right steps, tools, and techniques, you can easily remove it without causing any damage to your sink or pipes. Not only will you save money by avoiding costly plumbing services, but you’ll also have the satisfaction of knowing how to manage this common household issue. In this article, we will explore different approaches to removing a sink stopper so you can find the one that suits you best.
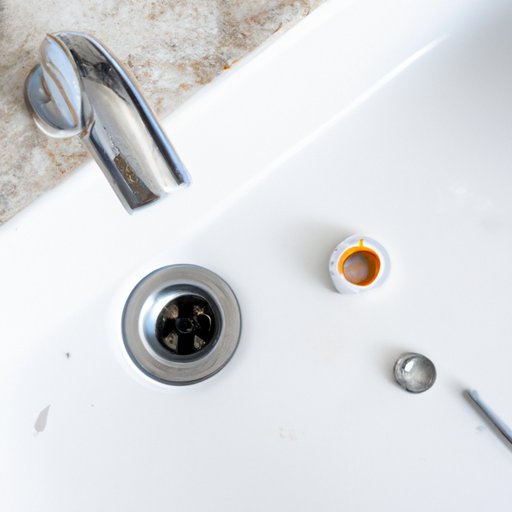
II. Step-by-Step Tutorial
If you prefer a more visual and hands-on learning experience, this tutorial approach is perfect for you. Here are the steps to follow:
- Locate the sink stopper under the sink.
- Look for the rod connecting the stopper to the sink lever, which should be located in the back of the drainpipe. Grip it firmly.
- Turn the rod counterclockwise to loosen it from the sink lever.
- Extract the stopper carefully from the drainpipe.
Use a pair of pliers if the stopper is stubborn or if you can’t reach it with your fingers. You can also try twisting the stopper gently as you pull it out. Remember to watch out for any rings or other small jewelry that may fall off when the stopper comes out.
III. Video Demonstration
If you feel more comfortable learning by watching someone else do it, a video demonstration may be your go-to approach. Here are some recommended videos:
- How to Remove a Sink Stopper – The Home Depot
- Replacing or Removing a Sink Stopper – Home Repair Tutor
- How to Remove a Sink Plug – DIY Extra
Watching video demonstrations can be beneficial as you can see each step being done in real-time and in a way that is easy to follow. Plus, if you miss any steps or if something is unclear, you can rewind and review it as many times as you need to.
IV. Listicle Approach
If you prefer a straightforward, systematic approach, a listicle with all the necessary tools needed to remove a sink stopper and simple instructions may be your best bet. Here are the steps:
Tools needed:
- Pair of pliers
- Screwdriver
- Bowl or bucket
Steps:
- Clear out any debris from the sink and plug the drain with a stopper or a rag to avoid losing any parts.
- Locate the sink stopper rod under the sink, which should be near the back of the drainpipe.
- Disconnect the rod from the sink lever.
- Remove the stopper from the drainpipe, using pliers if necessary.
- Check that all parts of the stopper have been removed and clean the drainpipe.
This approach is ideal for those who like to have a list of things to follow and keep track of the tools needed.
V. Common Issues and Solutions
Not everything goes smoothly when removing a sink stopper, so this section will highlight some common problems you might encounter and provide solutions to overcome them.
Problem: Stopper Won’t Budge
Solution: First, check if you’ve disconnected the sink stopper rod from the lever. If it’s still attached, you won’t be able to remove the stopper. If it is and the stopper still won’t come out, use pliers or a wrench (cover it with a cloth to avoid scratching the parts) to twist and wiggle the stopper gently until it comes loose.
Problem: Rusty Stopper
Solution: If the stopper is rusty, try spraying it with a rust dissolver and let it sit for a few minutes before attempting to remove it. If it’s too corroded or rusty to extract, you may need to replace the entire stopper assembly.
Problem: Broken Stopper
Solution: If a part of the stopper is broken, you may need to replace the whole stopper assembly. However, if the break is minor, you can use pliers or a screwdriver to extract the remaining pieces. Just exercise caution to avoid creating further damage.
VI. Troubleshooting
In this section, we’ll look at different problems you might face when removing a sink stopper and how to deal with them.
Problem: Water is Not Draining
Solution: If water is not draining properly, the stopper may not have been reinstalled correctly. Check the stopper and ensure it is properly aligned. You may also want to pour hot water down the drain to clear out any potential clogs.
Problem: Drainpipe is Leaking
Solution: If the drainpipe is leaking after you’ve removed the stopper, check if the nut or washer connecting the rod and stopper to the lever is loose. If it is, tighten it with pliers. If the leak persists, you may need to replace the entire assembly.
Problem: Rod Won’t Reconnect to Lever
Solution: Some sink stoppers have a spring retainer that might get stuck when you’re trying to reconnect the rod to the lever. Use pliers to help push and shift the spring retainer back in place. You can also try adjusting the lever’s height by bending it carefully so it lines up with the rod.
VII. Unique and Creative Ways
For those who enjoy thinking outside the box, here are some creative methods you can try:
- Use boiling water and dish soap to loosen the stopper and extract it easily.
- Apply some bike chain lubricant or WD-40 on the stopper’s threads to make it slide out faster.
- If the stopper is very stubborn, try using dental floss or a zip tie to loop around it and pull it out.
These are just a few examples of how your creativity can help you overcome challenges that may arise when removing a sink stopper.
VIII. Comparison of Different Sink Stopper Types
Not all sink stoppers are created equal, and this section will show you how to remove each type of sink stopper.
Pop-Up Stoppers
- Pull up the stopper to its maximum height.
- Locate the nut holding the lever assembly to the drainpipe and unscrew it.
- Remove the lever assembly and stopper from the drainpipe.
Push-and-Pull Stoppers
- Grab the stopper and pull it upwards to remove it from the drainpipe.
- Find the horizontal lever that connects to the stopper’s underside and unscrew it to remove the stopper assembly.
Lift-and-Turn Stoppers
- Turn the stopper counterclockwise to unscrew it from the drainpipe.
- Locate the set screw underneath the stopper’s cap and unscrew it to access the stopper assembly.
- Pull out the stopper and stopper assembly from the drainpipe.
IX. Conclusion
In conclusion, there are many ways to remove a sink stopper, ranging from straightforward to highly creative approaches. If you prefer a hands-on tutorial, the step-by-step approach is perfect, while those who prefer visual learning can watch videos. The listicle approach is ideal for systematic and straightforward learners, while the troubleshooting approach helps you diagnose and fix potential problems. Finally, the unique and creative ways showcase how creativity can come in handy when you face unexpected obstacles. With this knowledge, you’re now equipped to remove sink stoppers with ease and confidence.
We recommend starting with the step-by-step tutorial and using the common issues and solutions section to prepare for any challenges you may face. By incorporating your newly acquired skills, you’ll be able to tackle this common problem like a pro before you know it.