Introduction
Gel nails are a popular trend in nail care because they look fantastic and last longer than traditional nail polish. They are beautiful and can last up to three weeks. However, removing them can be a bit of a challenge if you’re not familiar with the correct process. If you’re in a rut on how to remove your gel nails at home, worry no more. This article will guide you through the process of safely, effectively, and efficiently removing gel nails at home.
Step-by-Step Guide
The importance of following a step-by-step guide when removing gel nails cannot be overstated. By following this sequence, you’ll have an easier time and will be more satisfied with the result. Here’s how to safely remove your gel nails at home:
Necessary tools and materials
– Nail file
– Acetone
– Nail buffer
– Cotton balls or pads
– Almond oil
– Cuticle pusher
Preparing your nails
Use a nail clipper or nail file to trim your nails down to a manageable length. This step is essential as it reduces the amount of time it takes to remove the gel. Lightly buff the nail bed by gently scrubbing the top coat with the nail buffer tool, making sure not to scratch the skin surrounding the nail.
The actual removal steps
The most popular and effective method of removing gel nails is the soak-off method, but we’ll get to that later. Alternatively, you can use the foil wrap method, the manual file method, or the peel-off method. Choosing one of these will depend on your preferences, equipment availability, and the condition of your nails.
Post-removal care tips
Clean your nails with a nail polish remover or soap and warm water. Apply a thin layer of almond oil on your nail bed and massage your cuticles to promote the growth of new, healthy nails.
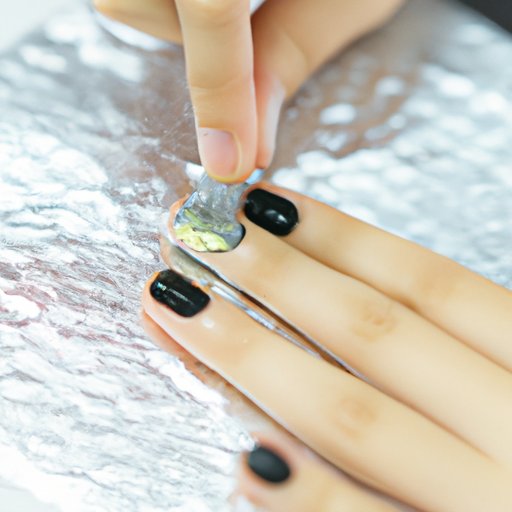
Soak-Off Method
This is the most popular method for removing gel nails. You can either use a soak-off bowl or a soak-off tray, which are readily available online or at your local beauty store.
Necessary tools and materials
– Acetone
– Nail buffer
– Cotton balls or pads
– Aluminum foil
– Cuticle pusher
A step-by-step guide for using acetone to soak off gel nails
1. Start by buffing the top of the nail to remove the shiny coat. This process ensures that the acetone can work well on the gel.
2. Soak a cotton ball or cotton pad with acetone. You can fold it into small squares and place them on your nails.
3. Wrap each finger in aluminum foil to cover the cotton pad and hold the heat.
4. Leave the foil wraps on your nails for at least 10 minutes to soften the gel. If you’re having a hard time removing the gel, you can extend the time up to 30 minutes, ensuring you don’t exceed that time.
5. Using a cuticle pusher, gently push back and remove the softened gel. Use a cotton pad with acetone to remove any remaining gel residue.
Tips on how to avoid damaging the natural nails
To avoid damaging your natural nails, follow the following tips:
– Never pick or force the gel off your natural nail. It can damage your nails, and you may end up losing your natural nails’ top layer.
– Use a fine-grit nail file to prep your nails before using any removal method.
– Limit any filing or buffing to a minimum.
– Use products that have natural ingredients, especially when it comes to nail-care products.
Foil Wrap Method
This method requires aluminum foil, cotton pads, acetone, and a buffer tool.
Necessary tools and materials
– Acetone
– Nail buffer
– Cotton balls or pads
– Aluminum foil
A step-by-step guide for using foil wraps to remove gel nails
1. Buff your nails lightly with the buffer tool.
2. Soak a cotton ball or cotton pad in acetone and place it on your nail bed. Place a piece of aluminum foil over your fingertip to hold the cotton pad in place.
3. Repeat this method on all your fingers, and wait for 10-15 minutes.
4. Remove the foil wraps and use a cuticle pusher to scrape off the softened gel.
Troubleshooting tips for common issues that arise
– Soak the cotton ball in acetone and not nail polish remover.
– Use lighter pressure when using the buffer tool to reduce the damage caused to your natural nails.
– If your nails feel heat sensation, remove the foil immediately.
Manual File Method
This method requires a nail file and a healthy bit of elbow grease. It’s the slowest method but doesn’t require any other tools or materials besides the nail file.
Necessary tools and materials
– Nail file
A step-by-step guide for manually filing off the gel nails
1. Buff your nails lightly with the buffer tool
2. Use a nail clipper to trim your nails to a less cumbersome length.
3. Place a single nail on a flat surface and file the surface of the gel without pressing down too hard. Take care of your natural nail underneath.
4. File carefully at the edges between your gel nail and natural nail until it’s removed entirely.
Tips on how to avoid harming the natural nail underneath
– Limit the number of times you file your nails. Filing will weaken your natural nails and make them vulnerable.
– Use a larger nail file because smaller nail files can take longer to remove the gel, causing more friction and damage to the natural nails underneath.
DIY Gel Soak Solution
If you don’t have acetone, making the DIY gel soak solution is an alternative method.
Necessary tools and materials
– Water
– White vinegar
– Lemon juice
– Olive oil
– Glass bowl
– Nail buffer
– Foil or manicure gloves
A step-by-step guide for making and using the DIY solution
1. Mix equal parts of white vinegar and lemon juice, and add a tablespoon of olive oil.
2. Heat the mixture in a microwave for 15 seconds.
3. Buff your nails lightly with the buffer tool.
4. Submerge your hands or fingers in the mixture for 10-15 minutes.
5. Use either foil or manicure gloves to keep the solution on your nails.
Tips on how to avoid damaging the natural nail
– Do not rub your hands after using the solution as this can damage your natural nails.
– Do not overexpose your nails to the solution. Follow the recommended times.
Peel-Off Method
The peel-off method is the simplest method to remove the gel nails.
Necessary tools and materials
– Cuticle stick
– Nail polish remover
A step-by-step guide for using the peel-off method
1. Buff your nails lightly with the buffer tool.
2. Use a cuticle stick to lift the end of the gel nail.
3. Apply a bit of nail polish remover on the underside of the lifted edge.
4. Gently peel off the gel nail.
Tips on how to avoid damaging the natural nail
– Be gentle when lifting the edges of the gel nail to avoid removing too much of your natural nails.
– Apply a bit of moisturizing lotion on your nails after the peeling process to prevent damage.
Aftercare Tips
It is essential to take note of your nails’ health after the removal process to keep them healthy.
– Keep your nails hydrated. Moisturize your nails daily with cuticle oil and hand lotion.
– Avoid exposing your nails to too much water or heat.
– Limit the use of harsh nail care products.
– Protect your nails by wearing gloves when cleaning or doing chores that involve harsh chemical products.
Conclusion
Removing gel nails at home can be a daunting task. Still, this article has provided several methods to help you remove your nails quickly, safely, and efficiently. Always remember to follow the steps carefully and use the recommended tools and materials to avoid damaging your natural nails. Remember that healthy nails are the goal, and the aftercare tips provided will help you keep your nails strong and healthy. We encourage you to explore different methods and share your experience with removing gel nails at home.