I. Introduction
Dip nails have become increasingly popular in recent years due to their long-lasting durability and customizable aesthetic. However, the removal process can be tricky and often leads to damaged or weakened natural nails if not done properly. Knowing how to safely and effectively remove dip nails is crucial for maintaining healthy nails and avoiding any painful mishaps. In this article, we will provide a step-by-step guide, DIY techniques, professional tools, time-saving hacks, alternative removal methods, and post-removal care tips to ensure a successful removal process every time.
II. Step-by-Step Guide
Before beginning the removal process, it’s important to gather all necessary tools and materials. These include acetone, cotton balls, aluminum foil, nail clippers, nail file, cuticle oil, etc. Once you have everything you need, follow these steps for a successful removal process:
1. Begin by clipping your nails as short as possible to reduce soaking time and minimize damage.
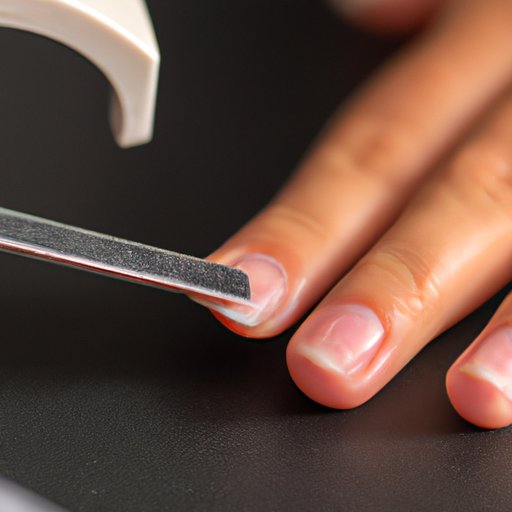
2. File the surface of your dip nails using a nail file to remove any shine or glitter particles present on the surface.
3. Next, soak cotton balls in acetone and place them on each nail, ensuring they are properly fastened and in contact with the dip powder.
4. Wrap the nails with aluminum foil and leave them undisturbed for 10-15 minutes.
5. After the soaking period is complete, gently remove the foil and cotton balls from the nails, taking care not to scrape or pull the dip powder off.
6. Scrape off the dip powder gently using a cuticle pusher or an orangewood stick. Be sure to remove all the dipping powder present on the nails. If some residue remains, repeat the soaking process or use acetone to remove any clinging residue.
7. Finish the process by buffing the nails with a buffer to smoothen the nails, moisturize the nails with cuticle oil or lotion.
III. DIY Techniques
If you don’t have access to acetone or prefer to use a more natural approach, there are several DIY techniques that can be used to remove dip nails. Here are some options:
1. White vinegar and Lemon Juice- Mix white vinegar and lemon juice in equal proportions in a small bowl, soak cotton balls in the mixture, and apply them to your nails. Leave them for 15-20 minutes before scraping off the dip powder.
2. Baking Soda- Create a solution by mixing baking soda, warm water, and lemon juice in a small bowl. Apply the solution to your nails with a cotton ball, and remove the dip powder once the nails are soft enough.
3. Acetone and Glycerin- Mix equal amounts of glycerin and acetone in a small bowl, and soak cotton balls in the solution. Apply the cotton balls to your nails, wrap them in aluminum foil, and leave them to soak for 10-15 minutes. Remove the dip powder using a cuticle pusher or an orangewood stick.
IV. Professional Tools
In a salon setting, professionals typically use an electric nail drill or e-file to quickly remove dip nails. However, it’s important to ensure that the professional is qualified and experienced in the use of such tools, as improper use can cause serious damage to the natural nails. It’s also important to know that these tools are not recommended for at-home use. If you do opt for professional tools, it’s best to use them solely in a salon setting. Some recommended professional-grade removal products include Nail File, OPI Expert Touch Polish Remover, and Gelish Soak Off Gel Remover.
V. Time-Saving Hacks
If you’re short on time or looking for ways to make the removal process more efficient, there are several time-saving hacks you can try:
1. Prepping Nails – Before beginning the removal process, trim your nails as short as possible and file them down to reduce soaking time and minimize damage.
2. Use Warm Water – Placing your hand in a bowl of warm water for 5-10 minutes before the soaking process can help speed up the soaking process.
3. Use Heated Pads – Applying heated pads to your nails while soaking can speed up the process more effectively.
4. Multi-Task – Use the soaking period to catch up on work, listen to a podcast, or watch a movie so that you are actively occupied while waiting.
VI. Preventing Damage
While performing the removal process, it’s essential to be gentle to your natural nails and avoid pulling or scraping at them to prevent nail damage. Here are some tips to keep your nails healthy:
1. Be gentle – Avoid pulling, scraping, or twisting the nails during the removal process.
2. Keep your nails moisturized – Use cuticle oil or your favorite lotion to hydrate and prevent your nails from drying out.
3. Take a break – If your nails become significantly weakened or brittle after removal, take a break of at least a week before applying a new set of dip nails.
VII. Alternative Removal Methods
Apart from soaking or electric nail drills, some alternative removal methods are gaining popularity. The first is the glue-soak method, which involves the application of nail glue to the dip powder layer and soaking it in acetone, allowing easy removal of the powder. The second is the removal clip system, which involves attaching clips that grip cotton balls and apply them to the nails. It works efficiently without the need to wrap your nails in foil.
VIII. Post-Removal Care
Once you’ve removed your dip nails, it’s important to care for your natural nails to promote healthy regrowth. Here are some tips:
1. Apply cuticle oil to your nails – This will hydrate and strengthen your nails.
2. Use strengthening products – Use biotin or collagen supplements to promote healthy nail growth and cuticle health.
3. Regular manicures- Opt for regular manicures, giving your nails breathing time between each manicure.
IX. Conclusion
Knowing how to remove dip nails is an essential skill to ensure the health and safety of your natural nails. With our step-by-step guide, DIY techniques, professional tools, time-saving hacks, and post-removal care tips, you’re ready to tackle the removal process with confidence. Remember to be gentle and patient with your natural nails and take breaks between manicures to ensure their durability and longevity.