I. Introduction
Dealing with a clogged toilet can be frustrating and inconvenient, especially if you’re not familiar with the process of plunging it correctly. To help you overcome this challenge, we have put together a comprehensive guide on the proper way to plunge a toilet.
This article series will help you understand the importance of plunging a toilet correctly, introduce you to effective techniques, and provide preventative measures to avoid the issue in the future.
II. Step-by-Step Guide
It is important to follow the correct sequence when plunging a toilet to prevent further damage or ineffective results. Here is a step-by-step guide to help you confidently plunge your toilet:
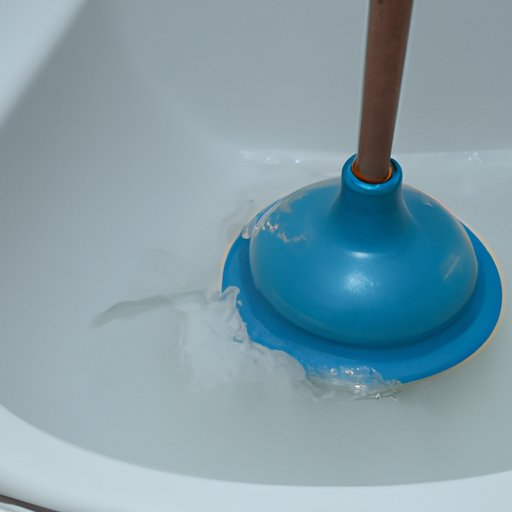
1. Preparing the Plunger and the Toilet
The right plunger and some water put in the bowl help build suction. Run hot water over the plunger to soften it, then fill the bowl with a few inches of water. You want to cover the base of the plunger’s cup.
2. Placing the Plunger Properly
Put the plunger over the drain in the toilet bowl so that it completely covers it, ensuring the rubber bulb fits around the opening. Apply slight pressure to create a tight seal. You don’t want to have any air coming out around the plunger’s edge.
3. Applying Pressure and Creating Suction
Push and pull the plunger’s handle with quick strokes, without lifting the cup entirely off the hole. You want to maintain a tight seal while pumping. Work at a gradual pace, not too hard, or too fast, and be consistent.
4. Removing the Plunger and Checking the Results
After plunging for several minutes, give the toilet flush a try. If it flushes, congratulations you’re done. If not, repeat the plunge process, still holding that tight seal until you feel a release of the clog. Check if the water level drops down to the normal level. If it does, then run hot water down the toilet to ensure the clog is completely removed.
III. Video Tutorial
A video tutorial can be a great complement to written instructions. Here are the topics the video tutorial will cover:
1. The Demonstration of Plunging a Toilet Step-by-Step
The video will provide a demonstration of the process of plunging a toilet, showing how to apply pressure, create suction, and remove the plunger. During the video, you’ll learn when to use more force or less, and how fast is ideal for achieving the most effective results.
2. Dos and Don’ts to Avoid Further Damage
The tutorial will also highlight dos and don’ts to avoid further damage. For instance, you don’t want to flush heavy items down the toilet, and you never want to use chemicals that could damage your plumbing. Furthermore, you will learn how to tell if the clog is far more severe and requires professional assistance.
3. The Summary or Call to Action
The tutorial will end with a summary of what you’ve learned, a recap, or a call to action to encourage viewers to keep their toilets clean and prevent clogs from forming.
IV. Common Mistakes to Avoid
Here are some common mistakes people make when plunging a toilet:
1. Not creating enough suction
If you don’t have enough water to create suction, or if you haven’t created a tight seal between the plunger and the toilet, you won’t be able to plunge effectively. It’s crucial to make sure you have a good seal and enough water in the bowl before plunging.
2. Using the wrong type of plunger
Toilet plungers are different than sink plungers, and using a sink plunger on a toilet can be disastrous. Toilet-specific plungers are better shaped and designed to give the correct air pressure needed to release the clog effectively.
To avoid these mistakes, ensure that you’ve got the right equipment and take your time.
V. Plunging Alternatives
If the plunger isn’t working or you’re looking for a more eco-friendly solution, there are alternatives to plunging. Some of the methods include:
1. Baking Soda and Vinegar
Baking soda and vinegar can create a reaction that will break down the clog and dissolve any grease hanging around the pipes. Pour a half cup of baking soda into the bowl, followed by a cup of white vinegar. Let it sit for thirty minutes before flushing.
2. Drain Snake
If the clog is deeper than expected, a drain snake could clear things up. This professional-grade tool uses a long, flexible wire to break up and remove clogs. Inserting the hook into the hole to grasp and pull the clog out is also possible.
However, these alternatives come with their own set of pros and cons, and you should evaluate them carefully before deciding which option to pick.
VI. Preventative Measures
Preventing toilet clogs is always better than having to plunge a toilet. Here are a few tips to help you prevent a clogged toilet:
1. Small Flushes Are Better
Instead of trying to flush everything in one go, use several small flushes to move any waste down the pipes gradually.
2. Avoid Flushing Foreign Objects
You should avoid flushing anything other than toilet paper and human waste down your toilet. Flushing wipes, paper towels, and feminine products can quickly lead to clogs.
3. A Toilet Seat Cover or Bidet Can Be Useful
Using a toilet seat cover can help avoid having to plunge a toilet, as less waste will accumulate in the bowl. Also, a bidet could help reduce the amount of toilet paper, and decrease the chance of blocking the pipe
4. Regular Maintenance and Cleaning
Finally, regular cleaning of your toilet helps keep it in good condition. A thorough cleaning once a week or every two weeks will prevent any buildup that could cause a blockage.
VII. Environment-Friendly Tips
Here are some eco-friendly options that are safe and effective:
1. Natural Rubber Plungers
Natural rubber plungers are biodegradable and less likely to break down but still get the job done. There isn’t any added PVC or chemicals.
2. Homemade Drain Cleaners (With Baking Soda, Vinegar, etc.)
These everyday household items are safe for the environment and your plumbing while still being strong detergents.
VIII. Conclusion
Toilet clogs may be a frequent problem for many homeowners, requiring frequent plunging and maintenance, but now you are well-equipped to handle the task on your own. Regardless of whether you choose to use a standard plunger, alternative methods, preventative measures, or eco-friendly options, remember to always be mindful of proper techniques and the environment.
By making some minor changes and following the steps listed in this guide, you can keep your toilet running smoothly and prevent clogs that make things complicated. Plunging a toilet isn’t as daunting as it seems, and with this guide, you’ll be able to tackle the job with confidence.