I. Introduction
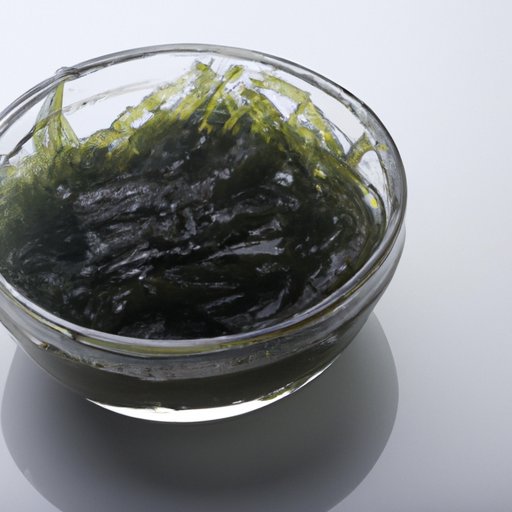
Sea moss, also known as Irish moss, is a type of seaweed that has been used for hundreds of years as a natural remedy for a variety of ailments. It is packed with essential vitamins and minerals, including iodine, calcium, potassium, and magnesium, and is believed to have numerous health benefits.
Making your own sea moss gel at home is a simple and cost-effective way to harness the power of this superfood. In this article, we will provide a step-by-step guide to making sea moss gel and explore the benefits of incorporating it into your diet.
II. Five Simple Steps to Make Your Own Sea Moss Gel at Home
Making your own sea moss gel may seem daunting, but it’s actually quite simple. Here are the five steps you need to follow:
Step 1: Rinse and Soak
Begin by rinsing your sea moss under running water to remove any debris. Soak it in a bowl of water for 24-48 hours, or until it has expanded and become soft.
Step 2: Blend with Water
Drain the water from the sea moss and add it to a blender with 1-2 cups of fresh water. Blend until smooth and creamy.
Step 3: Strain
Pour the blended mixture through a fine-mesh strainer to remove any remaining solids.
Step 4: Add Flavor (Optional)
You can add a sweetener such as honey or agave nectar, or a flavor such as vanilla or cinnamon, to the sea moss gel if desired. Simply add the flavoring of your choice to the blender during the blending process.
Step 5: Store
Transfer the sea moss gel to a clean glass jar with a tight-fitting lid and store in the refrigerator for up to 2 weeks.
It’s important to note that the quality of your sea moss will affect the quality of your gel. Make sure to source high-quality, organic sea moss for the best results.
Additionally, if you want to achieve a smoother texture, you can soak your sea moss in coconut water instead of plain water.
III. DIY Guide to Creating Nutritious Sea Moss Gel in Your Kitchen
Sea moss gel is a nutritious and versatile ingredient that can be used in a variety of dishes. It is a natural thickener and can be added to smoothies, desserts, and even savory dishes to add a boost of nutrition.
Benefits of Sea Moss Gel
Sea moss gel is a great source of essential vitamins and minerals, including iodine, calcium, potassium, and magnesium. It is also rich in antioxidants and has anti-inflammatory properties.
Consuming sea moss gel can help boost the immune system, aid in digestion, improve skin health, and promote overall wellness.
Detailed Explanation of Each Step
When making sea moss gel, it’s important to follow each step carefully to ensure the best possible results.
Step 1: Rinse and Soak
Begin by rinsing your sea moss thoroughly under running water to remove any debris. Place it in a bowl and cover it with water. Allow the sea moss to soak for 24-48 hours, or until it has expanded and become soft.
Step 2: Blend with Water
Drain the water from the sea moss and add it to a blender with 1-2 cups of fresh water. Blend on high speed until the mixture is smooth and creamy.
Step 3: Strain
Pour the blended mixture through a fine-mesh strainer to remove any remaining solids. Use a spatula to scrape the sides of the strainer to get all of the gel out.
Step 4: Add Flavor (Optional)
You can add a sweetener such as honey or agave nectar, or a flavor such as vanilla or cinnamon, to the sea moss gel at this point if desired. Simply add the flavoring of your choice to the blender during the blending process.
Step 5: Store
Transfer the sea moss gel to a clean glass jar with a tight-fitting lid and store in the refrigerator for up to 2 weeks.
How to Store Sea Moss Gel
Sea moss gel should be stored in an airtight container in the refrigerator. It will keep for up to 2 weeks, but it’s best to use it within a week to ensure maximum freshness.
It’s important to stir the sea moss gel before each use, as it may separate over time.
Additional Uses for Sea Moss
In addition to making sea moss gel, there are many other ways to use this nutritious ingredient:
- Add it to a salad for an extra boost of nutrition
- Use it to thicken soups and stews
- Add it to smoothies for a creamy texture and added nutrients
- Make a sea moss face mask to improve skin health
IV. Quick and Easy Recipe for Homemade Sea Moss Gel
If you’re looking for a quick and easy recipe for sea moss gel, this is the one for you. It only requires a few simple ingredients and takes just a few minutes to prepare.
Brief Overview of the Recipe
To make this sea moss gel, you’ll need just three ingredients:
- 1 cup dried sea moss
- 4 cups water
- 1-2 teaspoons agave nectar (optional)
Step-by-Step Directions
- Rinse the sea moss thoroughly under running water to remove any debris.
- Soak the sea moss in a bowl of water for at least 24 hours, or until it has expanded and become soft.
- Drain the water from the sea moss and add it to a blender with 4 cups of fresh water. Blend on high speed until the mixture is smooth and creamy.
- Pour the blended mixture through a fine-mesh strainer to remove any remaining solids.
- Transfer the sea moss gel to a clean glass jar with a tight-fitting lid and store in the refrigerator for up to 2 weeks.
Nutritional Benefits of the Ingredients Used
This sea moss gel is packed with essential vitamins and minerals, including iodine, calcium, and magnesium. The addition of agave nectar adds a touch of sweetness without adding refined sugar.
V. The Art of Making Sea Moss Gel: A Step-by-Step Guide
Making sea moss gel is an art, and with a little practice, you can perfect your technique to create a smooth, velvety texture every time.
Tips for Perfecting Your Sea Moss Gel-Making Skills
- Use high-quality sea moss for the best results
- Soak the sea moss for at least 24 hours to ensure maximum softness
- Blend the sea moss on high speed for several minutes to achieve a smooth texture
- Use a fine-mesh strainer to remove any remaining solids
- Store the sea moss gel in a clean, airtight container in the refrigerator
Special Equipment or Techniques to Improve the Quality of Sea Moss Gel
While no special equipment is required to make sea moss gel, using a high-powered blender can help achieve a smoother texture. Additionally, soaking the sea moss in coconut water instead of plain water can add extra flavor and nutrition.
Common Mistakes to Avoid
The most common mistake made when making sea moss gel is not soaking the sea moss for long enough. It’s important to give it enough time to soften before blending it to achieve the best possible texture.
VI. Unlocking the Benefits of Sea Moss: How to Make Your Own Gel
Sea moss is a nutrient-dense superfood that has been used for centuries for its health benefits. Incorporating sea moss gel into your daily routine can help boost your immune system, improve digestion, and promote overall wellness.
Explanation of the Health Benefits of Sea Moss
Sea moss is high in essential vitamins and minerals, including iodine, calcium, and magnesium. It is also rich in antioxidants, which can help protect the body against disease. Consuming sea moss gel can help boost the immune system, aid in digestion, and improve skin health.
Ways to Incorporate Sea Moss into Your Daily Routine
There are many ways to incorporate sea moss gel into your daily routine. You can add it to smoothies, oatmeal, or yogurt for a nutritious breakfast, or use it as a natural thickener in soups and stews. You can also use sea moss topically in the form of a face mask to improve skin health.
How Making Your Own Sea Moss Gel is More Cost Effective
Buying pre-made sea moss gel can be expensive, but making your own at home is a cost-effective way to enjoy the benefits of this nutritious ingredient. By buying high-quality sea moss in bulk, you can save money and make your own sea moss gel whenever you need it.
VII. Transform Your Health with Homemade Sea Moss Gel: An Easy Tutorial
Your health is in your hands, and making your own sea moss gel is an easy way to take control of your wellness. By incorporating sea moss gel into your daily routine, you can help boost your immune system, aid in digestion, and promote overall health and wellness.
How Making Your Own Sea Moss Gel is a Way to Take Control of Your Health
By making your own sea moss gel, you can ensure that you are using high-quality, organic sea moss and controlling the ingredients that go into your gel. This puts you in control of your health and wellness.
Other Ways to Improve Health and Wellness
In addition to making sea moss gel, there are many other ways to improve your health and wellness:
- Eat a balanced diet rich in whole, unprocessed foods
- Exercise regularly
- Get enough sleep
- Manage stress through mindfulness and other relaxation techniques
How to Incorporate Sea Moss Gel into Your Daily Routine
There are many ways to incorporate sea moss gel into your daily routine. You can add it to smoothies, oatmeal, or yogurt for a nutritious breakfast, or use it as a natural thickener in soups and stews. You can also use sea moss topically in the form of a face mask to improve skin health.

VIII. Healthy Habits Start in the Kitchen: How to Make Sea Moss Gel Yourself
Healthy habits start in the kitchen, and making your own sea moss gel is a simple and easy way to improve your health and wellness. By taking control of the ingredients that go into your gel, you can ensure that you are getting the best possible nutrition.
Links Between Diet and Overall Health
There is a strong link between diet and overall health. Consuming a diet rich in whole, unprocessed foods can help reduce the risk of chronic diseases such as heart disease, diabetes, and cancer.
How Making Your Own Sea Moss Gel is a Healthy Habit
Making your own sea moss gel is a healthy habit because it allows you to control the quality of the ingredients that go into your gel. By using high-quality, organic sea moss and natural flavorings, you can ensure that you are getting the best possible nutrition.
Encouragement to Try Making Sea Moss Gel
If you haven’t yet tried making sea moss gel at home, we encourage you to give it a try. It’s a simple and easy way to add nutrition to your diet and take control of your health and wellness.
IX. Conclusion
Making sea moss gel at home is a simple and cost-effective way to add nutrition to your diet and improve your health and wellness. By following our step-by-step guide, you can create a smooth and delicious sea moss gel in your own kitchen. We encourage you to try making sea moss gel today and experience the many health benefits of this nutrient-dense superfood.