I. Introduction
Winter is one of the most beautiful seasons of the year, and with it comes an abundance of snowflakes. But did you know you can bring the beauty of snowflakes indoors by making your own paper snowflakes? In this article, we’ll explore the various angles of making paper snowflakes, including a step-by-step guide, creative designs, seasonal decor, a fun activity for kids, the science of snowflakes, eco-friendly materials, and much more. Our aim is to inspire and provide you with the knowledge and tools to create unique and beautiful paper snowflakes.
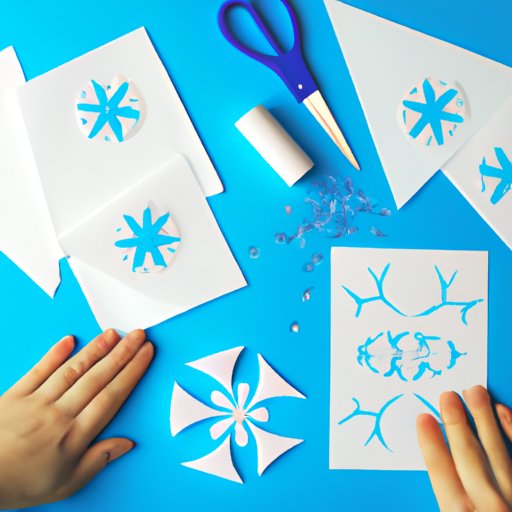
II. Step-by-Step Guide
The first step to creating paper snowflakes is gathering the necessary materials. You will need white or colored paper, scissors, and a pencil. Follow these simple instructions to make your paper snowflakes:
- Take a square piece of paper and fold it in half diagonally to form a triangle.
- Take the triangle and fold it in half again to form a smaller triangle.
- Begin creating a pattern by cutting small shapes out of the edges of the triangle.
- Unfold the paper to reveal your unique paper snowflake.
For a more detailed guide, follow this YouTube tutorial. For more complex designs, you can fold the paper multiple times or create more intricate patterns.
III. Creative Designs
Now, let’s showcase some unique designs and patterns for paper snowflakes. Here are some examples:
- Five-pointed snowflake: This is the most basic snowflake design. Simply cut triangles out of each side of the folded triangle.
- Six-pointed snowflake: This is the most common snowflake design. Fold the paper twice to create a smaller triangle, then cut the paper in a circular or triangular shape.
- Eight-pointed snowflake: Start by folding the paper in half, then in half again. Cut out shapes of your choosing from each side and repeat the process on all four sides.
- Layered snowflake: Cut three or four pieces of paper of different sizes, fold them in half, and cut a simple shape out of each side. Then stack the snowflakes together and staple them in the center to create a layered snowflake.
For more creative ideas and visual aids, check out this video tutorial. Remember to experiment with different patterns and shapes to create your own unique snowflake designs!
IV. Seasonal Decor
Paper snowflakes make perfect decorations during the winter season, and there are plenty of ways to incorporate them into your home decor. Here are some ideas:
- Create a snowflake garland: Cut multiple snowflakes of the same size and string them together to create a garland. Hang the garland on your fireplace or use it to decorate your Christmas tree.
- Make a mobile: Cut multiple snowflakes in a variety of sizes and hang them from a wire hanger. Hang the mobile in a window or from the ceiling.
- Decorate your windows: Use a simple sticky adhesive to attach your snowflakes to your windows. You can create a winter wonderland by covering the entire window pane with snowflakes.
For more ideas, check out this video tutorial.
V. Fun Activity for Kids
Paper snowflakes are also a fun activity for kids, and they can be incorporated into holiday crafts or artwork. Here are some ideas:
- Make snowflake ornaments: Cut snowflakes out of various sizes and glue them together in a layered formation. Add a ribbon for hanging.
- Create snowflake paintings: Use white paint on blue paper to create a winter scene. Then, glue paper snowflakes on top of the painting to add texture.
- Collaborative snowflakes: Have multiple children work together to create a giant snowflake. Each child can make a unique snowflake, then they can be combined to form a large masterpiece.
For more kid-friendly ideas and visual aids, check out this video tutorial.
VI. The Science of Snowflakes
Did you know that all snowflakes are unique and have a specific shape? Snowflake formation is a fascinating process, and making paper snowflakes can be a fun way to learn about the science behind it. Here’s how to create realistic-looking paper snowflakes:
- Start by folding the paper in half twice to create a smaller square – this will resemble the ice crystals of a snowflake.
- Next, fold the square diagonally to create a smaller triangle, then fold the triangle in half to create a smaller triangle.
- Begin the cutting process by making small cuts on the edges of the folded triangle, creating a unique pattern.
- Unfold the triangle to reveal your realistic-looking snowflake.
For a more detailed guide, check out this video tutorial.
VII. Eco-Friendly Materials
Making paper snowflakes can be eco-friendly too! Instead of buying new paper, you can use scrap paper, old books, or even brown paper bags. Here are some eco-friendly materials you can use to create your snowflakes:
- Newspaper
- Brown paper bags
- Recycled Christmas wrapping paper
- Old books or magazines
- Recycled printer paper
By using these alternative materials, you can reduce your environmental impact and create unique and beautiful snowflakes.
VIII. Conclusion
The possibilities for paper snowflakes are endless. Whether you’re making them with kids, decorating your home, or exploring the science behind their formation, creating paper snowflakes is a fun and creative activity. We hope this article has inspired you and provided you with the knowledge and tools to create unique and beautiful paper snowflakes. Don’t be afraid to experiment with different designs and materials.