Introduction
Paper airplanes are a timeless and fun activity that has been enjoyed by generations of humans. Despite their ubiquity, many people struggle to make paper airplanes that actually fly well. That’s why we’ve put together this article, which will walk you through the step-by-step process of making your own paper airplane. In addition to the basic instructions, we’ll also provide folding techniques for more advanced designs, a video tutorial for visual learners, and a brief history of paper airplanes.
Step-by-Step Instructions
The first thing you’ll need for making paper airplanes is a piece of paper. Any kind of paper will work, although lightweight paper is generally better since it will be easier to fly. You’ll also need a pair of scissors.
Let’s start with a basic design:
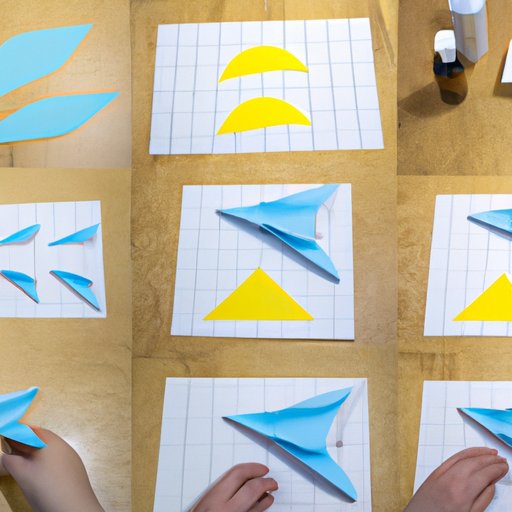
1. Fold the paper in half vertically, making a crease down the middle. Unfold the paper and you should see the crease running down the center.
2. Fold the top corners of the paper down to the center crease, so that the edges line up with it. This will create a small triangle at the top of the paper.
3. Fold the top part of the paper down so that the top edge lines up with the bottom edge of the triangle you just created. Make a crease, then unfold the paper.
4. Next, fold the top corners of the paper down once more, this time so that they meet the halfway line created in step 1.
5. Fold the entire plane in half along the crease you made in step 3. Then fold the wings down, creating two flaps that are angled upwards.
To test your paper airplane, hold it by the bottom with the nose facing upwards. Give it a gentle toss and see how it flies. If it doesn’t fly as well as you’d like, you can adjust the angles of the wings to make it fly better.
If you’re feeling ready for a more advanced paper airplane design, try these steps:
1. Follow step 1 from the basic design.
2. Fold the top edge of the paper down to meet the center crease.
3. Fold the top corners down to meet the center crease, making two triangular flaps.
4. Fold the top of the paper down again so that it meets the bottom edge of the triangle created in step 3.
5. Fold the entire plane in half along the crease from step 1, then fold the wings down as before.
With practice, you can adjust the angles and flaps of your paper airplanes to make them fly further and smoother.
Video Tutorial
While written instructions and diagrams can be helpful, some people learn better by seeing things in action. That’s where video tutorials come in. Check out this video tutorial for making a paper airplane. The tutorial is easy to follow and provides helpful tips for making your airplane fly better.
Historical Context
Paper airplanes have a surprisingly rich history, dating all the way back to ancient China. Before airplanes were invented, people would fold paper into various shapes, including birds. These folded papers were called “zhezhi” in China and “origami” in Japan.
In the early 20th century, paper airplanes began to take on a new significance when they were used as a tool for studying aerodynamics. The U.S. Army commissioned Jack Northrop, a prominent aviation engineer, to design and test paper airplanes to better understand how airplanes were affected by wind and other factors.
Since then, paper airplanes have become a fun and lighthearted aspect of aviation, with many people creating their own designs and competing in paper airplane contests.
Folding Techniques
There are countless designs for paper airplanes, each with their own unique folding techniques. Here are a few examples:
– The Dart: This design has a very sleek and aerodynamic shape. Start with a piece of paper folded in half vertically, then fold the top corners down to meet the center crease. Fold the top edges down again to the center crease, then fold the paper in half along the center crease. Finally, fold the wings down as before.
– The Glider: This design uses more subtle adjustments to create a smoother, more graceful flight. Start by folding the paper in half down the center crease, then fold the top corners down to the bottom edge of the paper. Fold the top of the paper down so that it lines up with the bottom edge of the triangular flaps you created. Fold the paper in half along the center crease, then create a small wing flap on the back of the plane by folding the edges of the paper up diagonally.
Once you understand these folding techniques, you can start to experiment with your own designs and modifications.
Decorating Paper Airplanes
Part of the fun of making paper airplanes is the ability to customize them with your own decorations. Here are a few ideas for how to decorate your paper airplanes:
– Use stickers or markers to add designs to the wings or body of the plane.
– Create a unique color scheme using different colors of paper or paint.
– Add characters or images to the paper to create a themed airplane.
By experimenting with different decorations, you can make your paper airplanes truly one-of-a-kind.
Conclusion
Making paper airplanes is a fun and creative activity that has been enjoyed by people for centuries. With a little practice and experimentation, you can create your own unique designs that fly smoothly and look great. By following the step-by-step instructions, folding techniques, video tutorial, and decorating tips in this article, you’ll be well on your way to becoming a paper airplane expert.