I. Introduction
There’s something about crispy, juicy chicken tenders that just hits the spot. They’re great for a quick and easy meal, as a snack, or even as party food. And while it may be tempting to just grab a box of frozen tenders from the grocery store, making them from scratch is easier than you might think. In this article, we’ll cover everything you need to know about making chicken tenders, including recipes and techniques for getting the perfect texture, flavor, and crunch.
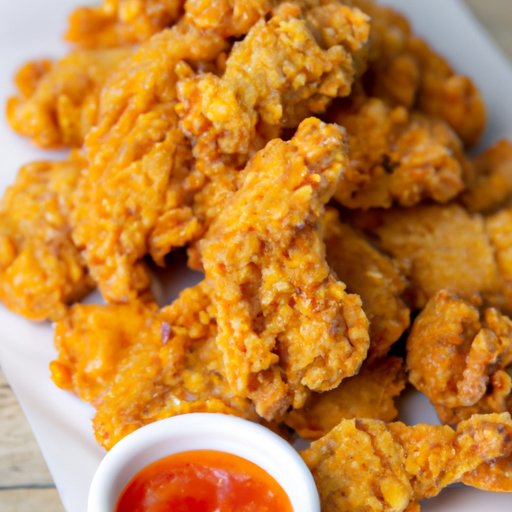
II. 5 Easy Steps to Perfectly Crispy Chicken Tenders
If you’re looking for a foolproof guide to making crispy chicken tenders, look no further. This five-step process will ensure your tenders come out perfect every time:
Step 1: Prep your chicken
Start with boneless, skinless chicken breasts or tenderloins and cut them into strips. For best results, make sure they’re the same size and thickness. Pat them dry with paper towels to remove excess moisture.
Step 2: Coat your chicken
You’ll need three bowls for coating your chicken. The first bowl should have flour, the second should have beaten eggs, and the third should have a mixture of breadcrumbs and seasonings like salt, pepper, garlic powder, and paprika. Dip each chicken strip into the flour, then the egg, and finally the breadcrumb mixture, pressing the breadcrumbs onto the chicken to ensure they stick.
Step 3: Chill your chicken
Place your chicken strips onto a baking sheet lined with parchment paper and chill them in the refrigerator for at least 30 minutes. This will help the coating adhere to the chicken and prevent it from falling off during cooking.
Step 4: Cook your chicken
You have two options for cooking your chicken tenders: in the oven or on the stove. To bake them in the oven, preheat your oven to 400°F and line a baking sheet with parchment paper. Place the chicken strips on the sheet and bake for 20-25 minutes or until they’re golden brown and crisp. To cook them on the stove, heat up some oil in a frying pan or deep fryer and cook the chicken strips until they’re crispy and cooked through, around 3-4 minutes per side.
Step 5: Serve and enjoy!
Once your chicken tenders are cooked, serve them hot with your favorite dipping sauce and sides.
III. A Foolproof Recipe for Homemade Chicken Tenders
If you’re looking for a recipe to follow for making homemade chicken tenders, this one won’t steer you wrong. Here’s what you’ll need:
– 1 pound boneless, skinless chicken breasts or tenderloins
– 1/2 cup all-purpose flour
– 2 eggs, beaten
– 1 1/2 cups breadcrumbs
– 1 teaspoon salt
– 1/2 teaspoon black pepper
– 1/2 teaspoon garlic powder
– 1/2 teaspoon paprika
– Cooking oil for frying
Here’s how to make them:
Step 1: Prep your chicken
Follow the same instructions as Step 1 in the previous section.
Step 2: Coat your chicken
Follow the same instructions as Step 2 in the previous section.
Step 3: Chill your chicken
Follow the same instructions as Step 3 in the previous section.
Step 4: Cook your chicken
Heat up about an inch of oil in a frying pan over medium-high heat. Once the oil is hot, drop in the chicken strips and cook for around 3-4 minutes per side or until they’re crispy and golden brown. You may need to cook them in batches.
Step 5: Serve and enjoy!
Follow the same instructions as Step 5 in the previous section.
IV. The Secret to Restaurant-Quality Chicken Tenders at Home
If you’ve ever wondered why restaurant chicken tenders always seem to be extra crispy and juicy, it’s because they use a few special techniques and ingredients. Here’s how you can replicate that restaurant quality at home:
Use buttermilk to marinate your chicken
Buttermilk helps to tenderize chicken and gives it a tangy flavor. Marinate your chicken in buttermilk for at least an hour, or overnight if possible, before breading and cooking.
Double coat your chicken
Instead of dipping your chicken tenders in the coating mixture just once, dip them a second time to create an extra-thick, crispy coating.
Add some cornstarch to your breadcrumb mixture
Cornstarch helps to create an extra-crispy coating on the outside of the chicken.
Fry in peanut oil
Peanut oil has a high smoke point and a mild flavor that won’t overpower the chicken. Use it to fry your chicken tenders for that extra-crispy texture.
V. Healthy Chicken Tenders: A Better-for-You Recipe
If you’re looking for a healthier version of chicken tenders, this recipe uses a few healthier ingredients to create a delicious and nutritious meal:
– 1 pound boneless, skinless chicken breasts or tenderloins
– 1/2 cup whole wheat flour
– 2 eggs, beaten
– 1 1/2 cups panko breadcrumbs
– 1 teaspoon salt
– 1/2 teaspoon black pepper
– 1/2 teaspoon garlic powder
– 1/2 teaspoon smoked paprika
– Cooking spray
Here’s how to make them:
Step 1: Prep your chicken
Follow the same instructions as Step 1 in the previous sections.
Step 2: Coat your chicken
Ditch the standard flour and breadcrumbs and instead use whole wheat flour and panko breadcrumbs. Follow the same instructions as Step 2 in the previous sections.
Step 3: Chill your chicken
Follow the same instructions as Step 3 in the previous sections.
Step 4: Cook your chicken
Preheat your oven to 400°F and line a baking sheet with parchment paper. Spray the chicken strips with cooking spray and bake for 20-25 minutes, flipping them halfway through, or until they’re golden brown and cooked through.
Step 5: Serve and enjoy!
Follow the same instructions as Step 5 in the previous sections, and consider serving your chicken tenders with a side salad or roasted veggies for a balanced meal.
VI. Gluten-Free Chicken Tenders: How to Make Them from Scratch
Making gluten-free chicken tenders is just as easy as making regular chicken tenders. Here’s what you’ll need:
– 1 pound boneless, skinless chicken breasts or tenderloins
– 1/2 cup gluten-free flour blend
– 2 eggs, beaten
– 1 1/2 cups gluten-free breadcrumbs
– 1 teaspoon salt
– 1/2 teaspoon black pepper
– 1/2 teaspoon garlic powder
– 1/2 teaspoon paprika
– Cooking oil for frying
Here’s how to make them:
Step 1: Prep your chicken
Follow the same instructions as Step 1 in the previous sections.
Step 2: Coat your chicken
Use a gluten-free flour blend and gluten-free breadcrumbs in place of the standard versions. Follow the same instructions as Step 2 in the previous sections.
Step 3: Chill your chicken
Follow the same instructions as Step 3 in the previous sections.
Step 4: Cook your chicken
Follow the same instructions as Step 4 in the previous sections, using a gluten-free cooking oil like vegetable or canola oil.
Step 5: Serve and enjoy!
Follow the same instructions as Step 5 in the previous sections.
VII. Get Creative with Chicken Tenders: Fun Flavors and Dipping Sauces to Try
Chicken tenders don’t have to be boring – try out these ideas for fun new flavors and dipping sauces:
Season your chicken with different spices
Try seasoning your chicken with cajun spice, ranch seasoning, lemon pepper, or any other spice or herb blend you like.
Add some crunch with different coatings
Instead of traditional breadcrumbs, try panko breadcrumbs, crushed cornflakes, crushed potato chips, or even crushed tortilla chips.
Get creative with your dipping sauces
Use your favorite condiments like BBQ sauce, honey mustard, ketchup, ranch dressing, or salsa. Or try making your own dipping sauce by mixing mayo, sour cream, or Greek yogurt with herbs, spices, or citrus juice.
VIII. Conclusion
Making crispy, delicious chicken tenders at home is easy once you know the tricks. With our step-by-step guides and recipes, you’ll be able to create perfect chicken tenders every time.