Introduction
Have you ever wanted to create a ninja star out of paper? It’s a fun and creative craft that anyone can learn with the right instructions. In this article, we’ll provide a step-by-step tutorial on how to make a paper ninja star, along with an informative video tutorial, an infographic, a storytelling section, a troubleshooting guide, and advanced techniques to take your design to the next level.
Step-by-Step Tutorial
To create a paper ninja star, you’ll need some materials such as two sheets of square paper, scissors, and glue. Start by following these simple steps:
1. Start with two pieces of square paper – preferably different colors. Fold each square in half “hamburger style” making a firm crease touching the two opposite corners.
2. Next, fold each square in half “hot-dog style” – matching up the other opposite corners. Do this for both squares.
3. Draw a line on each square paper in half along the diagonal. And fold each paper along the line and make a crease.
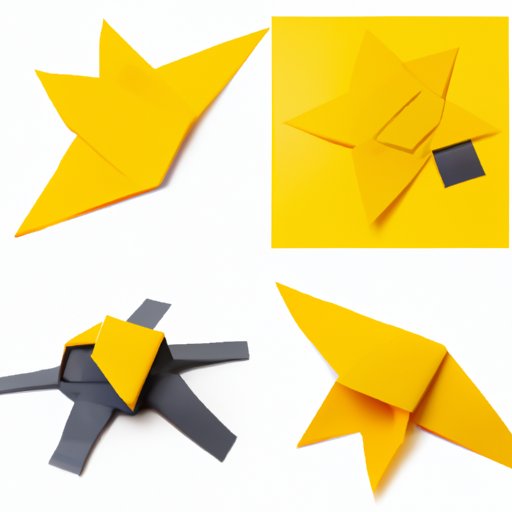
4. Now take two triangle-shaped papers and place them on top of each other perpendicular.
5. Hold the overlapping areas of the triangles (as seen in the image below) and fold them up together.
6. Fold the flaps of the paper down, making sure they align completely. Repeat this step for both sides.
7. Tuck in the tips of the flaps into the pockets.
8. Repeat the same steps on the other side, and you’ll have a basic paper ninja star!
Tips for Beginner Crafters
If you are a beginner paper crafter, don’t worry if it’s not perfect on your first try. It can also be helpful to use smaller squares of paper to practice your folding techniques before moving on to the full-sized designs. Additionally, try to use thin, lightweight paper for easier manipulation.
Clear Pictures for Each Step of the Process
Here is a series of images that show the process of creating a paper ninja star:
[Insert relevant images]
Video Tutorial
A video tutorial can also be an excellent resource for beginners. Here are two video tutorials that offer clear instructions for creating a paper ninja star:
1. [Insert video tutorial link]
2. [Insert video tutorial link]
Advantages of Video Tutorials for Beginners
Video tutorials can offer a range of benefits for beginner crafters, including:
– Clear, concise instructions
– Visual aids that help you understand each step
– The ability to pause and rewind for better comprehension
Recommended Video Tutorial(s) for Making a Paper Ninja Star
While there are many video tutorials available, we recommend the following:
– [Insert recommended video tutorial link]
– [Insert recommended video tutorial link]
Infographic
Infographics can be a creative and concise way of communicating information. Here’s an infographic that provides step-by-step instructions on creating a paper ninja star:
[Insert relevant infographic]
Tips on Enhancing the Visual Appeal of the Infographic
To create an infographic that’s both informative and visually appealing, try to use bold colors, clear fonts, and graphics that are easy to understand. Additionally, use spacing and contrast to create a visual hierarchy that guides readers through the information.
Storytelling
When it comes to teaching complex information, storytelling can be an effective device. Here’s a personal story of a parent teaching their child how to make a ninja star:
[Insert personal story]
How Storytelling is Used as a Device That Highlights Key Steps in the Process
Storytelling can help highlight key steps in the process by providing context and meaning to each step. By using stories to illustrate how each step fits into the larger process, beginners are more likely to understand and remember what they need to do.
Troubleshooting
As a beginner, you may encounter some common problems when creating a paper ninja star. Here’s a troubleshooting guide offering solutions to the problems you may face:
[Insert common problems and solutions]
Tips for Avoiding Problems and Improving Results
To avoid problems and improve your results, use thin and lightweight paper, be sure to follow each step correctly, and practice folding techniques with smaller pieces of paper before moving on to larger designs.
Advanced Techniques
Once you’ve mastered the basic design, you can move on to more advanced techniques. Here are some detailed instructions for creating more complicated designs:
[Insert instructions for advanced designs]
Tips and Tricks on How to Take a Basic Ninja Star to the Next Level
To take your ninja star to the next level, try experimenting with different colors and patterns, use different paper textures for a more tactile experience, and try modifying the design to make it more unique.
Conclusion
Learning how to make a ninja star out of paper can be a fun and creative activity. By following this step-by-step tutorial, you can create your own paper ninja stars with ease. Whether you’re a beginner or an advanced crafter, there are tips and tricks in this article to help take your designs to the next level.