I. Introduction
If you’re looking for a creative and festive way to give money as a gift, a money lei may be just the thing you need. A money lei is a garland or necklace made out of paper money folded in a certain way and strung together with ribbon or twine. It’s a popular tradition in many cultures, especially in Hawaii, where lei-making is a cherished part of the local culture.
In this article, we’ll show you how to make your own money lei from start to finish. Whether you’re a crafty person or a beginner, our step-by-step guide will give you all the information you need to create a stunning and memorable gift. We’ll also provide you with some tips and ideas for decorating your lei, customizing it for different occasions, and making it last for a long time.
Here’s what you’ll need to get started:
- Currency you’ll be using
- Ribbon or twine
- Scissors
- Glue or double-sided tape
II. Step-by-Step Guide
1. Preparing the currency
Before you start folding your currency, make sure it’s clean and crisp. You can iron the bills if necessary. If you’re using different denominations of currency, sort them out according to value and design.
2. Creating the base of the lei
To start your lei, take a long strip of ribbon or twine and fold it in half. Tie a knot at the halfway point, leaving two long tails on either side. This will be the center of your lei.
Next, tie a knot around the center knot using a short piece of ribbon or twine. This will be the foundation for your lei.
3. Adding the currency to the lei
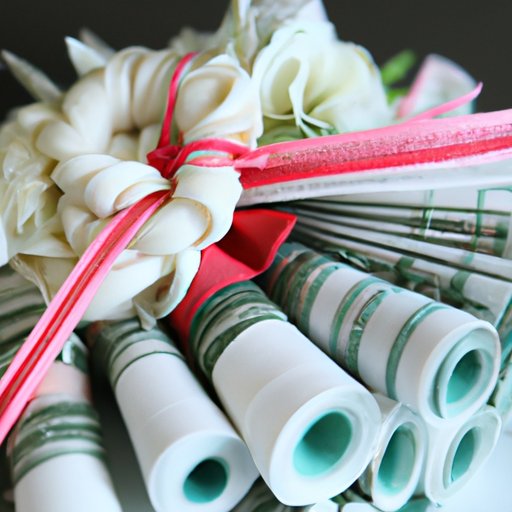
Now you’re ready to start adding your bills. Fold each bill in half lengthwise, creasing it down the middle. Then fold it in half again, creasing it along the short edge. You should end up with a bill that’s about one-fourth its original size.
Slide each folded bill onto the foundation ribbon or twine so that the knots are hidden inside the folds. Push the bills as close together as possible to create a full and dense lei. Continue adding bills until you’ve reached your desired length.
4. Securing the ends of the lei
Once you’ve added all your bills, tie the two ends of your lei together securely with a knot. You can also use glue or double-sided tape to keep the bills from sliding around.
5. Optional decorations
If you’d like to add some extra flair to your money lei, you can use flowers, beads, or other decorations. Simply tie them onto the ribbon or twine between the bills. You can also curl the ends of the bills for a more festive look.
III. Video Tutorial
For those who prefer visual instructions, we’ve put together a video tutorial that shows you how to make a money lei step by step. Check it out below:
IV. Themed or Occasion-based Lei Making
If you’re making a money lei for a special occasion, such as a graduation or wedding, you can customize it to fit the theme. For example:
- For a graduation lei, use bills in the graduate’s school colors, or add a graduation cap decoration made out of paper or felt.
- For a wedding lei, use bills in the couple’s lucky numbers, or add miniature wedding bells or flowers.
- For a birthday lei, use bills with the person’s age, or add candles or balloons.
Here are some pictures of sample leis to give you some inspiration:
INSERT PICTURES HERE
V. History of Lei Making
Lei-making is a long-standing tradition in many cultures, including Hawaiian, Polynesian, and Maori. Originally, leis were made of natural materials, such as flowers, leaves, and shells, and were worn as a symbol of affection, respect, or celebration.
The practice of making money leis is a more recent development, likely influenced by the popularity of cash gifts and the creative spirit of lei-makers. While some purists may object to using currency in lei-making, others see it as a way to honor the tradition while adding a modern twist.
Some of the traditional materials used in lei-making, such as ribbon, string, and feathers, can still be incorporated into money leis for an authentic touch.
Here are some pictures and descriptions of traditional lei-making materials:
INSERT PICTURES HERE
VI. Best Practices for Money Lei Making
To make sure your money lei looks beautiful and lasts a long time, here are some tips and best practices to keep in mind:
- Use new, clean bills that aren’t crumpled or torn
- Handle the bills with care to avoid creasing or ripping them
- Make sure your knots are tight and your bills are secure
- Avoid exposing the lei to moisture or direct sunlight, as this can damage the bills
- Experiment with different ribbon or twine colors and textures to create unique looks
- Consider using real flowers or leaves to add to the traditional feel of your lei
VII. Conclusion
Making a money lei is a fun and rewarding activity that can result in a beautiful and meaningful gift. By following our step-by-step guide, you’ll be able to create a stunning lei that’s sure to impress. Don’t be afraid to experiment with different materials, decorations, and themes to make your lei truly unique.
We hope you’ve enjoyed our article and found it helpful.