I. Introduction
Boutonnieres are a small but essential detail when it comes to weddings, proms, and other formal events. A beautifully crafted boutonniere can elevate any outfit and add a touch of elegance and personality to your attire. In this article, we’ll show you how to make a variety of boutonnieres, from classic to rustic and even non-floral designs. We’ll cover all the necessary materials and provide step-by-step instructions to help you create your own custom boutonniere.
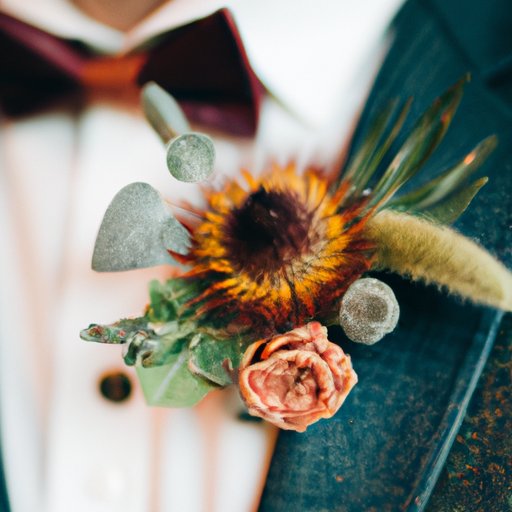
II. How to Make a Classic Boutonniere
The classic boutonniere is timeless and elegant, typically featuring a single flower and some greenery. To create a classic boutonniere, you’ll need the following materials:
- A flower of your choice
- Greenery, such as eucalyptus or ferns
- Wire cutters
- Floral tape
- Pins or magnets
Once you have all your materials, follow these simple steps:
- Cut the stem of your flower to around 2-3 inches in length, and remove any leaves or thorns.
- Add a few pieces of greenery to the stem, trimming them to the same length as the flower.
- Bind the stem and greenery together using floral tape.
- Attach a pin or magnet to the base of the stem to secure the boutonniere to your lapel or shirt.
To ensure that your classic boutonniere looks its best, be sure to choose high-quality, fresh flowers and greenery. Don’t be afraid to experiment with different types of flower and greenery combinations, and remember to keep the color scheme in mind, coordinating with the rest of your outfit.
III. DIY Boutonniere for Weddings
Your wedding day is an opportunity to personalize your boutonniere and make it truly unique. Here are the steps to follow:
- Choose flowers and greenery matching your wedding colors and themes. You may want to include personal touches like buttons, small pine cones, or miniature paper or ribbon accents.
- Aside from the flowers and greenery, you’ll also need floral wire, pliers, floral tape, and fabric glue.
- Cut three 4-inch lengths of floral wire and floral tape them together to create one thick wire stem.
- Bend the wire in half to create a loop, shaping it like a horseshoe while twisting the stem. Be sure that the looped end is bigger in diameter than the blossom if you’re working with a smaller flower.
- Apply a drop of glue to the stem of the blossom and secure it to the middle of the wire loop, either facing upwards or sideward. Wrap the wire stem onto the flower stem.
- Spread the blossom guard onto the stem of the flower from right below the flowerhead, going down. This stops water drainage and makes the flowers last longer.
- Position the flowers and greenery onto the loop, making sure that the combination is harmonious and balanced. Adjust the blossoms to avoid looking cramped. Shield the backs of the blossoms with additional greenery.
- Twist the wire below the greenery or blossoms to bind them to the loop. Cover it with floral tape to hold it in place and also use it to wrap the loop, including the top part of the stems. Cut excess floral tape with scissors.
- For the final touch, wrap the ends of the stems with ribbon and secure with floral pins or a magnet.
A wedding boutonniere is a perfect opportunity to include significant personal elements that may not match the rest of your outfit but remind you of important things. A family heirloom tied around the stem, a symbolic tendril of ivy, or a trinket resembling a hobby can all brighten up your day.
IV. Crafting a Rustic Boutonniere
Rustic boutonnieres are a perfect way to channel a natural and relaxed look. The following are the steps:
- Pick flowers and greenery with a rustic vibe, such as berries, wheat, lavender, and twine string.
- You’ll also need floral wire, pliers, floral tape, and ribbon or twine.
- Gather your greenery and wrap floral wire around the stem. Twist the wire tightly around the stem leaving some wire dangling down.
- Attach your flower head onto the top of the stem using floral tape and wrap floral tape around the stem and wire together.
- Choose a length of twine, and tie it around the base of the flowers and braid it through the dangling wire to tie a bow. You can even personalize it by attaching a small item, such as a charm or a locket, to the twine.
A rustic boutonniere is a perfect addition to any nature-inspired nuptials. Be creative and experiment with various natural materials and textures – the options are infinite.
V. Making a Boutonniere with Non-Floral Materials
Non-floral boutonnieres are versatile and innovative. Here’s how to make them:
- Select intriguing items such as feathers, beads, buttons, seashells, or fabric scraps, and plan a mix that will make your boutonniere look the best.
- Gather the materials you need: floral wire, pliers, floral tape, hot glue gun, and a backing material such as ribbon or burlap.
- Decide how you want your boutonniere to look – play around with the order, size, and amount of materials to get the right appearance.
- Cut floral wire to the appropriate length for the centralized element, then start adding the rest of the materials along the wire by twisting and wrapping the wire ends around the elements, using floral tape to secure the elements in place.
- Once you’ve arranged your elements as planned, secure everything together using hot glue, then finish by wrapping the wire with ribbon or burlap.
- Pin your creation to your lapel or shirt and enjoy it.
Boutonnieres made with non-floral materials are not only visually appealing but also sustainable, making them an excellent choice for eco-conscious consumers.
VI. Simple and Elegant Boutonnieres
Elegance and simplicity go a long way when it comes to boutonnieres. These instructions will show you how to craft a simple, elegant boutonniere that you’ll admire:
- Choose lush, well-shaped flowers that create a bold statement despite their modesty.
- Gather the other necessary supplies, including floral wire and tape and rubber bands.
- Cut the stem of the flower to the length you want, and remove any leaves using a clean cut.
- Wrap floral wire around the stem of the blossom twice and twist the wire ends to secure it in place.
- Initially, the wire may make it seem a bit unstable, but you can fix it with a rubber band that you place over the flower and underneath the knot of the wire wrap.
- Wrap floral tape over the wire and rubber band, beginning at the base of the flower and extending up the wire stem. Keep pulling the tape and level it up with your fingers until it sticks. Try to wrap floral tape tightly enough to allow for durability but not too tight when stunting the flowers.
- You may add additional greenery or ribbon to the stem if you choose.
- Secure the boutonniere to your lapel or shirt using a magnet or a simple sewing pin.
A simple boutonniere will always add a touch of elegance to your outfit and usually looks more natural than an elaborate one. Keep your color palette basic, and you’ll have an elegant accessory that’ll match any outfit.
VII. Conclusion
Creating your own boutonniere is an excellent way to add a personal and unique touch to your outfit, and it’s easier than you think. With the right materials and a little bit of know-how, you can make a variety of beautiful and memorable boutonnieres for your next big event. Whether you’re creating a classic boutonniere, a rustic design, a personalized wedding boutonniere, or a non-floral design, the tips and tricks in this article will guide you and inspire you. So let your creativity flow, and enjoy creating your own custom boutonnieres.