Introduction
A ceiling fan is a great addition to any home, providing comfort through air circulation while also adding style to a room. Installing a ceiling fan yourself can also save you money on installation fees and give you a new DIY skill. In this guide, we’ll break down the steps for installing a ceiling fan.
Step-by-Step Guide to Installing a Ceiling Fan: A Beginner’s Tutorial
Before we get started, make sure to turn off power to the room you will be working in. You’ll also need several tools, including a ladder, screwdriver, wire strippers, pliers, and a voltage detector. Safety goggles and gloves are also recommended. Once you have everything you need, follow these steps:
Step One: Assemble Ceiling Fan Mount and Hardware
Check the manufacturer’s instructions to make sure you have all the necessary pieces, and then lay out the parts to ensure nothing is missing. This step’s specifics depend on your ceiling fan’s design, but it typically involves attaching the downrod, canopy, and other hardware.
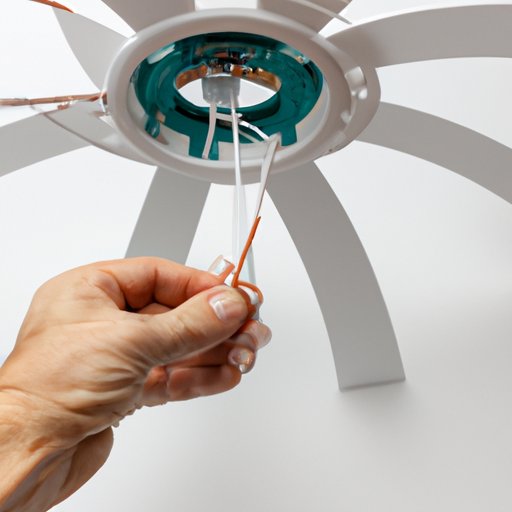
Step Two: Attach Mounting Bracket to Ceiling
With the help of a friend, hold the mounting bracket to the ceiling and screw it into place. Make sure it’s level, and use a voltage detector to confirm that there are no live wires in the area where you want to install the fan.
Step Three: Install Ceiling Fan Bracket
Attach the ceiling fan bracket to the mounting bracket, following the manufacturer’s instructions. It’s important to check that all screws are tightened and that it’s level.
Step Four: Install Fan Motor
Attach the fan motor to the ceiling bracket, following the manufacturer’s instructions. Make sure all screws are tightened, and the motor is securely attached.
Step Five: Attach Fan Blades
Attach the fan blades to the fan motor, following the specific instructions laid out by the manufacturer. Typically, this involves matching the blades to the appropriate arms and screwing them in tightly.
Step Six: Attach Light Kit (If Applicable)
If your ceiling fan comes with a light kit, now’s the time to attach it. Follow the manufacturer’s instructions carefully to ensure that all wiring is connected correctly and safely.
Step Seven: Install Pull Chains and/or Remote Control Unit
Attach the pull chains and/or remote control unit, following the specific manufacturer’s instructions. This step is optional, but most ceiling fans come with pull chains to adjust the fan speed and turn the light on and off.
Step Eight: Test Fan to Ensure Everything Is Properly Installed
Double-check all screws and wiring to ensure everything is securely attached. Turn the electricity back on and test the fan to ensure it’s functioning properly.
DIY Ceiling Fan Installation: Tips, Tools, and Techniques for Success
Before you dive in, there are some tips to keep in mind when performing a DIY installation:
Tip 1: Choose the Right Fan for Your Space
When selecting a ceiling fan to install, take your room’s size into consideration. The fan should be appropriately sized to move the amount of air you’ll need in your room. Larger rooms require larger fans and vice versa. Most ceiling fans have size recommendations on the packaging.
Tip 2: Measure Your Ceiling Height
Make sure the ceiling height is sufficient for the fan you’ve chosen. The fan blades should be at least 7 feet from the floor to prevent head injuries and ensure maximum efficiency. If your ceiling is lower than 8 feet, you may need to install a flush-mounted fan instead.
Tip 3: Troubleshoot Common Issues During Installation
If something goes wrong during installation, keep these troubleshooting tips in mind:
- If the fan wobbles or shakes, check that all blades are evenly screwed in and make sure the fan is level.
- If the fan is noisy, check that all screws are tightened and that the mounting bracket is securely attached to the ceiling.
- If the fan won’t turn on or off, check that the wiring is connected correctly and that your power source is working.
- If the fan/light switches don’t work properly, make sure all wiring is connected correctly, and that the switches are compatible with your ceiling fan.
- If the fan is installed too close to the ceiling or too low for the room, you may need to reinstall it using a drop rod or move to a new location.
Tip 4: Tools You’ll Need to Install Your Ceiling Fan
You’ll need a few tools to get the job done:
- Screwdrivers
- Wire strippers
- Pliers
- Voltage detector
- Ladder or step stool
- Safety goggles and gloves
Say Goodbye to Expensive Installation Costs with These Easy Ceiling Fan Installation Steps
Hiring a professional to install a ceiling fan can be expensive. Doing it yourself can save you a significant amount of money. On average, a professional installation can cost between $75 to $150 per hour. With this guide, installing your own ceiling fan can be cost-effective, and straightforward, even for a beginner. The price of a ceiling fan can range anywhere from $30 to $500, depending on the brand and its features.
Troubleshooting Your Ceiling Fan Installation: Common Problems (and Solutions)
Installing your ceiling fan might not always go as planned. Here are some tips to help you solve common ceiling fan installation problems:
1. The Fan Wobbles or Shakes
Check that all blades are evenly attached and that the fan is properly balanced. Make sure everything is tightened and the mounting bracket and ceiling fan are level.
2. The Fan is Noisy
If your ceiling fan is a little too loud, check that all screws are properly tightened. Put a drop of oil on the motor to reduce the noise. Make sure the blades are attached to the blade arm correctly.
3. The Fan Won’t Turn On or Off
Make sure the wiring is connected correctly and that your power source is functioning. Check that the fan and light have separate wiring paths that are correctly installed.
4. The Fan/Light Switches Don’t Work Properly
If your switches aren’t working, make sure all wiring is connected correctly. Make sure the switches you’re using are compatible, and the power source can support them. It is essential to check the wiring connection at all points.
5. The Fan is Installed Too Close to the Ceiling or Too Low for the Room
Double-check that the fan blades are at least 7 feet above the floor and that the fan isn’t too close to the ceiling, preventing proper air circulation. If the fan is too low, you may need to get down-rods. If the fan is too high, you may need to install a flush mount fan instead.
Upgrade Your Home’s Look with a Ceiling Fan: A How-To Install Guide
A ceiling fan is more than a functional object. It can add a stylish element to a room and complement the decor. There are many options when it comes to ceiling fans, including various designs, number of blades, and color. Here are some tips for choosing a ceiling fan:
1. Consider Your Home’s Architecture
The ceiling fan you choose should complement your home’s style, whether it’s modern, traditional, or rustic.
2. Choose the Right Blade Size
For optimal airflow, choose the right blade size based on room size. A 52-inch fan is suitable for rooms up to 400 square feet, while a 44-inch fan is suitable for rooms up to 225 square feet.
3. Choose the Right Number of Blades
The more blades your ceiling fan has, the less air it will move. Choose the number of blades based on your preferences and the look you want to achieve.
Don’t Sweat It: Installing a Ceiling Fan Made Simple
Installing a ceiling fan yourself can be a straightforward process, and it saves you money in the long run. When tackling this project, remember to follow our step-by-step guide, and take all safety precautions. Keep it simple, and enjoy the benefits and comfort of a ceiling fan.
Still, have questions? Do not hesitate to ask us in the comment section below or share your experience with us. We are always happy to hear from our readers.