Introduction
French braids have been around for centuries and they continue to be the go-to braid for many women around the world. Not only are they beautiful, but they also provide practical benefits such as keeping hair out of your face. In this article, we will explore how to French braid your own hair step-by-step, examine the different types of French braids, discuss alternative braiding techniques, and provide tips on how to incorporate French braids into your everyday or special occasion styles.
Step-by-Step Tutorial
Before beginning, it’s important to prepare your hair. Brush your hair to remove tangles and then decide where you want your French braid to begin. To section your hair, take a comb and separate your hair starting from the top of your head to the nape of your neck, and then across from one ear to the other. This will give you three sections of hair. Now you’re ready to start.
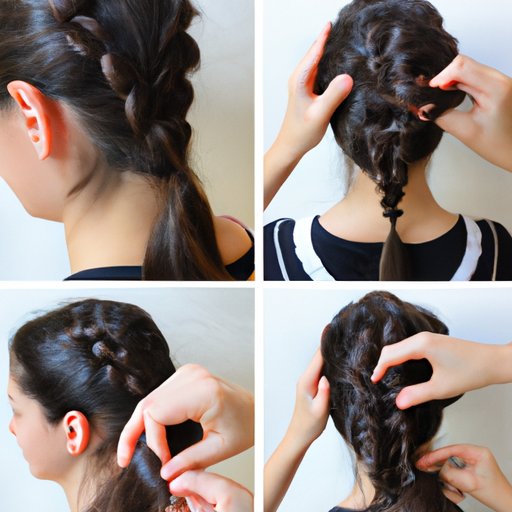
1. Take a small section of hair from the top of the head and divide it into three equal parts.
2. Begin by crossing the right strand under the middle strand, and then cross the left strand under the new middle strand.
3. Next, take a small section of hair from the right side of the head, and add it to the right strand. Then, cross the right strand over the middle strand.
4. Take a small section of hair from the left side of the head, and add it to the left strand. Then, cross the left strand over the middle strand.
5. Continue steps 3 and 4, alternately adding small sections of hair to each side and crossing those sections over the middle section until you reach the nape of your neck.
6. Now, you should have three sections of hair, one from the top, and one from each side. Braid these three sections of hair by continuing to cross the right section over the middle section, then the left section over the middle section until you reach the end of your hair.
7. Secure the braid with an elastic hair tie.
Make sure to keep the braid tight and secure by pulling each section tight before crossing it over the middle section. Also, be sure to incorporate all the hair from each side before continuing the braid. A common mistake is to leave loose strands of hair which can cause the braid to fall apart.
Explainer Piece
A French braid, also known as a “plait” originated in North Africa and eventually made its way to Europe in the early 1900s. The French braid is an intricate braid that involves crossing three sections of hair over each other while picking up additional hair each time you cross over.
The top section of a French braid is the most important and the trickiest to get right. It needs to be straight and tight to anchor the braid. The middle and bottom sections are easier to braid and can be looser.
To incorporate new sections of hair into your French braid, take a small section of hair near the top of your braid and combine it with the right or left section of your braid, depending on the direction you are braiding. Then, cross the new section of hair over the middle section of your braid.
As with the tutorial section, be sure to keep the braid tight and secure by pulling each section tight before crossing it over the middle section. A common mistake is to braid too loosely, which can cause the braid to unravel.
Beginner’s Guide
French braiding requires minimal equipment. All you need are a comb, elastic hair ties, and maybe some hair clips to keep sections separate. French braids work best on hair that is shoulder-length or longer, and can be done on straight, wavy, or curly hair.
For the best results, wash your hair the night before and let it air dry. This will help to provide some texture to the hair and make it easier to braid.
To start the braid, separate your hair using steps 1 and 2 from the tutorial section. Then, follow the steps outlined in the tutorial section until you reach the nape of your neck.
Be patient when you’re first starting out, don’t worry if you make mistakes – keep practicing until you get the hang of it. Remember, practice makes perfect.
Video Tutorial
In this video tutorial, we will guide you through the process of French braiding step-by-step, providing tips on how to keep the braid tight and secure, and how to avoid common mistakes.
Be sure to check out the video below:
Inspirational Piece
French braids are incredibly versatile and can be used for many different occasions and hairstyles. They work well as an everyday hairstyle, a workout hairstyle, and can be used for special occasions such as weddings or proms.
French braids can also be modified in different ways to create variations of the classic braid. For example, you can create a messy French braid by intentionally leaving some strands loose or high/low side French braids by changing where you start your braid.
You can also use French braids to create intricate updos or as a way to put up bangs or small tendrils of hair that fall around your face.
Alternative Techniques
If you’ve mastered the art of French braiding, you may want to try out some alternative braiding techniques such as the Dutch braid or the waterfall braid.
The Dutch braid is similar to the French braid, only the strands are crossed under instead of over. The result is a braid that sits on top of your hair, rather than underneath like the French braid.
The waterfall braid involves dropping small sections of hair as you braid, to create a cascading effect. Both of these braids require a bit of practice but are well worth the effort.
Conclusion
French braids are a great way to keep hair out of your face while still looking elegant and stylish. With some practice, anyone can master a French braid. Remember to section correctly, keep the braid tight and secure, and be patient as you learn. So go ahead, try out some of the variations and alternative techniques and see what works best for you.