Introduction
Stick drift is a frustrating problem that can ruin the gaming experience. It typically occurs when the controller’s joystick moves on its own, even if you’re not touching it. This issue can happen to almost any controller, regardless of the brand or generation. Stick drift can be caused by various factors such as wear and tear, dirt, dust, or other internal malfunctions. You may think that buying a new controller is the only solution, but the truth is, you can fix stick drift on your own. In this article, we’ll explore different methods and tips to help you fix your controller’s stick drift and get back to playing your favorite games.
5 Simple Steps to Fix Controller Stick Drift: A DIY Guide
If you’re looking for a DIY solution to fix your controller’s stick drift, you’re in the right place. Here are five simple steps to follow:
Step 1: Turn Off the Controller
Before starting any repair processes on your controller, it’s essential to turn off the controller and disconnect it from the console or PC. This process helps avoid any short circuits or accidents that could damage your device.
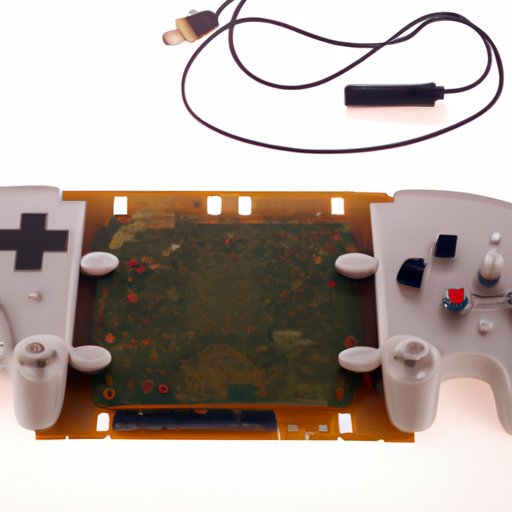
Step 2: Remove the Rubber Caps
To fix stick drift, you should remove the rubber caps on the joystick. Use a small screwdriver or any precision tool to detach the caps gently. Once removed, clean both the controller’s joystick and the pads with a microfiber cloth. Make sure to remove any debris, dirt, or grime that might cause the stick drift issue. The sticks should look clean and shiny before attaching the rubber caps back onto them.
Step 3: Check the Controller Sensors
Another common reason for stick drift is broken or malfunctioning sensors in the controller. To check if the sensors are causing the issue, use a cotton swab dipped in rubbing alcohol to clean the sensors thoroughly. Make sure to be gentle when cleaning to avoid damaging the sensors or the circuit board. Also, inspect the controller’s inside parts to ensure that all components are in good condition and secured in place.
Step 4: Apply Lubrication to the Sticks
Once you’ve cleaned and checked all sensors, you can apply lubrication to the sticks. Use a silicone-based lubricant to avoid any potential damage to the controller’s plastic parts. Apply the lube sparingly around the joystick sticks, ensuring that it reaches all parts and the crevices. Move the sticks around to distribute the lubricant evenly while avoiding any excess lube on the controller’s surface.
Step 5: Test the Controller
You’re almost done fixing the controller’s stick drift. Now it’s time to test if the steps you took have fixed the issue. Connect the controller back to your console or PC and turn it on. Check if the controller’s joystick returns to its center position once you release it. If the stick drift issue still persists, repeat the steps or consider consulting an expert for further assistance.
Expert Tips to Fix Controller Stick Drift
If you’re looking for a more advanced and technical solution to fix your controller’s stick drift, the following tips and tricks from experts may help. These tips are more complex and require additional tools or skills to use successfully.
Tip 1: Replace the Joystick Module
If the first DIY solution didn’t work, you should consider replacing the joystick module. To do so, you need to disassemble the controller entirely and remove the joystick module from it. Replace the old joystick module with a new one, or one from another broken controller. Once you’ve replaced the module, reassemble the controller and test it to see if the stick drift issue is fixed.
Tip 2: Calibrate the Joystick
Another effective solution to fix stick drift is to calibrate the joystick. Calibration is the process of resetting the joystick to its default settings using software or apps that control the controller. To calibrate the joystick, you must first download an app or software that’s compatible with your controller’s brand and type. Follow the instructions and steps outlined in the app to calibrate your controller’s joystick successfully.
Tip 3: Replace the Potentiometer
If the stick drift issue is still present after trying the first two solutions, another part you can replace is the potentiometer. The potentiometer is the component that controls the joystick’s movement and position. It’s usually the cause of stick drift on most controllers. To replace the potentiometer, you need to disassemble the controller again and locate the potentiometer on the joystick module. Once you’ve found it, remove it and replace it with a new one using a soldering iron. Reassemble the controller and test it to see if the issue has been fixed.
Why Does Stick Drift Happen? And How to Fix It
Now that we’ve explored some tips and tricks to fix stick drift, let’s delve into what causes it and how to fix it.
Explanation of What Causes Stick Drift in Controllers
A joystick is an essential part of a controller that allows you to play games and navigate menus. The joystick consists of four internal parts: a plate, a spring, a sensor, and a potentiometer. The potentiometer measures the joystick’s movement in different directions and sends signals to the console or PC. Over time, the potentiometer can wear down or malfunction, leading to stick drift. Other factors that can cause stick drift are dust, dirt, or debris that collect around the joystick area and sensors.
Common Reasons Why Stick Drift Happens
The following are some common reasons why stick drift can happen:
- Wear and tear of the controller’s joystick and internal components
- Accidental damage or drops that affect the joystick’s performance
- Dirt, grime, or debris that collects on the joystick and sensors
- Misuse or incorrect use of the controllers causing undue strain on the joystick and sensors
Different Methods to Fix Stick Drift
There are different methods to fix stick drift, depending on the severity and cause of the issue. You can try using DIY solutions, such as cleaning the joystick or recalibrating it. For more advanced and technical issues, you can replace the joystick module or potentiometer.
How to Fix Stick Drift on Different Types of Controllers
Need more help with fixing stick drift on your specific controller type? Here are some solutions:
Solutions for Xbox Controllers
Xbox controllers can suffer from stick drift due to wear and tear or accumulated dirt and debris. To fix stick drift on Xbox controllers, you must follow the same steps as the DIY guide mentioned earlier. Xbox also provides software solutions to fix stick drift, such as the Xbox Accessories App on Windows or the Xbox app on consoles. Follow the instructions for your specific Xbox app to calibrate, troubleshoot, and fix stick drift.
Solutions for PlayStation Controllers
PlayStation controllers can suffer from stick drift due to age, misuse, or damage. To fix stick drift on PlayStation controllers, you must follow the same steps as the DIY guide mentioned earlier. PlayStation also provides a calibration feature to fix stick drift. Press and hold the “PS” button on the controller, navigate to “Settings,” select “Devices,” choose “PlayStation Accessories,” and select “Motion Sensor Calibration.” Follow the instructions on the screen to calibrate your controller’s joystick.
Solutions for Nintendo Switch Controllers
Nintendo Switch controllers can suffer from stick drift due to age or damage. To fix stick drift on Nintendo Switch controllers, you must follow the same steps as the DIY guide mentioned earlier. Nintendo also provides a calibration feature to fix stick drift. Navigate to “System Settings,” select “Controllers and Sensors,” choose “Calibrate Control Sticks,” and follow the instructions on the screen to calibrate your controller’s joystick.
Is Your Controller Suffering from Stick Drift? Here Are 3 Effective Solutions
If you’re short on time, here are three effective solutions to fix stick drift:
Solution 1: Clean the Joystick
The quickest solution to fix stick drift is to clean the joystick and sensors. Use a microfiber cloth to clear any dirt, dust, or grime around the stick area and sensors. Apply lubrication to the sticks to ensure more comfortable and smoother movement.
Solution 2: Recalibrate the Joystick
Recalibrating the joystick is one of the easiest and quickest ways to fix stick drift. Follow the calibration process outlined in the instructions for your controller type to reset the joystick’s default settings.
Solution 3: Replace the Joystick Module or Potentiometer
If the first two solutions don’t work, you can consider replacing the joystick module or potentiometer. These parts are available in online stores or electronic shops, and they’re relatively easy to replace on your own.
The Ultimate Guide to Fixing Stick Drift: From Cleaning to Replacing
If you want a comprehensive guide to fix stick drift, follow these steps:
Basic Cleaning and Lubrication Methods
Start by removing the rubber caps on the joystick and cleaning the joystick and sensors thoroughly. Then apply lubrication to the sticks and test the controller to see if the issue is fixed.
Advanced Cleaning and Calibration Methods
If basic cleaning didn’t work, try cleaning the sensors with cotton swabs dipped in rubbing alcohol, or recalibrate the joystick using software or apps designed for your controller’s brand and type.
Replacing the Joystick Module or Potentiometer
If cleaning and calibration didn’t work, the next step is to replace the joystick module or potentiometer. Follow the instructions mentioned earlier to replace these parts successfully.
Consider Replacing the Controller
If none of these solutions work, or if you don’t have the skills or tools to fix the issue, you may need to consider replacing the controller entirely.
Conclusion
Stick drift may be a common issue, but it’s not impossible to fix. In this article, we explored various methods, tips, and tricks to help you fix your controller’s stick drift, from basic cleaning and lubrication to more advanced solutions like replacing the joystick module or potentiometer. We also provided specific solutions for Xbox, PlayStation, and Nintendo Switch controllers. Remember to be patient and careful when following any of these methods to avoid damaging your controller. We hope this guide has helped you fix your controller’s stick drift and get back to enjoying your favorite games.