I. Introduction
Drawing mouths can be a daunting task for many artists. Achieving proper proportions, shading for realism and conveying the right expression are all essential elements to make a great mouth drawing. However, with the proper guidance, you can confidently draw mouths that will bring your art to life. In this article, we provide a step-by-step tutorial and a range of tips to help you improve your mouth-drawing abilities.
II. Step-by-Step Tutorial
When it comes to drawing realistic mouths, the following step-by-step tutorial can make the process easier for beginners:
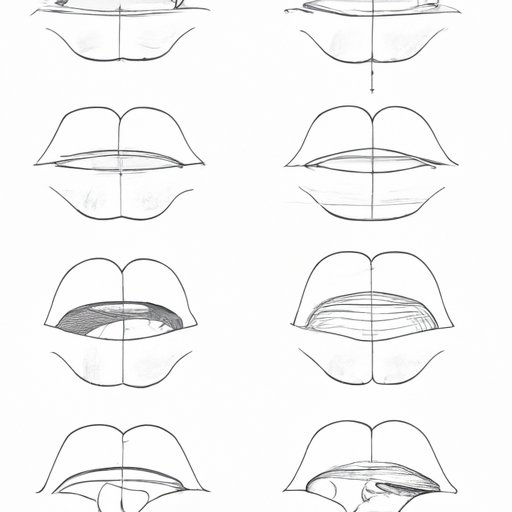
A. Start with basic shape of the mouth
The best way to start your mouth drawing is with a basic shape that resembles a curved diamond or triangle. This shape will represent the outline of the lips. It’s important to remember that different expressions can influence the shape of the lips, so experiment with different shapes and sizes to achieve the desired effect.
B. Add upper and lower lip shapes
Add the upper and lower lip shapes following the basic outline that you created in the previous step. You should be able to see the top lip protruding slightly further than the bottom one.
C. Draw the teeth and tongue
The teeth and tongue will add further dimension to your mouth drawing. Start by adding basic shapes for the teeth and tongue. For teeth, these shapes are essentially rectangles with rounded edges. The tongue is more organic, like a fat water drop.
D. Add shading for realism
Shading is one of the most important parts of mouth drawing. It’s important to remember that the inside of the mouth will always be darker than the outside. Shade the interior of the mouth with a darker pencil to create this contrast.
E. Tips for adding depth and dimension
To create depth and additional dimension, use a darker pencil on the corners of the mouth, under the lower lip, around the teeth, and on the tongue. Blend the colors and use darker lines to add textural variety.
III. Use of Visual Aids
Visual aids are essential for any artist looking to improve their drawing skills. Here are a few different options to consider with regards to mouth drawings:
A. Diagrams of different mouth shapes and expressions
It’s essential to understand the range of mouth shapes and expressions to create the perfect facial expression. Look for diagrams and charts for inspiration and reference, so you can come up with unique and more organic-looking drawings.
B. Sketches of different angles and perspectives
It’s also valuable to sketch the mouth in different angles to help improve your understanding of the anatomy and develop a more well-rounded skill-set. Experiment with different perspectives and angles to better understand how depth perception and shading affects your work.
C. Show how different shapes affect the overall appearance of the mouth
Different shapes of the mouth can completely change the facial expression. Experiment with different shapes to get comfortable with how each affects the overall emotional tone of the drawing.
IV. Consider Lighting
Lighting plays a major role in how a mouth looks, both in terms of realism and emotional tone.
A. Importance of lighting in drawing mouths
The lighting will affect shadows and highlights, which can create greater depth and dimension in your mouth drawing. Lighting is an important condiseration when it comes to creating realism and adding different tones to your work.
B. Differences between a mouth in the light and in shadow
Consider how light affects mouth drawings when shading. Mouths in the light will have more highlights and brighter colors, while mouths in the shade will require darker shading with fewer highlights.
C. Techniques for shading and highlighting to create realism
Shading and highlighting techniques involve layering lighter and darker shades in a way that creates visual depth. Try using the cross-hatching technique to achieve a realistic effect.
V. Contrast
When drawing a mouth, it’s essential to contrast the inner and outer parts of the mouth to achieve a realistic appearance. The following tips for creating the right contrast can help.
A. Inner part of the mouth versus outer part of the mouth
The inside of the mouth will always be darker than the exterior, so pay attention to the lines that separate the two areas.
B. Differences between lips, teeth, and tongue
The lips, teeth, and tongue are the three major components of the mouth. Understanding how these parts interact with one another can help you create more realistic drawings. For example, teeth can be seen only behind the lips.
C. How to consider each of these parts when drawing a mouth
It’s important to consider each component of the mouth individually, whilst also looking at how they interact. Use different shading and contrast techniques to highlight or downplay each part.
VI. Tips and Tricks
These tips and tricks will help you create more realistic and organic-looking mouth drawings:
A. Insider tips for realistic mouth drawings
Beginner artists may benefit from the use of reference images during the drawing process. Additionally, it can help to study the anatomy of the mouth and take the time to observe real-life mouths and facial expressions.
B. Specific types of pencils and shading techniques
The tools you use to sketch your drawing and add depth of tone are vital to your success. Consider using different types of pencils or blending tools to add texture, depth or brightness to various components.
C. Detailing techniques to make a mouth look more realistic
It’s easy to overlook the maginute details that can make or break a drawing. Think about how to add fine lines and additional shading to achieve a realistic-looking drawing that look 3D and organic.
VII. Practice Drills
Here are few practice drills that can help you improve your skills:
A. Exercises to build confidence in drawing mouths
Consider sketching the same mouth repeatedly in various emotions and scenarios to build your repertoire and grow more comfortable with the form.
B. Tips for practicing and improving your technique
It’s important not to get discouraged by shortcomings in your skills. Instead, practice often! Use reference images as guidelines, yet also push yourself to draw freehand from your imagination to better understand the anatomy and flow of mouths.
C. Strategies for overcoming common pitfalls
Pitfalls are common in any new skill, and you should not let them deter you. Be clear on the problems that naturally arise, such as misproportioned shapes; and practice correcting those issues for improvement.
VIII. Conclusion
Drawing complex body parts such as the mouth, may seem a daunting task, but with the right guidance, it can become a fun and rewarding learning process! Use the tips outlined in this article to improve your skills and progress in your abilities.