How to Draw an Owl: A Step-by-Step Guide
Drawing an owl can be challenging for some, but it’s worth learning as it can be a fun and rewarding experience. Not to mention, owls are fascinating creatures, and capturing their intricacies on paper can amplify their beauty. In this article, we’ll cover everything you need to know about drawing an owl and provide an in-depth guide on how to create an accurate and stunning illustration.
Step-by-Step Guide
Before we get started, here’s what you’ll need:
– Pencils, preferably graphitite (2H, HB, 2B, 4B)
– Paper, preferably a heavier weight (such as 140lb)
– Erasers
– A reference photo
Now, let’s begin!
1. Start by sketching a basic outline of the owl. Draw a large circle for the head and a smaller circle for the body. These two circles should overlap slightly. Next, add two almond shapes connected at the center of the head for the eyes.
2. Sketch the wings. Draw two long curves on either side of the body from the top edge of the body to the bottom.
3. Add feathers to the wings. Start below the head and continue drawing small “V” and “U” shapes, getting wider as you move towards the tips of the wings.
4. Draw the beak and talons. Add a small triangle at the bottom of the head for the beak and two curved shapes at the bottom for the talons.
5. Add detail to the owl’s face. Finish off the eyes by drawing a smaller, second circle within each eye. Then, shade in the larger circle leaving a small white circle for the light reflection. Next, add eyebrows above the eyes and texture for the beak and talons.
6. Add texture to the feathers. Start at the head and work your way down, drawing small curved lines for the feathers. Keep the lines going in the same direction as the feathers to create a more realistic look.
7. Refine your drawing. Erase any unneeded lines and darken the lines you want to keep.
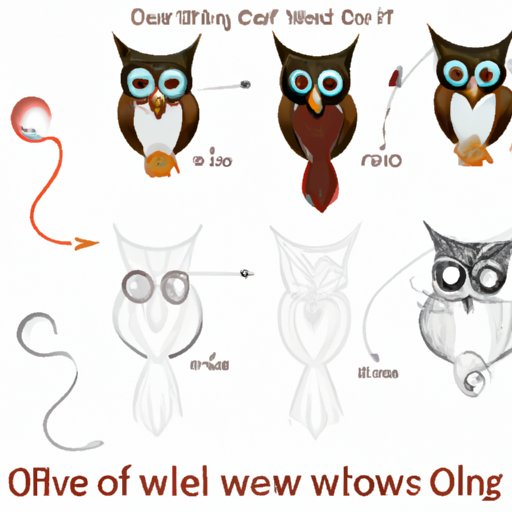
Visuals-based Tutorial
For a more detailed guide, let’s explore a visual-based tutorial.
Step 1
Start by sketching a circle for the head and a smaller circle for the body. These two circles should overlap slightly.
[Insert Image 1: Owl body circle and owl head circle]
Step 2
Draw two long curves on either side of the body from the top edge of the body to the bottom.
[Insert Image 2: Wing outlines]
Step 3
Add small “V” and “U” shapes to the wings to create the feathers.
[Insert Image 3: Wing feathers]
Step 4
Draw a small triangle at the bottom of the head for the beak and two curved shapes at the bottom for the talons.
[Insert Image 4: Beak and Talons]
Step 5
Add more definition to the eyes, eyebrows, and texture to the beak and talons.
[Insert Image 5: Eye Detail and Beak Textures]
Materials-based Instructions
Now that you understand the steps involved in drawing an owl, let’s talk about the materials you need to complete your artwork.
Pencils
Using pencils with a variety of hardnesses can help you create different effects. In general, it’s recommended that you use graphite pencils with different grade ranges to create different tones and lines in your drawing. For example, you might use a 2H pencil for light underdrawings, an HB pencil for general lines and shading, a 2B pencil for darker lines and shadows, and a 4B pencil or higher for more dramatic and obvious contrast.
Paper
A heavier paper, such as 140lb, will allow for more texturing and erasing without tearing. You can use sketchbook paper or heavyweight watercolor paper.
Erasers
A kneaded eraser is a great option for erasing pencil lines without damaging the paper. White plastic erasers are also helpful for removing heavier marks.
Style and Technique-based Guide
Here, we’ll take a closer look at the key elements of style and technique necessary to capture the beauty of an owl in your drawing.
Proportions
Owls have a unique body shape, so it’s essential to get the proportions right. When drawing the body, it’s important to remember that the wings start from the top of the body. The large head is placed on top of the body with large, forward-facing, eyes.
Detailing
An owl’s feathers have a great range of texture and color. A detailed approach means taking the time to draw each and every feather, beginning at the owl’s head and working your way outward. Use hatching and cross-hatching to create shadows and make the feathers appear more defined.
Shading
A proper understanding of shading can draw the viewer’s focus to the details you want them to notice. This can add depth to the piece and make it appear more realistic. Light usually appears opposite the source, and thus the areas of the owl facing away from the light source are likely to cast shadows.
Historical and Cultural Aspect
Owls have played a prominent role in art and storytelling throughout history. In many cultures, they’re associated with wisdom and transformation and appear frequently in literature and mythology. You can capture the owl’s intellectual qualities by giving the owl appropriate attributes and placing it within a storybook or mystical environment.
Cultural Depictions of Owls
Ancient Greeks perceived owls as symbols of good fortune and wisdom. They were also viewed as a symbol of change and intelligence in Hindu culture. In Native American culture, an owl is often portrayed as a guardian of the forest and a messenger of death. And in Japan, the owl was considered a symbol of good luck and protection from suffering.
Conclusion
Drawing an owl may seem challenging, but with a little patience, it can become an enjoyable and rewarding experience. By following these step-by-step instructions and using the right materials, you can create an accurate and detailed owl drawing. Remember to focus on proportions, fine detailing, shading, and look to the cultural aspects of the owl for inspiration. Happy drawing!
Call to Action
Grab your materials and try drawing your owl today! Remember, this is about having fun and creating something beautiful. Don’t worry if it’s not perfect. Just enjoy the process and see where your creativity takes you.