Introduction
Drawing a realistic eye is considered a milestone for many artists, as it requires a combination of techniques, observation, and patience. If you are a beginner or simply want to refine your skills, this article will provide you with a complete guide on how to draw a realistic eye. We will cover five topics, including a step-by-step tutorial, a video tutorial, an infographic, a Q&A with an artist, and an overview of the tools required. Let’s get started.
Step-by-Step Tutorial
Drawing a realistic eye requires a combination of observing the eye’s details and understanding its anatomy. Here’s a step-by-step guide to help you draw a realistic eye:
1. Start by drawing a circle for the iris and a smaller circle in the center for the pupil.
2. Draw a curve line for the eyelid and another line for the lower lash line.
3. Shade the iris with the lighter value around the edge and the darker value in the center to create depth.
4. Draw the reflections using a small white circle for the light source and a curved line for the highlight.
5. Shade the eyelid and lower lash line with varying values to create a three-dimensional shape.
6. Draw the upper lashes with thin and tapered lines, and the lower lashes with thicker and curved lines.
7. Shade the eye socket and brow bone to create a frame for the eye.
8. Erase the guidelines and clean up your drawing.
Specific Techniques and Tips
To make your realistic eye drawing stand out, here are some techniques and tips to keep in mind:
– Use a sharp pencil to create clean lines and precise details.
– Pay attention to the placement of the iris, as it affects the eye’s expression and direction.
– Shade the iris gradually, working from light to dark tones, and use different pencil pressures to create texture and depth.
– Observe the reflection of the light source on the eye’s surface to make it look more realistic.
– Draw the lashes with curved lines that follow the eye’s shape, and use varying thickness to suggest volume and texture.
– Use a reference photo or a mirror to observe your own eye’s details, anatomy, and proportions.
Tools Needed
To draw a realistic eye, you’ll need specific tools to achieve the desired result. Here are the most common tools used in eye drawing:
– Pencils: Graphite pencils are ideal for drawing eyes, as they allow you to create a range of values, from light to dark. They come in different grades, from 6H (hard) to 8B (soft), and you can choose depending on your preference and technique.
– Erasers: Kneaded erasers are best for lightening areas without smudging or damaging the paper. They can be shaped into different forms and reused multiple times. Also, a white eraser can be used for hard lines and corrections.
– Blending tools: Tortillions, blending stumps, or brushes can be used to blend different values and create smooth transitions between them.
– Paper: A smooth or medium surface paper is best for eye drawing, as it allows you to create fine details and smudge less. You can use bristol, drawing, or sketch paper, depending on your preference and technique.
Video Tutorial
If you prefer to learn through a visual guide, here’s a video tutorial on drawing a realistic eye:
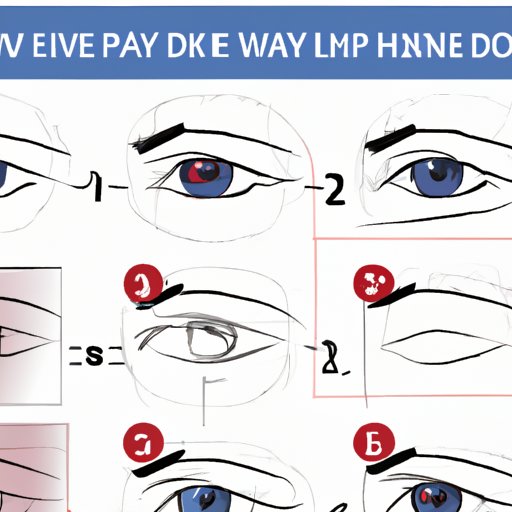
Infographic
For a quick visual guide on the steps and techniques involved in drawing a realistic eye, here’s an infographic:

Q&A with an Artist
To learn from an experienced artist, here’s a Q&A session on drawing a realistic eye:
Q: How do you approach drawing a realistic eye?
A: I usually start by observing the eye’s details, such as the iris color, the shadow areas, and the reflections. Then, I sketch the basic shapes and proportions, and build up the values gradually using different pencil pressures and blending tools. I also pay attention to the overall harmony and balance of the eye with the surrounding features.
Q: What are some common mistakes beginners make when drawing an eye?
A: One common mistake is drawing the iris too big or too small, which can affect the eye’s expression and look unrealistic. Another mistake is not blending the values properly, which can result in harsh lines and uneven textures. Also, beginners tend to focus on the details only and forget about the overall shape and form of the eye.
Q: What tools do you recommend for a beginner who wants to draw a realistic eye?
A: I recommend starting with a 2B or 4B graphite pencil, a kneaded eraser, and a blending stump. These tools are easy to use and allow you to create different values and textures. Also, a good reference photo or a mirror can help you observe the details and improve your observation skills.
Conclusion
Drawing a realistic eye requires practice, patience, and observation skills. In this article, we covered five topics to help you draw a realistic eye, including a step-by-step tutorial, a video tutorial, an infographic, a Q&A with an artist, and an overview of the tools required. We hope this article provided you with the techniques, tips, and inspiration to create your own realistic eye drawing. Remember, the key is to observe, practice, and enjoy the process.