Introduction
Flamingos are beautiful creatures with vibrant colors that make them stand out. However, drawing them can be quite challenging, especially for beginner artists. That’s why we’ve put together this guide to help you learn how to draw a flamingo step-by-step.
We understand the difficulties you may face when tackling this task, and that’s why this article provides a comprehensive guide that breaks down the drawing process into simple steps. Whether you’re an aspiring artist or just looking for a fun challenge, we hope this article will help you achieve your artistic goals.
Step-by-Step Guide
Let’s dive right in and start with a step-by-step guide that will help you learn how to draw a flamingo:
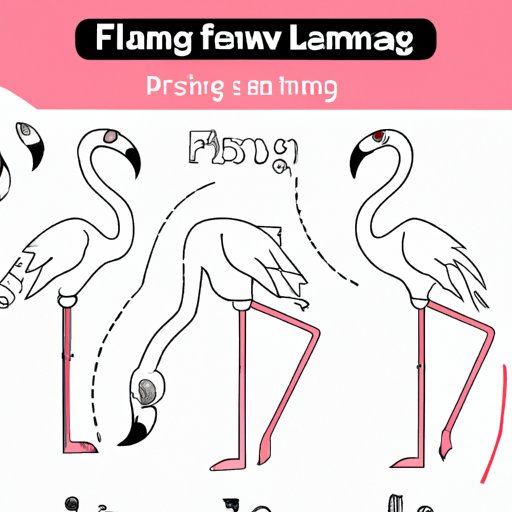
- Basic Outline: Start with a small oval shape for the flamingo’s body and a long and thin U-shape for its neck. Add a small circle at the top of the neck for the head.
- Beak and Eye: Next, add a small triangle-shaped beak and an eye next to it. The eye should be a small circle that sits above and to the left of the beak.
- Body Features: To add more definition to the flamingo’s body, draw a curved line inward from the oval shape to create the front wing. Draw a curved line outward from the body on the opposite side to create the back wing.
- Neck Features: Add a small curve to the neck that connects to the head, then draw a curvy line from the head down to the body to create the flamingo’s distinctive neck shape.
- Legs and Feet: For the legs, add two long, thin lines that bend inward for the joints and then outward again, ending with three toes at the bottom. Repeat this for the other leg as well.
- Feathers: Finally, add feather shapes at the base of the body, as well as feathers along the wings and tail. You can also add some shading to give your drawing more depth and dimension.
Video Tutorial
In addition to written instructions, a video tutorial can be an excellent way to learn how to draw a flamingo. Here’s a recommended video tutorial that will give you a visual representation of the entire drawing process:
Starting with Simple Shapes
It’s important to remember that all complex drawings begin with simple shapes. When it comes to drawing a flamingo, you can break down the bird into basic geometrical shapes to make the initial drawing process easier:
- Oval: Start with an egg-shaped oval for the body
- U-Shape: Draw a thin and elongated U-shape for the neck
- Triangle: Use a small triangle for the beak
- Circle: Draw a small circle for the eye.
Once you’ve sketched out these basic shapes, you can then refine your drawing by following the step-by-step guide mentioned earlier.
Tips and Tricks
Here are some common mistakes that beginner artists make when drawing a flamingo and some tips to avoid them:
- Proportion: Pay attention to the proportion of the head to the body and legs. Flamingos have long and thin necks, so make sure it doesn’t take up too much space in the drawing.
- Beak: Many people tend to make the beak too small. Make sure it’s big enough to stand out and balance the overall drawing’s composition.
- Shading: Adding shading can give your drawing more depth and dimension, but make sure it’s not too dark to distracting the viewer’s eyes from the main focus of the bird.
- Color: Flamingos have bright, beautiful colors, but make sure you use the right colors according to their natural hue and in the right proportions.
Remember, the more you practice, the better you’ll become at drawing a flamingo, so don’t get discouraged if it takes some time to master the art.
Comparison Article
Artists approach flamingo drawing in many different ways. Check out this side-by-side comparison article that showcases different styles and techniques to spark your creativity:
Side-by-Side Comparison: Different Approaches to Drawing a Flamingo
Write a Story
Here’s a short and straightforward story about a person learning how to draw a flamingo:
Carol was fascinated by the beauty of flamingos and had always wanted to learn to draw them. She picked up a pencil, clicked on the video tutorial, and started drawing. She struggled to get the right proportions and features but kept on practicing until she felt satisfied with her work. With each drawing, she improved her skills and gained more confidence. Now, Carol was skilled enough to draw flamingos without following any instructions.
Conclusion
Learning how to draw a flamingo may seem like a daunting task, but this comprehensive guide offers you the knowledge and tools necessary to achieve success. Starting with simple shapes and following detailed instructions is the key to mastering the art of drawing a flamingo. Don’t forget the essential tips and tricks for avoiding common mistakes and achieving a professional-looking final product.