I. Introduction
Butterflies are gorgeous creatures, with intricate patterns and beautiful colors that come to life through art. However, many people struggle to capture the beauty of these fluttering insects in their sketches. This article aims to help you learn how to draw a butterfly, as well as get creative and expressive with your art.
The following sections will offer step-by-step tutorials, helpful tips, challenges, and insights into butterfly anatomy. With this guide, you’ll advance your drawing skills and create stunning butterfly illustrations.
II. Step-by-Step Tutorial: A How-to Guide for Drawing a Butterfly
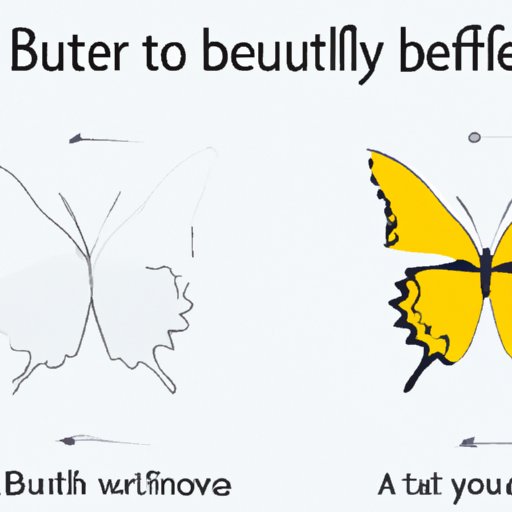
Let’s start by breaking down the steps to draw a butterfly. You will need paper and pencils or markers, and a reference photo or illustration for inspiration.
1. Begin with the body: draw a small, oval shape in the center of your paper. This will be the thorax of the butterfly.
2. Draw two long, skinny lines extending out from the thorax. These will be the antennae.
3. Next, add the butterfly’s wings: draw two more oval shapes on either side of the thorax. These should be slightly larger than the body, and more narrow on top.
4. Connect the wings with a curved line and add a small circle at the top of each wing, where they meet the thorax.
5. Draw veins on the butterfly’s wings by creating several thin, parallel lines that converge at the top of each wing.
6. Finally, add details to the butterfly’s head, antennae, and wings, such as stripes or spots.
Refer to illustrations as you draw and use light, sketchy lines until you’re comfortable with the form and shape of the butterfly.
III. Getting Creative with Butterflies: Tips for Drawing and Customizing Your Own Artwork
Once you’ve grasped the basics, it’s time to get creative with your butterfly drawings! Here are a few tips to help you add a personal touch to your artwork:
– Experiment with colors: Butterflies come in an array of colors, and it’s up to you how you want to express them. Consider adding new hues or experimenting with different color schemes for a unique and exciting effect.
– Patterns and textures: A butterfly’s wings can be full of details, like stripes, spots, and other intricate geometric shapes. These all make great patterns to play around with, don’t be afraid to try something new.
– Adding personality: Your butterfly does not have to look precisely like a real one! Adding your flair in the form of whimsical personalities, different sizes, or even exaggerated structures can give your artwork an entirely fresh perspective and make this painting unique.
For inspiration, browse sites like Instagram and Pinterest, which are flooded with tons of creative butterfly artwork.
IV. Butterflies in Context: Incorporating Butterflies into Larger Illustrations
Butterflies are fantastic inclusions when it comes to larger illustrations. They bring color, depth, and visuals to your artwork. Here are a few suggestions to help you integrate butterflies into your work:
– Nature landscapes: Landscapes associated with mountain and plains can be given new meaning by adding butterflies that so gracefully complement the florals and natural scenery. Try adding butterflies to fields of flowers, waterfalls, or even forest scenes.
– Insects menagerie: Why not try creating a whole montage of different insects, including your favorite butterfly? You could paint a beautiful garden, full of life, or a scene from your favorite park, complete with fluttering butterflies. Let your imagination run free.
– Collages: A butterfly can be incorporated into different theme collages like creating a surreal collage or scrapbook layout incorporating butterflies for a fun and inspirational effect.
The possibilities are endless, and incorporating butterflies and their aesthetic into different scenes can make the artwork more engaging and emotionally appealing.
V. Moving Beyond Basics: Adding Texture and Detail to Your Butterfly Drawings
Shading and highlighting are effective ways of adding texture on your butterfly wings and body. Taking the time to add these details can bring your butterfly illustration to life. Here are some ways you can add texture and detail to your designs:
– Make use of different hatching techniques to create textures Illustrate an airbrush or similar effect. Consider the direction of the hatch and how it complements your design.
– Add realism by shading some of the areas of the butterfly, such as the neck and head. Dark areas of the wings could be shown to be folded over, creating a layer or dimension when the wings are resting.
– Highlighting regions of the butterfly can give it a more luminous appearance, appealing to the eyes. Pick a lighter color and layer it over a typical tone gently to provide the wings a lifelike quality.
VI. Timed Drawing Challenge: Putting Your Skills to the Test with a Butterfly Draw-Off
Challenging yourself is an excellent approach to elevate your artwork, and a draw-off with yourself or someone else is an ideal way to do this. You will work to improve your skills and improve your speed using a timer by engaging in this competition.
Choose a single butterfly reference photo, set a timer for 30 minutes, and attempt to draw the butterfly with whatever medium you want under 30 minutes. Challenge someone or share the outcome online, and reflect on ways to improve.
VII. Butterfly Anatomy: Drawing Accurately by Understanding Insect Anatomy
Butterflies’ anatomy can be rewarding and fascinating to learn about. By understanding how they’re built and structured, you can make more realistic and attention-grabbing illustrations. Here’s how to do it:
– Analyze the body segmentations and the location of various parts of the body in many butterfly representations.
– Break down the constructions of butterfly wings from a biology point of view into the 4 venations and 6 wing fields.
– Check out the various sections of butterfly antennas and how they improve the functionality of other systems.
Adding minute details to your designs will transform them into more impressive and appealing works of art. Reading blogs, journaling, and watching tutorials on butterfly anatomy will make it simple to understand.
VIII. A Therapeutic Escape: The Meditative Power of Drawing Butterflies
Art has multiple purposes, one of which is therapeutic and relaxing. Drawing butterflies, in particular, has a calming impact and can provide a soothing escape. Here are some ways to use drawing as a form of meditation:
– Take some time to sketch throughout the day, setting aside at least two hours for meditation or relaxation.
– Utilize butterfly painting as a way to meditate and calm down when dealing with depression, anxiety, or other mental health issues.
– Reflect on the feelings, concepts, and moods that your butterfly art communicates. Doing so can open up new, hidden insights into yourself and provide a way to connect with your emotions.
Butterfly drawing can indeed be used for therapeutic purposes. Making art a regular part of your routine can help you relax and unwind after a long day.
IX. Conclusion
Drawing butterflies can appear difficult at first, but with practice and patience, you can create a stunning butterfly illustration. Remember, focus on the basics and keep things simple before adding complexity. Experiment with different colors, angles, and textures to add your unique touch to the artwork.
Finally, use your drawing skills as a means of relaxing and therapeutic practice. Keep exploring your creativity, keep adding your imagination and keep sharing your flourishing art with others.