I. Introduction
If you’re looking for an easy way to add length and glamour to your nails, acrylic nails are the way to go. Acrylic nails are made of a mixture of liquid and powder, which is applied to your natural nails, and then shaped and painted to your desired specification. In this article, we’ll provide you with a comprehensive step-by-step guide, including everything you need to know to achieve a professional-looking outcome.
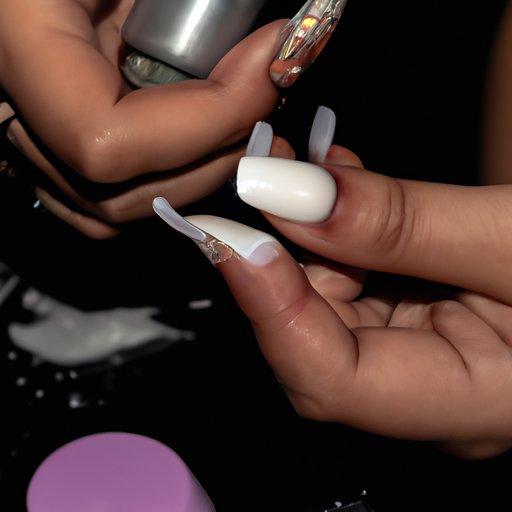
II. Step-by-Step Guide to Achieving Professional-Looking Acrylic Nails: From Prep to Polish
Before we begin, you’ll need to gather some essential materials and tools such as an acrylic powder, acrylic liquid, a nail brush, a nail file, and a nail buffer. Firstly, you’ll need to clean your natural nails, file, buff and shape them to your desired shape. Once you’ve done that, you’ll apply the tips with a nail glue if you wish to have tips. Then it’s time to apply the acrylic liquid and powder mixture to your nails to form the acrylic nails. Finally, paint your nails with your favorite nail polish and voila! You have beautiful acrylic nails. Remember to buff your nails if you want to give them a shine without polish.
If you want a more detailed, step-by-step guide on the process of applying acrylic nails, check out video tutorials on YouTube.
It’s important to note that getting perfect acrylic nails may take some practice, but stick with it, and you’ll get the hang of it in no time!
III. The Dos and Don’ts of DIY Acrylic Nails: Tips to Avoid Common Mistakes
One of the most common mistakes people make in the process of applying acrylic nails is not prepping the nails properly. It’s essential to clean, file, and buff your nails before applying the liquid and powder mixture. Also, it’s important not to rush the process to avoid an uneven application.
You should also avoid biting your nails or picking at the edges of your acrylic nails, as this can cause damage and spoil the look.
Finally, be careful not to leave the acrylic on for too long before filling them or removing them, as leaving them on for too long may cause them to lift and break off, resulting in damaged nails.
IV. Tools of the Trade: Essential Acrylic Nail Supplies and Their Uses
Having the right tools and materials can make all the difference in the application of acrylic nails. You need to invest in good quality tools, including a quality nail brush and file.
Other essential tools include cuticle nippers, cuticle pushers, and tweezers, among others, which can help you achieve the best results.
V. DIY vs. Professional Acrylic Nails: Pros and Cons
The option of doing your acrylic nails at home may seem daunting for some people; still, there are many benefits to it. Doing your acrylic nails can save you money, and with enough practice, you’ll get the hang of it, resulting in a professional look.
However, if you’re not confident enough, or you don’t have the right tools, going to a professional may be the best option. Professional nail technicians are trained to apply acrylic nails with precision and expertise.
VI. How to Remove Acrylic Nails Safely and Effectively: A Beginner’s Guide
Removing acrylic nails is a crucial step that you can’t ignore. Sometimes it may not happen that way you want, but by following the right steps, you can do it safely and effectively. You’ll need some acetone, cotton wool, tin foil, and a nail buffer.
To remove it, apply acetone onto a cotton ball, place it on the acrylic nails, wrap your nails in tin foil, and wait for 15-20 minutes. After that, the acrylic nails will start peeling off, and you can gently remove them with a nail buffer.
Remember, do not try to rip them off: this can cause damage and weaken your nails, leaving them vulnerable.
VII. Nail Bed Health: What You Need to Know Before and After Acrylic Application
The health of your nail bed is essential before and after acrylic application. When applying the acrylic nails, avoid applying the product on your cuticles and make sure you don’t damage your natural nails when shaping them. If you notice any redness, swelling, or discomfort, remove the acrylic nail and contact a doctor.
After removing the acrylic nails, it’s important to ensure that your nail beds are well moisturized. Use a cuticle oil to keep the area soft and healthy, especially if your nails are prone to damage.
VIII. Conclusion
Acrylic nails are a glamorous and trendy way to extend your nails and enhance your overall look. By following the steps we have outlined, you can easily achieve a professional-looking result. Moreover, this article emphasizes the importance of nail bed health, whether you are doing it yourself or going to a professional.
We hope this article has been helpful and informative to our readers who want to do their acrylic nails at home.