I. Introduction
Buns are a classic and versatile hairstyle that can be worn in a variety of ways, from sleek and polished to messy and relaxed. Learning how to do a bun can give you an elegant, put-together look that’s perfect for any occasion. In this article, we’ll provide a step-by-step guide on creating a classic bun, as well as tips and tricks for adding volume, creating a messy, undone bun, accessorizing with scarves and headbands, and even creating the trendy top knot. Whether you’re a hair styling pro or a novice, we’ve got you covered with this ultimate guide to buns.
II. Classic Bun Tutorial
Creating a classic bun is easier than you might think. Here’s what you’ll need:
- Brush
- Hair tie
- Bobby pins
- Hairspray (optional)
Follow these easy steps:
- Start by brushing your hair to get rid of any knots or tangles. You can make your bun as high or as low as you want, depending on where you want it to sit on your head.
- Pull your hair back into a ponytail, using your brush to smooth out any bumps or lumps. Secure it with your hair tie.
- Carefully twist your ponytail around the base, forming a bun shape. Keep twisting until you reach the ends of your hair.
- Tuck the ends of your hair under the bun, and then use your bobby pins to secure it in place. Make sure to hide the pins so they’re not visible.
- If you want your bun to stay put all day, spray it with some hairspray to keep the flyaways at bay.
III. Adding Volume to Buns
If you have fine or thin hair, creating a fuller-looking bun can be a bit of a challenge. But don’t worry – we’ve got some tips and tricks to help you out:
- Tease your hair: Backcombing your hair at the crown can give you extra volume and make your bun look fuller. Just be careful not to tease it too much, or your hair could end up damaged.
- Use a donut: A hair donut is a round, sponge-like accessory that you can use to create a perfectly round bun. Simply slide the donut over your ponytail, cover it with your hair, and secure it with bobby pins.
- Add extensions: If you really want to amp up the volume, you can use hair extensions to add length and thickness to your hair. Clip-in extensions are easy to use and can be removed whenever you want.
IV. Messy, Undone Bun
If you’re looking for a more casual, laid-back bun, the messy, undone bun might be just what you need. Here’s how to create it:
- Start by creating a low ponytail at the nape of your neck. Don’t worry about making it too neat – some flyaways and loose strands will help give you that relaxed, messy look.
- Twist your ponytail into a bun shape, but don’t worry about making it perfect. The messier, the better!
- Secure the bun with bobby pins, making sure to leave some loose pieces around your face for a more effortless style.
- Finish it off with some texturizing spray to give it some added volume and hold.
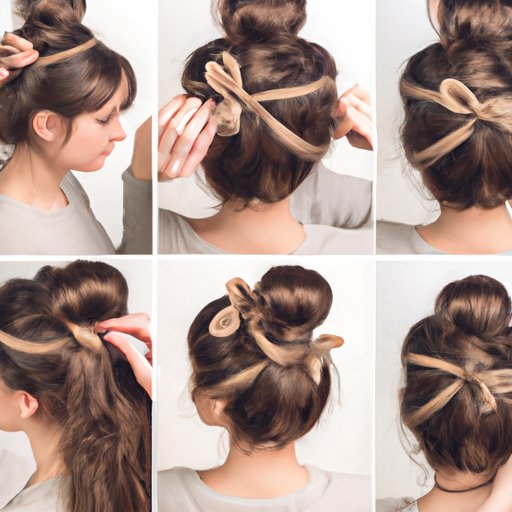
V. Bun Accessories
Buns don’t have to be boring! You can add some fun and flair to your bun by accessorizing with scarves, headbands, bows, and more. Here are a few ideas to get you started:
- Wrap a patterned scarf around your bun and tie it into a cute knot or bow.
- Place a beaded headband around the base of your bun for a bit of sparkle and shine.
- Use colorful bobby pins to secure your bun, or create a fun criss-cross pattern with them.
- Add a flower crown for a bohemian, festival-ready look.
VI. Top Knot Primer
The top knot is a popular and versatile hairstyle that can be dressed up or down, depending on the occasion. Here’s how to create a basic top knot:
- Start by brushing your hair into a high ponytail at the crown of your head. You can use a hair tie to secure it.
- Twist your ponytail into a bun shape, then wrap the hair tie around it to secure it in place.
- Use bobby pins to secure any loose pieces and create a more polished look.
- If you want a more textured look, use your fingers to gently pull at the bun and create some messy, tousled strands.
VII. Keeping Buns Secure
One common problem with buns is that they can sometimes slip or come loose, especially if you’re on the go or have a lot of activities planned. Here are a few tips to help keep your bun secure all day or night:
- Use more bobby pins: The more pins you use, the more secure your bun will be. Make sure to space them out evenly and use them to anchor different parts of your hair.
- Create a solid base: If your hair is too slippery, it might be hard to keep your bun in place. Try spritzing it with texturizing spray or dry shampoo to give it more grip.
- Try a hair net: If all else fails, a hair net can be a great way to keep your bun in place. Just tuck any loose pieces into the net and secure it with some extra pins.
VIII. Quick Low/Side Bun Tutorial
Short on time? You can still create a cute and simple low or side bun in just a few minutes. Here’s how:
- Gather your hair into a low ponytail either on the side or at the back of your head
- Twist your ponytail and wrap it around the base
- Secure the bun using bobby pins
- For a messier and more relaxed style, gently tug at the bun to loosen it up
IX. Conclusion
Whether you’re in a rush, attending a formal event, or just having a casual day out, buns can elevate your look and make you feel put together. From classic buns to messy styles, there’s a bun for every occasion. Experiment with different techniques and accessorize to add some personality.