Introduction
If you’re looking for a stylish haircut that’s both edgy and versatile, the classic mullet might be just what you need. Often maligned as a fashion faux pas, the mullet has actually undergone a revival in recent years, with celebrities and musicians sporting their own versions of the famous ‘do.
If you’re keen to try your hand at cutting your own mullet but aren’t sure where to start, don’t worry – we’ve got you covered. In this article, we’ll take you through the step-by-step process of cutting a mullet, as well as provide tips, insights, and styling advice from experts in the field. By the end, you’ll be ready to rock the look with confidence.
Step-by-step instructions
Preparation
Before you start cutting, you’ll need to get your tools in order and prepare your work area. Here’s what you’ll need:
- Scissors (preferably hair scissors, but regular ones will do in a pinch)
- Clippers or a razor (optional, but can help with blending)
- Comb and/or brush
- Hair ties or clips to section the hair
- A cape or towel to protect clothing
Once you’ve gathered your supplies, find a well-lit, clean area to work in. If you’re cutting hair at home, consider using a mirror to help you see what you’re doing from different angles. Make sure you have enough space to move around freely and access all sections of the hair.
Cutting process
Ready to get started? Here’s a step-by-step guide to cutting a mullet:
Sectioning the hair
Start by sectioning the hair into three parts: the top, the sides, and the back. Use hair ties or clips to separate each section. The top section should be relatively narrow and stretch from the hairline to the crown of the head. The sides should start at the hairline and end just above the ears. The back should extend from the nape of the neck to the bottom of the hairline.
Determining the length
Decide how long you want the mullet to be. Classic mullets typically have longer hair on the back and shorter hair on the sides and top. You can adjust the length to suit your personal preferences, but keep in mind that going too short can be difficult to fix.
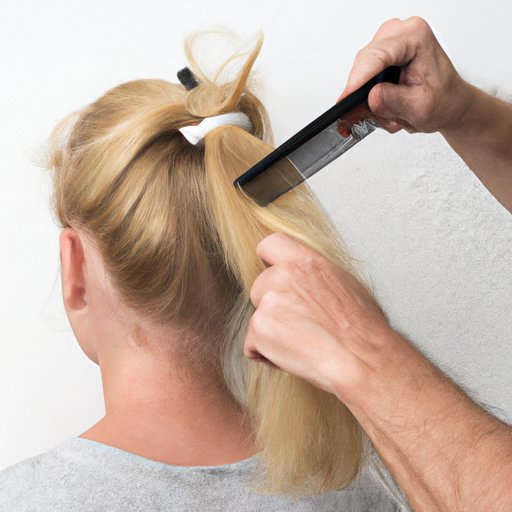
Cutting the sides
Starting with one side, comb the hair out and hold it between your fingers. Use scissors to cut the hair to the desired length. Keep in mind that you’ll be blending the hair later, so don’t worry too much about making it perfectly even at this stage. Repeat on the other side.
Cutting the back
Moving on to the back, start by cutting the hair at the nape of the neck. Use your fingers to measure the length and cut accordingly. As you work your way up, blend the hair into the sides by cutting at a slight angle. This will help create a more natural, graduated look.
Trimming the ends
Once you’ve finished cutting the back, it’s time to trim the ends of the hair to create a more defined shape. Use scissors to cut the hair on the sides and top, making sure to blend it into the longer hair on the back. Gradually work your way up the head, cutting small sections at a time, until you reach the desired length.
Finishing touches
With the main cutting done, it’s time to add some finishing touches. Here’s what to keep in mind:
Blending the layers
Using clippers or a razor, blend the hair at the back of the head into the sides and top. This will help create a more natural, cohesive look. Be careful not to overdo it, as you don’t want to create any bald spots or choppy sections.
Styling the look
Once you’re happy with the overall shape of the mullet, it’s time to style it. Depending on your hair type, you may want to use different products or techniques to achieve the desired look. For example, if you have straight hair, you might want to add some volume with a blow dryer or curling iron. If you have curly hair, you might want to define the curls with gel or mousse.
Common mistakes to avoid
When cutting a mullet, there are a few common mistakes to watch out for:
- Cutting the hair too short
- Not blending the layers properly
- Creating blunt, choppy sections
- Using dull scissors or clippers
By taking your time and following the steps carefully, you can avoid these mistakes and achieve a great-looking mullet.
Video tutorial
If you’re a visual learner, you might find it helpful to watch a video tutorial of the mullet-cutting process. There are plenty of tutorials available online, ranging from basic to advanced techniques. Here are a few things to look for when watching a tutorial:
Demonstration of the mullet-cutting process
The video should show, step by step, how to cut each section of the hair. Look for clear, close-up shots that show the scissors or clippers in action.
Different techniques and angles demonstrated
Depending on your skill level and the desired outcome, you may need to use different cutting techniques or angles to achieve the right shape. Look for a video that shows a variety of approaches, so you can pick and choose what works best for you.
Tips for achieving different styles
Whether you want a classic mullet, a modern take, or something in between, a good tutorial should provide tips and insights to help you achieve the desired look. Pay attention to any styling tips or product recommendations, and experiment until you find what works best for you.
Q&A
Here are some common questions about mullets, answered:
Hair types that work best for mullets
Mullets can work well on a variety of hair types, but they tend to look best on hair that’s thick, wavy, or curly. If you have straight or fine hair, you may need to add some volume with styling products or a blow dryer.
How to style a mullet
Styling a mullet depends on your personal preferences and the specific style you’re going for. Some people opt for a messy, tousled look, while others prefer a sleek, polished finish. Experiment with different products and techniques until you find what works best for you.
Essential tools for creating a mullet
In addition to scissors, you may want to invest in clippers or a razor to help with blending. A comb and/or brush can also be helpful for sectioning the hair and removing tangles. Don’t forget to protect your clothing with a cape or towel.
Other common questions about mullets answered
Some other frequently asked questions about mullets include:
- Can anyone pull off a mullet?
- How often should I trim my mullet?
- What are some common variations on the classic mullet?
The answers to these questions may depend on your individual preferences and styling goals. Experimentation is key!
History and trends
The mullet has a long and storied history, with its roots tracing back to ancient times. While its exact origins are unclear, the mullet as we know it today became popular in the 1970s and ’80s as a symbol of rebellious youth culture.
Since then, the mullet has experienced a resurgence in popularity, with everyone from Miley Cyrus to Joe Exotic donning the style. While it may still be considered a somewhat controversial haircut, there’s no denying its staying power.
Famous people who have sported the style
Over the years, countless celebrities and musicians have sported the mullet, often with their own unique twists. Some famous mullet-wearers include:
- Billy Ray Cyrus
- David Bowie
- Andre Agassi
- Bret Michaels
- John Stamos
The mullet’s cultural significance
The mullet has come to symbolize a number of things over the years, from youthful rebellion to working-class masculinity. Whatever your personal take on the hairstyle, there’s no denying its cultural significance and enduring influence on popular fashion.
Styling advice
Once you’ve cut your mullet, you’ll want to style it to suit your personal preferences. Here are some tips and tricks for achieving the look you want:
Products and techniques for styling a mullet
The right products can make a big difference when it comes to styling a mullet. Depending on your hair type, you may want to use mousse, gel, hairspray, or other products to add texture, hold, or shine. Experiment with different options until you find what works best for you.
Tips for those with curly, wavy, or straight hair
Depending on your hair type, you may need to adjust your styling techniques to achieve the desired look. If you have curly or wavy hair, you may want to scrunch it with your hands or use a diffuser attachment on your blow dryer to enhance the natural texture. If you have straight hair, you may want to add some volume with a curling iron or teasing comb.
Expert advice
To get some additional insights into cutting a mullet, we spoke to a hairstylist who specializes in the style. Here’s what they had to say:
Insights from a hairstylist or barber who specializes in mullets
“Cutting a mullet takes patience and precision,” our expert tells us. “You want to avoid any rough or choppy lines, and make sure you blend the layers properly. It’s also important to listen to the client’s needs and preferences, since everyone’s idea of a ‘good’ mullet can be slightly different.”
Common mistakes to avoid
“One of the biggest mistakes people make when cutting a mullet is not paying enough attention to the blending process,” our expert advises. “You really want to take your time with this step, using scissors or clippers to create a smooth transition from the shorter hair to the longer hair.”
Tips for achieving the desired look
“When it comes to styling a mullet, less is often more,” our expert says. “You don’t want to use too much product or over-manipulate the hair, as this can create an artificial or greasy look. Instead, try to enhance the natural texture and flow of the hair, and let the haircut speak for itself.”
DIY tips
If you’re feeling brave enough to cut your own mullet at home, here are some DIY tips to help you get started:
Getting the right tools
The right tools can make all the difference when it comes to cutting hair. Invest in a good set of hair scissors, and consider picking up clippers or a razor to help with blending. You’ll also need a comb or brush, hair ties or clips, and a cape or towel to protect your clothing.
Finding the right tutorial videos
There are plenty of tutorial videos available online that can walk you through the mullet-cutting process step by step. Look for videos that are clear, well-lit, and provide multiple angles and techniques. Remember to take your time and be patient – cutting hair can take practice!
Overcoming common challenges when cutting hair at home
Cutting hair at home can be a bit intimidating, especially if you’re new to the process. Here are some common challenges you may encounter, and how to overcome them:
- Cutting hair too short: Start with longer cuts and work your way up gradually, taking your time and checking your progress frequently.
- Blending hair unevenly: Use scissors or clippers to create a smooth, gradual transition from shorter to longer hair.
- Creating choppy sections: Use even pressure when cutting, and try not to lift the hair too high off the scalp.
- Feeling nervous or inexperienced: Remember, practice makes perfect!
Conclusion
Cutting a mullet can be a fun and satisfying way to switch up your hairstyle. By following our step-by-step instructions, watching tutorial videos, and seeking out expert advice, you can achieve a great-looking mullet that suits your personal style. Don’t be afraid to experiment with different cuts and styling techniques – after all, that’s what the mullet is all about!
Final recommendations
- Start with a longer length and work your way up gradually.
- Take your time and check your progress frequently.
- Don’t be afraid to experiment with different techniques and products.
- Seek out expert advice and watch tutorial videos to hone your skills.