Introduction
If you’ve ever wondered how your favorite celebrities always look perfectly sculpted and chiseled, then you’re not alone. Contouring has become all the rage in the beauty world, but it can seem intimidating at first. You might be wondering, what is contouring, and how do I do it? In this article, we’ll guide you through the entire process, from cleansing your face to choosing the right tools and products, all the way to achieving a natural, flawless look.
Before we dive in, it’s important to remember that contouring requires patience and practice, and choosing the right tools and techniques makes all the difference. With that said, let’s get started.
Step-by-Step Guide to Contouring Your Face
The first step in any makeup routine is preparing your skin. Clean, fresh skin provides the best base for contouring. Start by cleansing your face and applying a lightweight, oil-free moisturizer. Then, use a primer to make sure your makeup stays in place all day.
Next, it’s time to choose your contouring products. There are a variety of options out there, including powder and cream formulas, but the key is to choose a product that’s a shade or two darker than your skin tone. A cool-toned bronzer can also work as a contouring product.
When it comes to highlighting, choose a product that’s a shade or two lighter than your skin tone. You can use a concealer or a highlighter pen, but again, the key is to choose a product that’s suited to your skin tone and undertones.
Once you have your products, it’s time to start contouring. Here are the steps:
1. Contour
Using a small, angled brush, apply the contouring product in the hollows of your cheeks, along your jawline, and on the sides of your nose. Blend well with a sponge or brush to avoid any harsh lines.
2. Highlight
Apply the highlighting product to the high points of your face, including the bridge of your nose, the center of your forehead, and the tops of your cheekbones. Blend well to avoid any harsh lines.
3. Blending
Blend the contour and highlighter together using a brush or sponge. This will create a flawless, natural-looking finish.
4. Setting Powder or Spray
Finally, set the makeup using a setting powder or spray. This will ensure that your contour and highlight stay in place all day.
Highlighting the Tools Used for Contouring
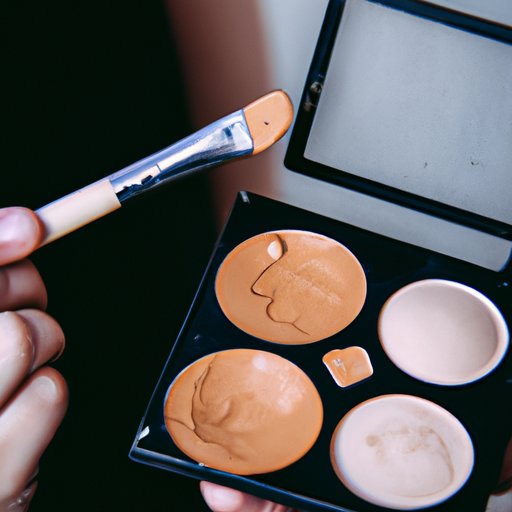
Choosing the right tools and products is essential for successful contouring. Here are some of the tools you’ll need:
1. Contouring Palettes
Contouring palettes come in a variety of shades and options. You can choose a palette with powder or cream products, or even a palette that includes both. Some palettes come with multiple shades for different areas of the face, while others include both contour and highlighter in one compact.
2. Blending Tools
To blend your contour and highlighter, you’ll need a brush or sponge. It’s important to choose a blending tool that’s soft and fluffy to avoid any harsh lines. A beauty blender sponge is a popular choice for blending makeup seamlessly.
3. Tips for Choosing the Right Tools
When choosing your contouring products and tools, it’s important to consider your skin tone and face shape. For example, if you have oily skin, a powder formula might be best for you, while those with dry skin might prefer a cream formula. When it comes to brushes, choose a small, angled brush to help you create precise lines on your face.
4. Using the Tools Effectively
Once you’ve chosen your contouring products and tools, it’s time to put them to use. Use a light hand when applying products, and always blend well to avoid any harsh lines. Practice on different areas of your face to find what works best for you.
Article Focused on Face Shapes
Contouring can be especially effective when applied according to your face shape. Here’s a guide to the different face shapes and how to contour them:
1. Round Face Shape
If you have a round face shape, focus on contouring your cheeks and jawline. Apply your contouring product in the hollows of your cheeks and along your jawline, and blend outwards. Apply your highlighter to the center of your forehead, the bridge of your nose, and the tops of your cheekbones. This will help to create definition and structure on your face.
2. Square Face Shape
If you have a square face shape, focus on contouring your temples and jawline. Apply your contouring product on your temples, along your jawline, and under your cheekbones. Use a light hand, blending outward to create natural-looking contours. Apply your highlighter to the center of your forehead and the tops of your cheekbones to create definition in the center of your face.
3. Heart Face Shape
If you have a heart face shape, focus on contouring your jawline and temples. Apply your contouring product along your hairline and under your cheekbones. Blend outward to create natural-looking contours. Apply your highlighter to the center of your forehead, the tops of your cheekbones, and the center of your chin to create balance and definition.
4. Oval Face Shape
If you have an oval face shape, focus on contouring your cheeks and jawline. Apply your contouring product in the hollows of your cheeks and along your jawline, and blend outward. Apply your highlighter to the center of your forehead, the bridge of your nose, and the tops of your cheekbones to create subtle definition and brightness.
Remember, contouring is all about enhancing your natural features, so don’t feel like you have to change your face shape entirely. Focus on accentuating your best features with a few simple steps.
Video Tutorials
Video tutorials can be a great resource for learning contouring techniques. Here are a few resources to get you started:
1. MakeupbyMario
MakeupbyMario is a celebrity makeup artist who has worked with stars like Kim Kardashian and Ariana Grande. His YouTube channel features a variety of makeup tutorials, including contouring tips and tricks.
2. Jaclyn Hill
Jaclyn Hill is a popular beauty YouTuber who has a series of videos on contouring and highlighting. Her tutorials are easy to follow and feature a range of products and techniques.
3. Wayne Goss
Wayne Goss is a professional makeup artist who has worked in the industry for over 20 years. His YouTube channel features a range of makeup tutorials, including contouring and highlighting for different face shapes.
Product Reviews
Here are a few different contouring products and palettes to consider:
1. Fenty Beauty Match Stix Trio
The Fenty Beauty Match Stix Trio includes three shades in a cream formula. The shades are designed for different areas of the face, including contouring, highlighting, and concealing. The formula is buildable and blends easily, making it a great option for beginners.
2. Huda Beauty Tantour Contour and Bronzer Cream
The Huda Beauty Tantour Contour and Bronzer Cream is a cream-to-powder formula that creates a natural, matte finish. The shade range is suited to a variety of skin tones, and the product is long-lasting and easy to blend.
3. NYX Professional Makeup Highlight and Contour Pro Palette
The NYX Professional Makeup Highlight and Contour Pro Palette includes eight shades of powder formula. The shades are blendable and buildable, making it easy to customize your contouring and highlighting. The palette is also affordable, making it a great option for those on a budget.
Conclusion
Contouring can seem intimidating at first, but with the right techniques and tools, anyone can achieve a sculpted, chiseled look. By following these tips and experimenting with different techniques, you’ll be a contouring pro in no time. Just remember, the key to successful contouring is to blend, blend, blend, and to choose products and tools that work for your skin type and face shape.