Introduction
Apple Watches are incredible devices that are able to do so much more than simply telling the time. They can monitor your health, enable you to take calls and messages on the go, act as a remote control for your TV, and so much more. One of the great features of the Apple Watch, however, is how easily you can customize it to suit your style and preferences. In this article, we will take a deep dive into everything you need to know about changing bands on your Apple Watch, including step-by-step instructions, top 5 best bands, maintenance tips, and even some fun DIY ideas!
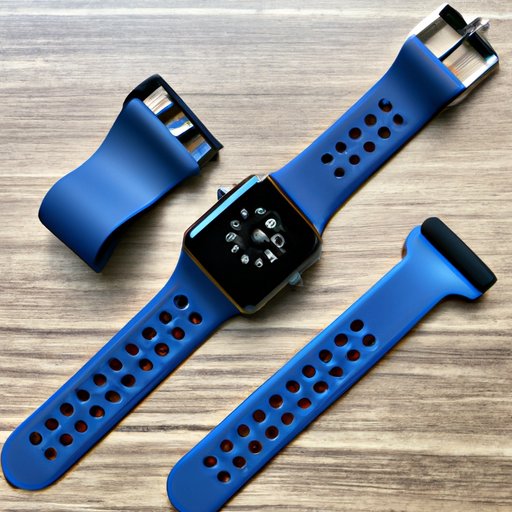
Step-by-Step Guide for Changing Apple Watch Bands
Changing bands on your Apple Watch is incredibly easy and only requires a few simple steps. Here’s what you need to do:
- Flip over your Apple Watch so that the back is facing upwards.
- Press the release button located on the underside of the watch band, and then slide the band out of its slot.
- Slide your new band into the slot, and make sure it clicks into place.
- Repeat these steps for the other side of the watch.
- Your new band is now ready to wear and enjoy!
It’s really that simple, and the entire process should only take you a minute or two. If you’re unsure of anything, always consult your Apple Watch’s user manual for more detailed instructions.
Video Tutorial for Changing Apple Watch Bands
If you’re more of a visual learner, then don’t worry – we’ve got you covered! Check out this video tutorial for step-by-step instructions on how to change an Apple Watch band:
Top 5 Best Apple Watch Bands
Now that you know how to change the band on your Apple Watch, you might be wondering which bands are the best. To help you out, we’ve put together a list of the top 5 best Apple Watch bands available on the market:
- Sport Loop
- Milanese Loop
- Leather Loop
- Nike Sport Band
- Link Bracelet
Each of these bands has its own unique features and benefits, and choosing the right one for you will depend on your personal style, needs, and preferences. To learn more about each of these bands and how to choose the perfect one for your Apple Watch, check out our in-depth guide here.
Maintenance Guide for Apple Watch Bands
Like any other accessory, your Apple Watch band will need proper maintenance to ensure that it lasts as long as possible and looks its best. Here are some maintenance tips to keep in mind:
- Change your band every 6-12 months to avoid damage or fraying from wear and tear.
- If your band gets wet, remove it from your watch and let it air dry before wearing it again.
- When cleaning your band, use a soft, non-abrasive cloth and mild soap if necessary.
- Store your band in a cool, dry place and away from direct sunlight to prevent fading or discoloration.
- Consider investing in a protective case or cover for your Apple Watch to prevent scratches or damage to your band.
By following these maintenance tips, you can help prolong the lifespan of your Apple Watch band and keep it looking its best for years to come.
Customization Ideas for Apple Watch Bands
If you’re feeling creative or simply want to add some extra personality to your Apple Watch, there are plenty of customization options available. Here are some ideas to get you started:
- Try out different styles and colors of bands to match different outfits or occasions.
- Experiment with different materials, like leather, denim, or even fabric, to add some texture and interest to your watch.
- Add charms, beads, or other decorations to your band to create a unique and personalized look.
- Customize your Apple Watch face to match your band and overall style.
- Consider creating your own DIY band using materials like paracord or braided yarn.
The possibilities are endless, so get creative and have fun with it!
Compatibility Guide for Apple Watch Bands
It’s important to note that not all Apple Watch bands are compatible with all models of Apple Watch. To help you figure out which bands will work with your specific model, here’s a detailed compatibility guide:
| Apple Watch Series | Band Compatibility |
|---|---|
| Series 6 | Compatible with all Apple Watch bands |
| SE | Compatible with all Apple Watch bands |
| 5 | Compatible with all Apple Watch bands |
| 4 | Compatible with all Apple Watch bands |
| 3 | Compatible with all Apple Watch bands |
| 2 | Compatible with all Apple Watch bands |
| 1 | Compatible with all Apple Watch bands |
If you have an older model of Apple Watch and are unsure if a particular band is compatible, always double-check with the manufacturer before making your purchase.
DIY Apple Watch Band Ideas
If you’re feeling crafty and want to make your own Apple Watch band, then here’s what you’ll need:
- Paracord or other strong, durable material
- A buckle or fastener
- A pair of scissors
- A lighter
Here are the step-by-step instructions:
- Measure your wrist and cut the paracord to the appropriate length.
- Attach the buckle or fastener to one end of the paracord.
- Weave the paracord in a pattern of your choice, making sure to leave enough room for the buckle or fastener on the other end.
- Attach the buckle or fastener to the other end of the paracord.
- Use the lighter to melt the ends of the paracord and prevent fraying.
- Your DIY Apple Watch band is now complete!
Conclusion
Changing bands on your Apple Watch is a quick and easy way to personalize your device and make it truly your own. Whether you’re looking for a new band to match a particular outfit, a new style to try out, or simply want to experiment with some fun DIY ideas, there are endless possibilities available.