Introduction
Orchids are a beautiful and elegant plant, often associated with luxury and exotic locales. As such, many people believe that they are difficult to care for, but with the right knowledge and techniques, anyone can keep an orchid healthy and blooming for years to come. In this article, we will cover all the essential aspects of proper orchid care, from choosing the right pot and soil to pruning and repotting. Let’s dive in!
Choosing the Right Pot and Soil for an Orchid
The first step in caring for your orchid is to choose the right pot and soil. Orchids prefer pots that provide adequate drainage and good airflow. The most effective pot type is a clay pot because it is porous and provides good air circulation. The ideal pot size for your orchid depends on the size of the plant, but as a general rule, it should be just large enough to accommodate the root system comfortably.
The soil type is also crucial. Orchids require a well-draining medium that allows air to circulate around the roots. A popular choice is a bark-based potting mix, which is nutrient-rich and allows for air circulation. Other options include sphagnum moss and coconut coir. Avoid using regular potting soil, as it retains too much moisture and does not provide good air exchange.
Understanding the Lighting Needs of an Orchid
Orchids are light-loving plants that require a specific type and intensity of light to thrive. In general, they require bright, indirect sunlight, but some species can tolerate direct sunlight. Placing your orchid near a south-facing window is generally ideal, as this direction receives the most sunlight during the winter months. If your orchid is not receiving enough light, you may notice that the leaves turn yellow or brown.
On the other hand, if your orchid is receiving too much light, the leaves may become burnt or dry. In addition to considering the direction of light, be aware of the intensity of light. Some species of orchids require less light than others, so it is important to research the specific species you have to determine their needs.
Watering an Orchid Properly
Overwatering is one of the most common causes of orchid death, so proper watering techniques are vital. Orchids do not require frequent watering, and it is best to wait until the potting medium is largely dry before watering again. You can test the soil by inserting a finger up to the second knuckle; if it comes out dry, then your orchid needs watering.
When watering an orchid, it is essential to use the appropriate tools and methods for your pot and soil type. Orchids typically prefer to be watered from the bottom, so that the roots have a chance to absorb the water over time. Alternatively, you can lightly water the root zone with a watering can or spray bottle. Avoid getting water on the foliage because it can lead to rotting or infection.
Feeding an Orchid with Appropriate Fertilizer
Orchids require a specific type of fertilizer, formulated for their unique nutritional needs. A balanced fertilizer, such as a 20-20-20 mix, is ideal. It is important to avoid overfeeding or underfeeding an orchid, as both can lead to health problems. A general rule of thumb is to feed an orchid every two weeks during the growing season, reducing feeding to once a month during the dormant season.
When applying fertilizer, be sure to follow the manufacturer’s instructions, and never apply more than necessary. Overfeeding an orchid can cause root burn, leading to the plant’s decline.
Recognizing and Preventing Common Orchid Pests and Diseases
As with any plant, orchids are susceptible to pests and diseases. Common pests that affect orchids include spider mites, mealybugs, and scale insects. Symptoms of pest problems include yellow or dry spots on the leaves, webbing, or visible insects on the plant. It is crucial to identify and address these issues promptly to prevent further damage.
To prevent pests and diseases, it is important to keep your orchid in a clean environment and monitor it regularly for signs of stress or damage. If you suspect an infestation, isolate the plant from other plants and begin treatment immediately. There are many effective treatments available, including natural remedies and chemical insecticides, so choose the method that works best for you and your plant.
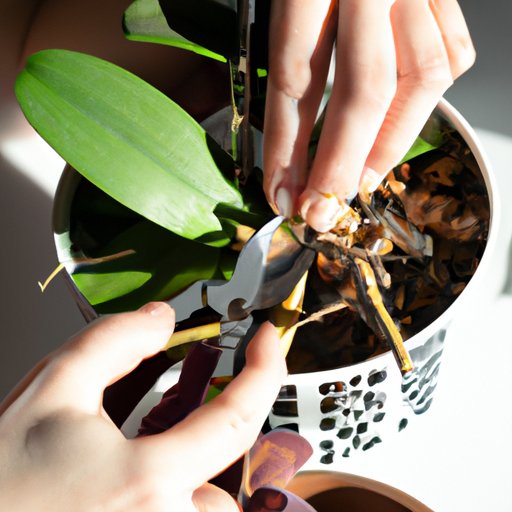
Pruning an Orchid for Optimal Growth and Blooming
Pruning an orchid can help promote healthy growth and blooming. Focus on removing dead or damaged areas, being careful not to damage the live tissue. Prune after the plant has finished blooming, during the dormant season. You can also remove any aerial roots that are dead or damaged.
In addition to promoting growth and blooming, pruning can help reduce the risk of diseases and pests. By removing dead or damaged tissue, you eliminate the ideal habitats for problem organisms.
Repotting an Orchid When Necessary
Over time, orchids may outgrow their pots or need a fresh potting mix to promote healthy growth. Repotting is necessary but should only be done when the plant is not in bloom, during its dormant season. Before repotting, inspect the roots for damage or disease and remove any unhealthy or dead material.
When repotting, be sure to use a pot that is just slightly larger than the previous one to prevent overwatering. Additionally, use a well-draining potting mix specific to orchids, such as bark or sphagnum moss. After repotting, avoid watering the orchid for four to five days to allow it to adjust to its new environment.
Conclusion
Orchids are a beautiful and rewarding plant that requires some care and attention to thrive. By choosing the right pot and soil, understanding lighting needs, watering properly, feeding appropriately, recognizing common pests and diseases, pruning for growth and blooming, and repotting when necessary, you can ensure your orchid remains healthy and beautiful for years to come.