I. Introduction
Are you ready to take your gardening game to the next level? Building a raised garden bed can be a game-changer for any gardener. Whether you’re a seasoned expert or just starting, a raised garden bed offers numerous benefits, including better drainage, improved soil quality, and accessibility. In this article, we’ll take you through the step-by-step process of building a raised garden bed.
II. Step-by-Step Guide
Building a raised garden bed may seem intimidating, but it’s actually a relatively straightforward process. The key is breaking down the process into manageable steps:
Choosing the Right Location
The first step in building a raised garden bed is finding the right location. Look for an area that gets plenty of sunlight and has good drainage. Avoid any areas with standing water or too much shade as this will hinder plant growth.
Selecting Materials
There are several materials you can use to build a raised garden bed, including wood, bricks, and cinder blocks. Choose a material that matches your aesthetic style and budget. Wood is a popular option but be sure to choose a type that won’t rot over time.
Building the Raised Bed
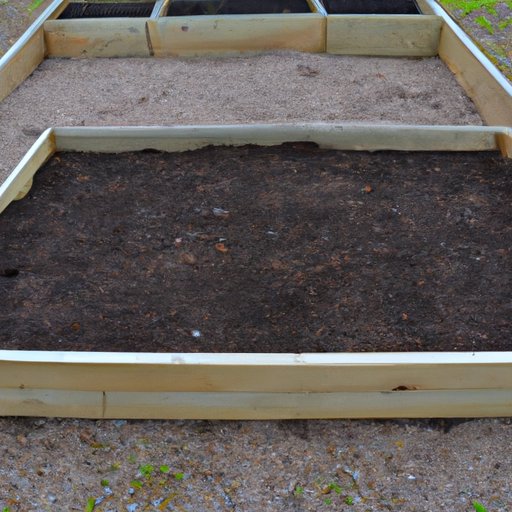
Once you’ve chosen the location and materials, it’s time to start building the raised bed. The dimensions of the bed will vary depending on your needs, but a good rule of thumb is to keep it no wider than 4 ft, so it’s easy to reach all the plants. For the height of the bed, 8-12 inches is recommended. This gives enough depth for root systems and soil without being too difficult to work with.
To start building, lay out the materials in the shape of the raised bed, using stakes and string to keep everything in place. Secure the corners and sides together, using screws or brackets to attach the wood pieces.
To prevent weeds, line the bottom of the bed with landscaping fabric before filling with soil.
III. DIY Video Tutorial
For those who prefer a visual guide, we’ve created a video tutorial to help guide you through the process. The step-by-step instructions are easy to follow, and the visual aids and demonstrations will ensure you understand the process correctly.
IV. List of Build Materials
Before starting the project, make sure you have all the necessary materials on hand. Here’s a list of essential materials:
- Wooden boards (cedar works well)
- Bricks or cinder blocks (if not using wood)
- Screws/Brackets (for securing the sides)
- Landscaping fabric
- Soil and compost
V. Benefits of Raised Garden Beds
Building a raised garden bed offers numerous benefits. Here are a few of the biggest advantages:
Improved Drainage
Raised garden beds offer better drainage, which can be especially useful for gardeners dealing with heavy rainfall or clay soil. They provide adequate drainage and prevent water-logging problems, allowing plants to grow better without drowning.
Soil Quality
A raised garden bed gives you greater control over the type and quality of soil in your garden, therefore providing the essential nutrients necessary for the optimal growth and health of your plants. The soil mixture should be 50% topsoil, 25% compost, and 25% sand.
Accessibility
A raised garden bed will save you time and energy because it allows you to garden without having to bend over and use all muscle groups. It also makes it easier to garden in less than ideal weather conditions.
VI. Compare and Contrast Types of Raised Garden Beds
There are several types of raised garden beds, with wood, brick, and cinder block being the most common. Here are the pros and cons of each type:
Wood
- Pros: Affordable, easy to work with and customize, aesthetically pleasing.
- Cons: Can rot quickly and may require annual replacement, may require chemical treatments to prevent rot.
Brick
- Pros: Long-lasting, easy to maintain, environmentally friendly, heat trapping capabilities.
- Cons: More expensive than other options, requires foundation building, less flexibility in design and size.
Cinder Block
- Pros: Low cost, easy to work with, durable, versatile design options.
- Cons: May not be aesthetically to your taste, heavy to move and position, and minimal insulation capacity.
VII. Add-Ons for Your Raised Garden Bed
Once you’ve completed your raised garden bed, you may want to consider adding some additional features to enhance the gardening experience. Here are a few suggestions:
Trellis
A trellis is a great way to add vertical space for vining plants, such as tomatoes and cucumbers.
Watering Systems
The irrigation system can be automatic or manual, and it will improve the watering efficiency of your plants while also saving time on watering.
Additional Soil Layers
Add some additional organic matter on top of the first soil layer to create a nutrient-rich planting surface for your plants and plan to plant soil-building covers like alfalfa and clover between crops.
VIII. Tips and Tricks
To make your DIY project even easier, we’ve compiled a list of tips and tricks to help you through the process:
- Use old doors as frames.
- Create a planting grid to space out plants evenly.
- Be sure to use a level to keep the sides of the raised bed square.
- Use a power drill to make assembly faster.
- If planning to build a larger raised garden bed, consider dividing the bed into compartments for better control of different soil types and plant rotations.
IX. Conclusion
Building a raised garden bed can take your gardening experience to the next level. The benefits are numerous, from better soil quality to improved drainage and accessibility. With our easy-to-follow step-by-step guide and helpful tips and tricks, you’ll be able to build your own raised garden bed with confidence.