I. Introduction
Brining chicken breasts is a simple yet effective technique that can make all the difference in achieving a succulent and flavorful meal. Not only does brining add moisture to the chicken, but it also infuses it with seasoning, resulting in a juicier and tastier end product. If you’re looking to up your cooking game and impress your family and friends with your poultry prowess, read on to learn how to brine chicken breast.
A. Explanation of Brining Chicken Breasts
Brining chicken is the process of soaking it in a saltwater solution (known as a brine) before cooking. Brines typically include salt, water, and a sweetener, as well as various seasonings like herbs, garlic, and lemon. The chicken absorbs the liquid and seasoning, ensuring that it stays moist and flavorful throughout the cooking process.
B. Benefits of Brining Chicken Breasts
The benefits of brining chicken are numerous. First and foremost, it helps to keep the meat moist and tender, preventing it from drying out during cooking. Additionally, brining infuses the chicken with flavor, making it more enjoyable to eat. Brining can also reduce cooking time, as the chicken will cook more quickly due to the added moisture. Finally, brining can help to ensure that chicken is cooked evenly, as the meat will be more uniform in thickness after soaking in the brine.
C. Preview of the Article’s Contents
In this article, we’ll guide you through the step-by-step process of brining chicken. We’ll cover the ingredients you’ll need, the preparation of the chicken, how to make the brine, and how to brine the chicken. We’ll also provide some helpful tips and tricks to make sure you get the best results. Finally, we’ll compare brining to marinating and explain why brining is the superior choice for juicy and flavorful chicken.
II. Step-by-Step Guide
A. Explanation of Brine Ingredients and Their Functions
Before we dive into the brining process, let’s first discuss the ingredients that make up a typical brine and their functions:
- Salt: The salt acts as a seasoning and a preservative, preventing bacterial growth and keeping the meat moist.
- Sugar: The sugar helps to balance and enhance the flavors in the brine.
- Water: The water is the main liquid component of the brine and enables the chicken to absorb the seasonings and flavors.
- Herbs and Spices: The herbs and spices add flavor and aroma to the brine.
B. Preparation of the Chicken Before Brining
Before brining the chicken, it’s important to prep it properly. Start by trimming any excess fat from the breasts and removing the skin if desired. Next, place the chicken in a resealable bag or container that’s big enough to hold all the chicken and the brine. The container should be non-reactive, such as plastic or glass, as certain metals can react with the salt in the brine.
C. Brine Preparation
Now it’s time to prepare the brine. The recipe for the brine will vary depending on personal taste preferences, but a basic brine will typically consist of:
- 1 cup of salt
- 1/2 cup of sugar
- 1 gallon of water
- Herbs and spices of your choice
Combine the ingredients in a large pot and bring to a boil, stirring occasionally until the salt and sugar have dissolved. Remove from heat and let the brine cool to room temperature.
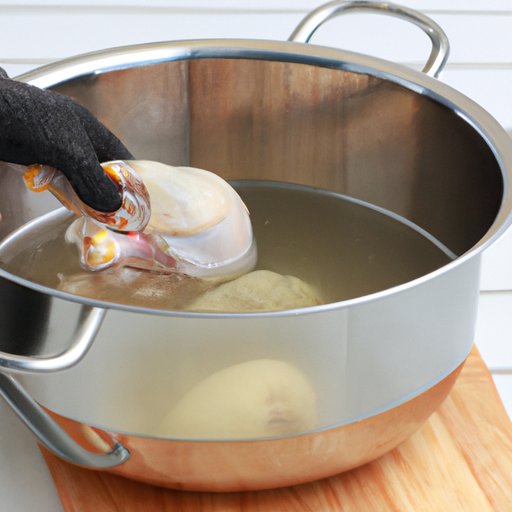
D. Brining Process
Once the brine has cooled, pour it over the chicken in the resealable bag or container. Make sure the chicken is completely submerged in the brine. If needed, weigh down the chicken with a heavy object to ensure it stays submerged. Seal the bag or container and refrigerate for at least 2 hours, but no more than 24 hours. For best results, brine for 4-6 hours.
E. Post-Brining Steps
After brining, remove the chicken from the brine and rinse it thoroughly with cold water to remove any excess salt. Make sure to pat the chicken dry with paper towels to remove any excess moisture before cooking.
F. Important Tips for Successful Brining
- Don’t over-brine: Brining for too long or using too much salt can result in a salty and mushy end product. Stick to the recommended brining times and ratios.
- Use a thermometer: Always use a meat thermometer to ensure the chicken is cooked to a safe temperature of 165°F.
- Experiment with flavors: Brining is a great opportunity to add additional flavors to your chicken. Try adding different herbs, spices, or even fruit juices for a unique twist.
III. Recipe Style
A. List of Ingredients with Quantities
- 4 chicken breasts
- 1 cup of salt
- 1/2 cup of sugar
- 1 gallon of water
- Herbs and spices of your choice (such as rosemary, thyme, garlic, and black pepper)
B. Preparation of the Brine
Follow the same instructions outlined in section II.C. to prepare the brine. For this recipe, we recommend using rosemary, thyme, garlic, and black pepper as the seasoning.
C. Instruction on How to Brine Chicken Breasts
- Trim any excess fat from the chicken breasts and remove the skin if desired.
- Place the chicken breasts in a large resealable bag or container, making sure they fit snugly.
- Combine the salt, sugar, water, and herbs/spices in a large pot and bring to a boil, stirring occasionally until the salt and sugar have dissolved.
- Remove from heat and let the brine cool to room temperature.
- Pour the brine over the chicken in the bag or container, making sure the chicken is completely submerged.
- Seal the bag or container and refrigerate for 4-6 hours.
- After brining, remove the chicken from the brine and rinse it thoroughly with cold water.
- Pat the chicken dry with paper towels and cook according to your preferred method.
D. Suggestions on Different Brine Flavors
Don’t be afraid to experiment with different flavors in your brine. Try using apple cider or beer instead of water, or adding honey, soy sauce, or hot sauce to the brine for a different flavor profile. You can also try using different herbs and spices, such as cumin, coriander, or paprika.
IV. Video Tutorial
A. Explanation of Equipment and Ingredients Needed for Brining
For this video tutorial, you’ll need:
- A large pot
- A resealable bag or container
- Chicken breasts
- Salt
- Sugar
- Water
- Herbs and spices of your choice
B. Step-by-Step Visual Tutorial
Insert video tutorial here.
V. Comparisons
A. Explanation of Differences Between Brining and Marinating Chicken Breasts
While brining and marinating are both techniques used to add flavor to meats, they are fundamentally different processes. Brining involves soaking the meat in a saltwater solution, while marinating involves coating the meat in a flavorful mixture and letting it sit for a period of time. Brining is primarily used to keep the meat moist and tender, while marinating is often used to add flavor to the meat.
B. Advantages and Disadvantages of Each Method
The advantages of brining are that it keeps the meat moist and tender, and infuses it with flavor. The disadvantage is that it can be time-consuming and requires advanced planning. The advantages of marinating are that it can be a quicker process and allows for a wider range of flavors. The disadvantage is that it doesn’t necessarily keep the meat moist and can result in dry meat if over-marinated or cooked.
C. Why Brining is the Superior Option
Overall, brining is the superior option for achieving juicy, flavorful chicken. While marinating can add flavor, it doesn’t do anything to keep the meat moist, and can even dry it out if over-marinated or cooked. Brining, on the other hand, ensures that the meat stays moist and tender, while also infusing it with flavor. It requires more advanced planning, but the end result is well worth it.
VI. Ingredient Focus
A. Information on Ingredients for Brine Mixture
We’ve already discussed the basic ingredients for a brine mixture (salt, sugar, water, herbs/spices), but let’s take a closer look at how different ingredients can affect the taste of the chicken:
- Salt: You can use various types of salt in your brine, such as table salt, kosher salt, or sea salt.
- Sugar: You can use different types of sugar in your brine, such as white sugar, brown sugar, or honey.
- Water: You can use different types of liquid in your brine, such as beer, apple cider, or vegetable broth.
- Herbs and Spices: You can use a variety of herbs and spices in your brine, such as rosemary, thyme, garlic, black pepper, or even tea.
B. Ratios of Each Ingredient
The ratio of ingredients in your brine will depend on personal preference, but a good starting point is to use about 1 cup of salt and 1/2 cup of sugar per gallon of water. Adjust the seasoning to your liking by adding more or less herbs and spices.
C. How Different Ingredients Can Affect the Taste of Chicken Breasts
Different ingredients in your brine can have a big impact on the taste of the chicken. For example, using apple cider instead of water can give the chicken a slightly sweet and tangy flavor, while using beer can add richness and complexity. Adding herbs like rosemary and thyme can add an earthy and aromatic flavor, while garlic and black pepper can add sharpness and spice. Experiment with different combinations of ingredients to find your preferred flavor profile.
VII. Conclusion
A. Recap of the Benefits of Brining Chicken Breasts
Brining chicken breasts is a simple yet effective technique that can make a big difference in the flavor and texture of your meal. It keeps the meat moist and tender, infuses it with flavor, and ensures even cooking.
B. Summary of the Article’s Key Points
- Brining involves soaking the chicken in a saltwater solution before cooking.
- Benefits of brining include keeping the meat moist and tender, infusing it with flavor, and ensuring even cooking.
- Preparation involves trimming the chicken and placing it in a non-reactive container.
- The brine mixture typically consists of salt, sugar, water, and herbs/spices.
- The brining process should take 4-6 hours.
C. Encouragement to Try Brining Chicken Breasts
Now that you have everything you need to know about brining chicken breasts, it’s time to give it a try! Start with a basic recipe and experiment with different flavors and combinations to find your preferred taste.