I. Introduction
Do you want a hassle-free but fancy hairstyle? The Dutch braid is a unique, helpful, and stylish way to keep your hair in place. A Dutch braid may look complicated, but it is easy to achieve with the right guidance. This article will guide you through the process of how to do a Dutch braid, step-by-step. Not only will we offer a written guide, but we’ll also provide a video tutorial to ensure you’re confident in mastering this style.
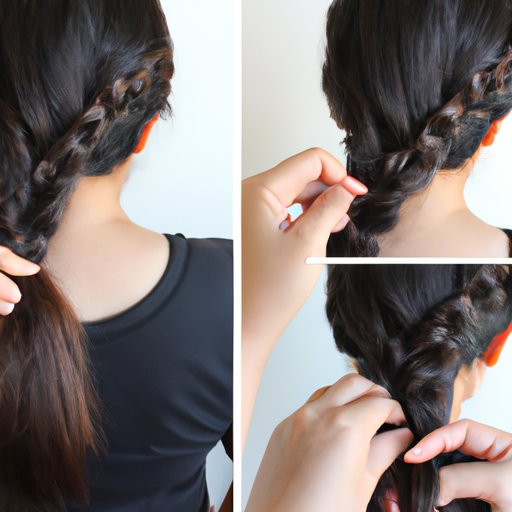
II. A Step-by-Step Guide
Before we get started, you will need some supplies. Having the proper tools and products can make this hairstyle a success. These include:
- Hairbrush
- Hair ties
- Comb
Once you have these tools ready, follow these steps:
- Start by brushing your hair to remove any tangles and get rid of any knots.
- Take a triangular section of hair from the crown of your head and divide it into three equal parts, right over the top of your forehead.
- Start the braid by cross the right strand under the middle strand.
- On the left side, cross the left strand underneath the middle strand.
- Now, pick up some hair from the right side of your head and add it to the right strand. Do the same thing on the left side, picking up hair from the left side and adding it to the left strand.
- Cross the right strand under the middle strand again, now with the added hair added to it.
- On the left side, do the same thing, crossing the left strand under the middle strand with the added hair added to it.
- Continue braiding in this way, picking up more hair from each side as you go.
- Secure the end of the braid with a hair tie when you reach the nape of your neck, and you’re done!
To ensure that the braid looks neat and secure, here are some tips:
- Make sure to keep the strands of hair you’re picking up relatively small, so the braid doesn’t get too bulky and loose its neatness.
- Do not braid too tightly as it may hurt your head and the braid may look unattractive and uneven.
- Adjust the braid by gently pulling on the strands—this will help to loosen it and make it look fuller.
III. A Video Tutorial with Expert Commentary
We’ve brought in an expert for a more in-depth tutorial – Adina Pignatare, a professional hairstylist with experience in Dutch braids. In this video tutorial, we’ll show you a complete how-to on creating a Dutch braid. Adina will demonstrate the technique on a model, while explaining each step in detail. Accompanying the video, there will be close-up shots of the braiding process, making it easier to master the technique.
With our video tutorial, you’ll have no trouble mastering the technique. Just follow along with Adina as she walks you through each step, and you’ll have a beautiful Dutch braid in no time!
IV. A Comparative Piece
Do you ever think about what makes a Dutch braid unique? Not all braid styles are created equal, and a Dutch braid is no exception. It has its unique characteristics that set it apart from other popular braid styles, such as French braids and fishtail braids.
A Dutch braid is unique because it is an inside-out braid. This means the braid sits on top of the hair, rather than being nestled within it. French braids, on the other hand, are outside-in braids; the strands are woven underneath with the hair on top. Fishtail braids, however, have a specialized “V” pattern, achieved by weaving two strands instead of three together.
When choosing a braid style, consider the occasion and your hair type. If you have shorter or thin hair, Dutch braids might not be the right fit. Instead, try fishtail braids or even simple French braids for a more streamlined approach. If you’re in an active event or want your hair to last longer throughout the day, try a Dutch braid, as it’s more secure.
V. A Break-Down of Common Mistakes
The Dutch braid may look complicated when you first try it out. Some common mistakes that you can fix include:
- Not twisting your hair enough.
- Starting the braid at the wrong place, usually too high or too low.
- Not securing hair tightly enough throughout the braid.
We will show you how to fix these mistakes. Sometimes, learning a new style requires some patience, so don’t get discouraged if you don’t succeed at first.
VI. A Celebrity-Inspired Guide
Do you want to be glamorous and trendy? You might want to try out some of the Dutch braid styles that are popular among celebrities.
One of the most popular Dutch braid hairstyles seen on celebrities is two Dutch braids. The style is achieved by creating two Dutch braids on each side of your head, meeting at the nape of your neck. It’s a half up, half down look that is perfect for casual and formal events. We’ll have a step-by-step guide to achieving this hairstyle, along with some pictures of celebrities who have rocked it.
VII. Conclusion
There is no reason why you cannot achieve this stunning style at home. With this step-by-step guide, a video tutorial, our breakdown of common mistakes, information on the benefits of Dutch braids, and a celebrity-inspired guide, you’ll be braiding like a pro in no time.